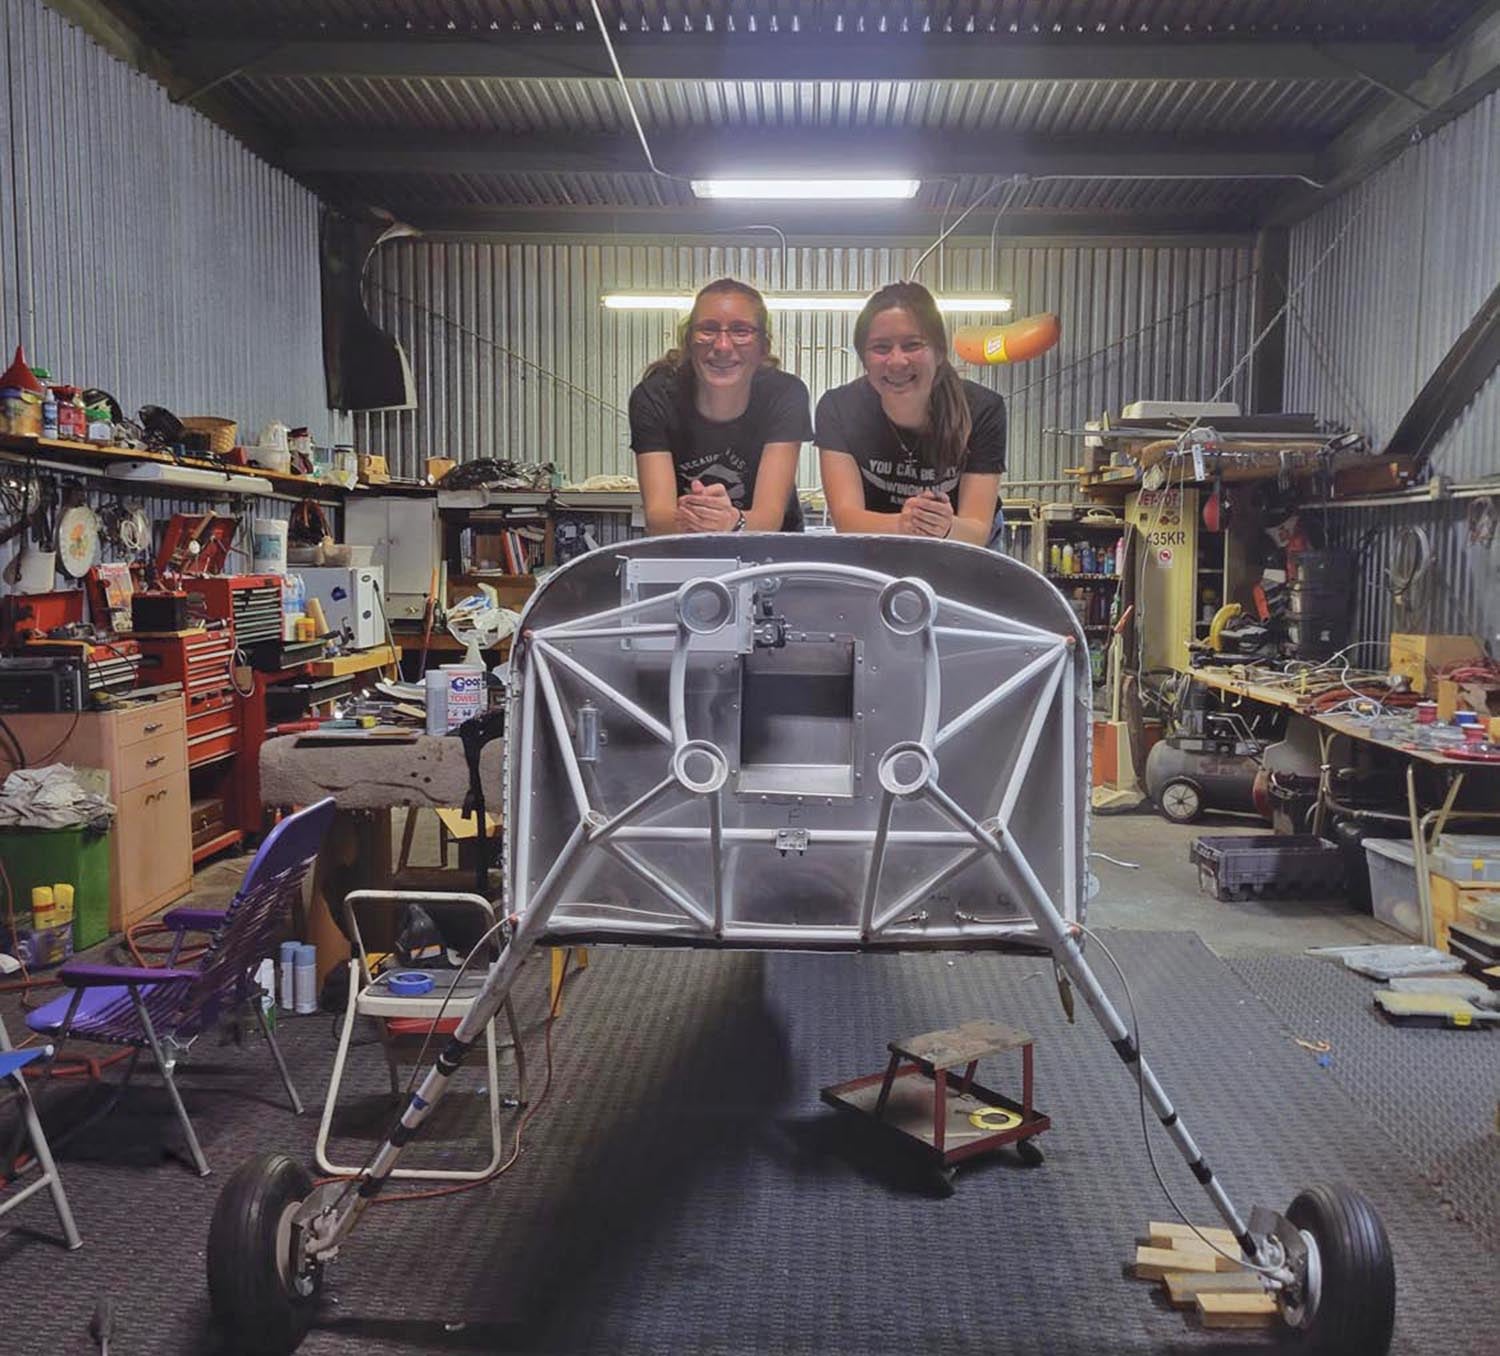
Once we had the wings and fuselage, it was time to kick some plans into gear. We needed to take apart the wheels, finish up the brake system, install the electric trim, seal the firewall, mount the engine and electronic ignition, work on the fuel system and prepare to attach the throttle and mixture cables.
The Night Crew Checks In
Ah, the wind. That’s nice. After a 100° day in Sacramento the Delta breeze sweeps through, cooling the valley and making the heat more and more bearable. With the 9:00 p.m. sunsets, the days are long, making the evenings the best time for projects and productivity. With good company and some vibey tunes, summer nights at the hangar couldn’t be better.
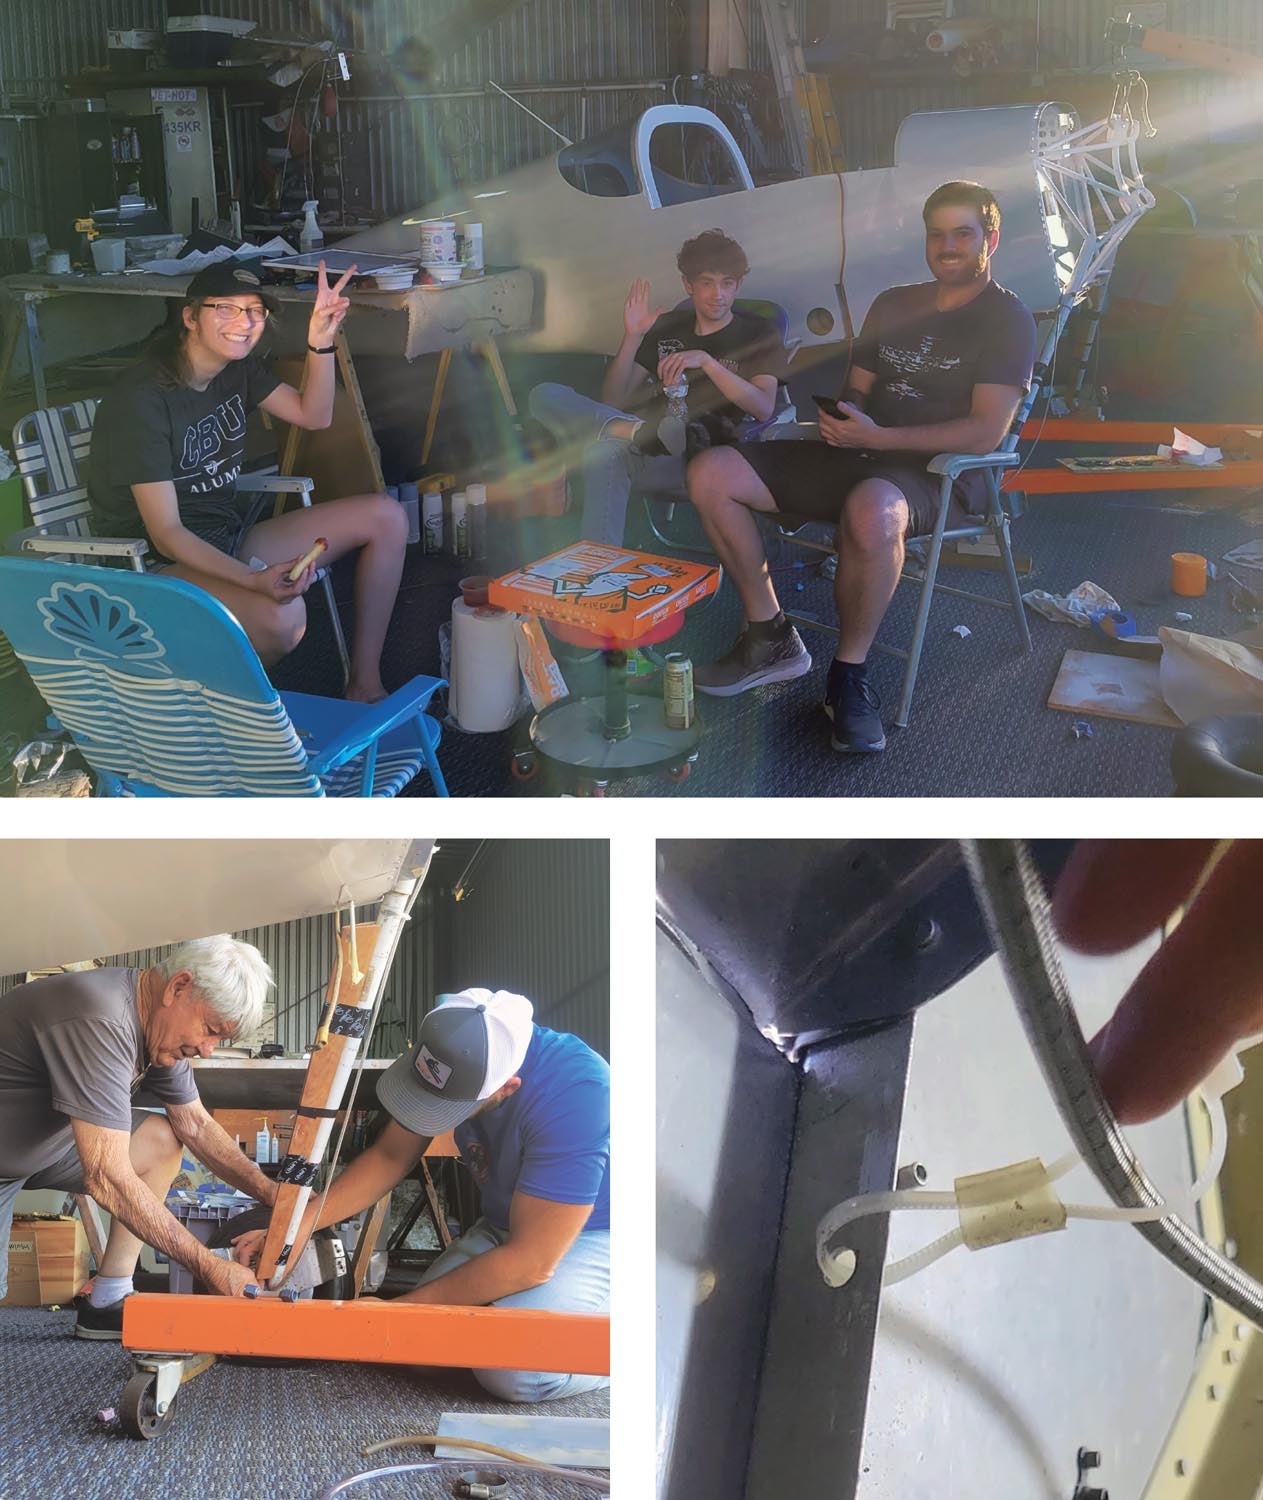
One evening, I invited a troop of young workers out. This included my friend Kyle Rodrigues, my super-smart engineer Tyler Pierson and tailwheel king and instrument pilot-to-be Sienna “Si” Schroder, one of my childhood besties visiting from Florida. When we have a lot of cooks in the kitchen, the best tasks are the ones that are time-consuming but can’t be messed up too easily. This evening, we needed to attach standoffs to the brake lines, take apart the wheels to add new tubes, paint the rotors and repack bearings, continue working through the baffling and reinstall the panels into the baggage compartment.
Si was super stoked to help with the project. She’s an airplane nerd and eager to learn, so I put her to work with the brake line standoffs. We grabbed the seat pads from Stan’s old outdoor furniture, threw them into the plane and lay down on our stomachs. After completing the brake lines last week, the next task was to attach standoffs to them so they wouldn’t chafe. We did our standoffs the simple way—a single zip tie and ¼ inch of clear plastic tubing. We selected the places where the lines were or might be rubbing. We tightened them down and moved the pedals back and forth to ensure that the brake lines would not rub within the full range of motion. After about an hour, we finally got all of them to not rub!
While Si and I were working on securing the lines, Kyle and Tyler tackled the baffling. There was plenty of work to do. We needed to follow the instructions carefully, label the pieces and fit them together as needed. Once complete, we would need to scratch them up with Scotch-Brite, prime and paint them and fit them to the engine. Kyle and Tyler worked on putting pieces together and riveting them. The instructions can be very confusing—there was a moment where they realized they did it backward! They quickly took it apart and re-riveted it again beautifully. While it was still warm out, Tyler took the finished pieces and primed/painted them.
Kerry had recognized that the screws for the panels in the baggage compartment needed to be painted. Heaven forbid we have white screws on blue paint! He punched all of them into a sheet of cardboard and spray-painted them with the same blue paint we used for the baggage area. By the end of the day, they were dry and ready for Si to puzzle together. Details like this really do make a difference.
While I started tackling other projects, Si folded herself into the baggage area of N2165U (good thing she is nimble!). She worked on matching the panels to their respective places in the walls and screwing them in. It turned out to be quite the challenge as all of the screws were different sizes! She ended up doing a fantastic job and screwed in all of the panels. They look great! Thank you, Si!
Time To Get Things Rolling!
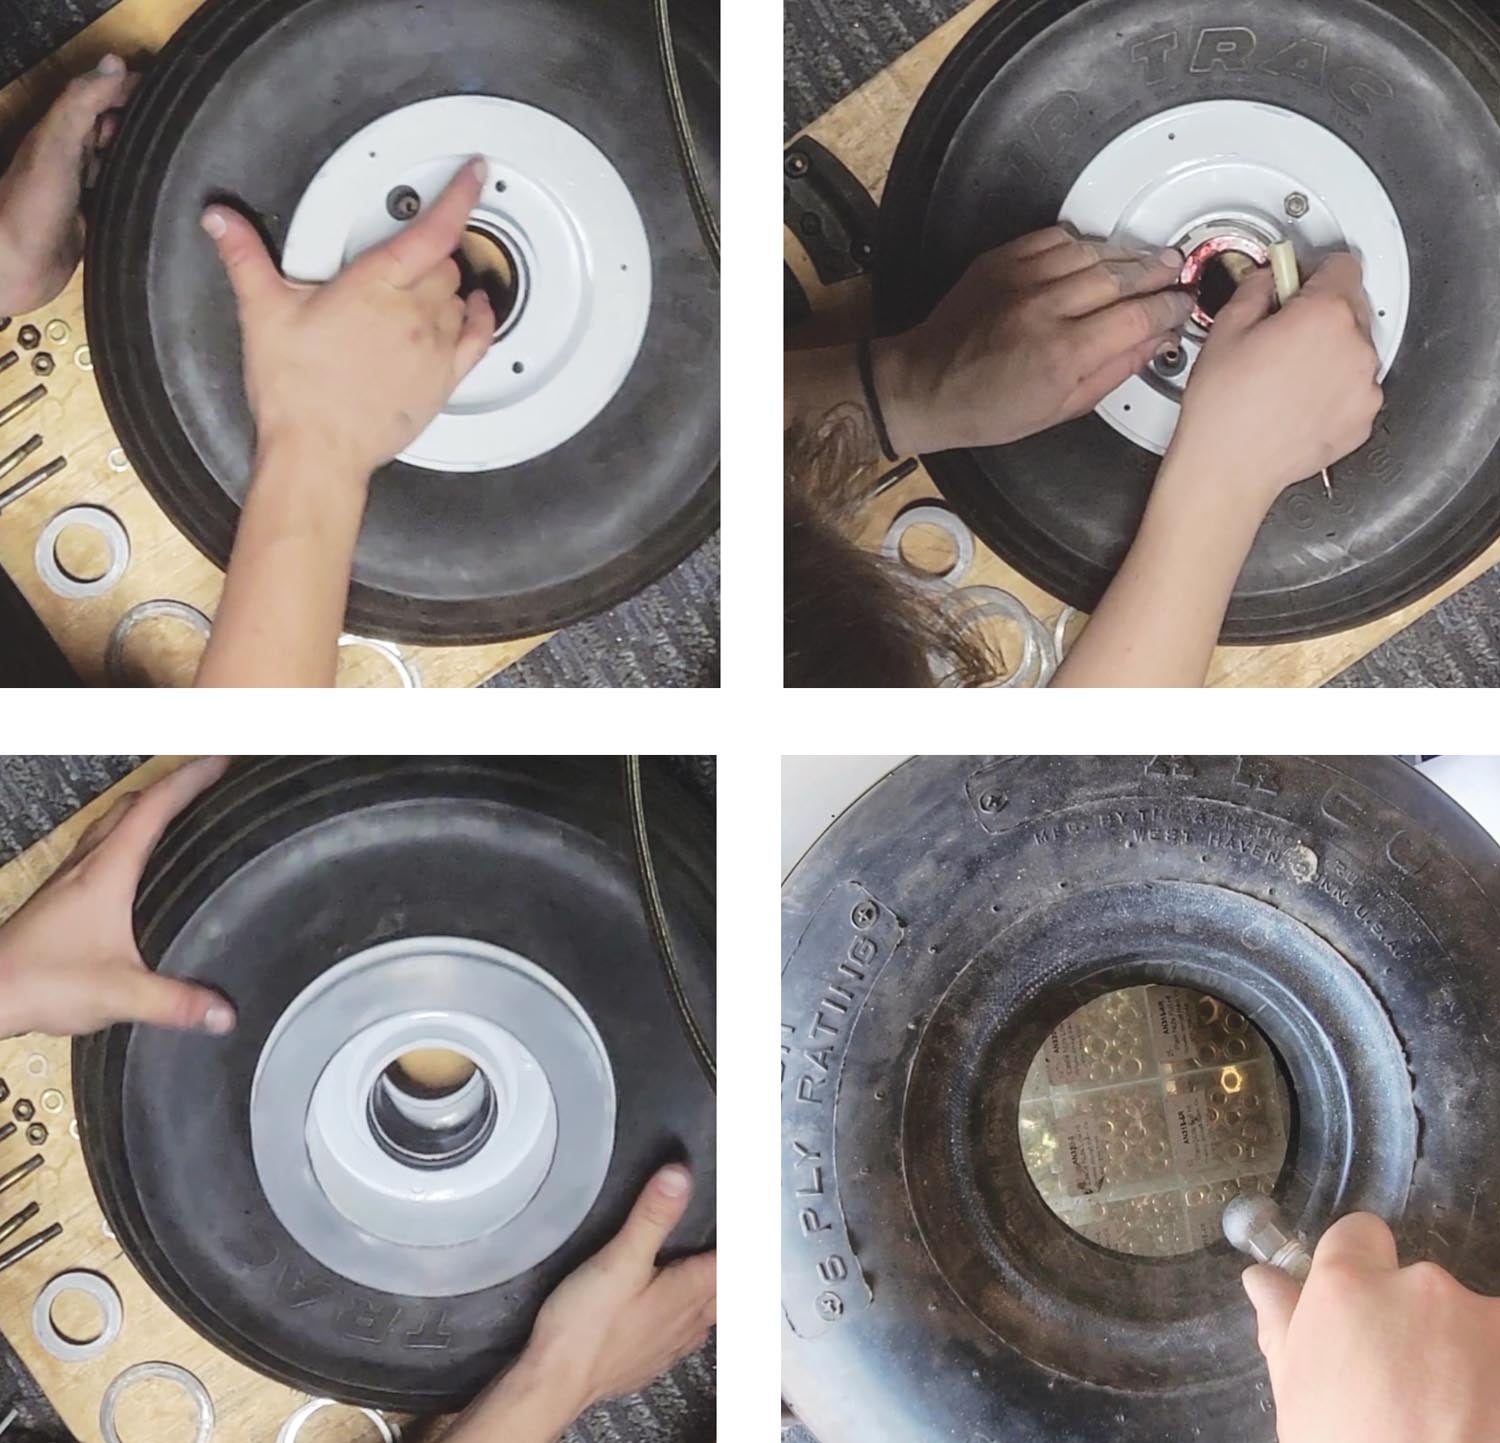
Quite literally. There was plenty to do with the wheels, including smoothing and painting out the wheel halves and disc, repacking bearings, replacing the tires and tubes, then putting everything back together. Stan borrowed an engine hoist from a friend. We had not put the engine on yet, but we attached the hoist to the mount so that we could jack it up and take the weight off of the wheels. We removed one wheel at a time and rebalanced the weight onto the axle, which was sitting on multiple wooden blocks.
Kyle kindly took the discs home and smoothed out the grooves on his lathe. He brought them back and Tyler spent the afternoon priming and painting the non-friction surfaces white. (Yes, I know they probably won’t stay that way long, but I can always remember them like this.)
While the wheel halves and discs were drying, I replaced the tires, checked the brakes, packed the bearings and tested the tubes, inflating them to ensure they held air. Then, I cleaned up the brake calipers so they would be free of oil and grease. Tyler primed and painted those, then returned them to me after they were dry!
Stan’s Inventory
Stan always happens to have exactly what we need in the back of his hangar. This time, there happened to be two brand-new tires! I was so excited to have them on my plane and commented (probably a few too many times) about how they smelled like Costco. On the wheels, the first task was to completely repack the bearings, which were full of dirty grease. I remembered the techniques that Stan, Nick and Mark (my three original mentors!) had taught me. Putting a glob of the greasy goo on the palm of my hand, I pressed the bearing onto it until the new grease poked through and pushed the old dirty stuff out. What started off in a glob quickly got everywhere. It looked like strawberry jam…. Oftentimes I have to remind myself it’s not edible.
With the plane still jacked up using the engine hoist, we slid the wheels on the axles. Then we attached the brakes to the brake caliper. I thought I was finished but then noticed something. The brake caliper was loose! I asked Kyle if we could tighten it. “No,” Kyle replied. “It’s a floating brake caliper.” He went on to explain to me that when you brake, pistons on the caliper are pushed with hydraulic pressure, causing the brake pads to push on the disc. I now know about these “single action” brakes, where the hydraulic “puck” pushes only on one side of the caliper so the whole thing has to move so the opposite pad gets a bite. It’s a great education to be working literally hands-on with these parts. We then lowered the hoist, transferring the weight of the fuselage back to my freshly redone wheels!
The Day Crew Checks In
With the brake system completely hooked up, it was time for bleeding. Stan prefers the “bottom up” method where you push brake fluid up from the calipers, through the master cylinders and then up and into the firewall-mounted reservoir. The benefit is that any air in the system gets pushed up and out, with clean fluid displacing it. You could also use the traditional fill-and-pump method where you bleed the system at the caliper end, but there are more chances to get and keep air bubbles in the lines.
Using the bottom-up method, we attached a tube to the reservoir and I held a tuna can underneath it until the bubbles disappeared. We kept going until there was no more air in the system. Then, we let it sit to see if there were any leaks to be had. And, it was good luck so far!
I tasked Zach with caulking the box that Stan created for the firewall. It is important to make sure there are no gaps in this process so that you minimize the heat and gasses in the engine from coming into the cockpit. This would be especially important in case of an engine fire in order to allow time to put the fire out and land. The firewall was fairly well sealed, but after Stan added the box for the oil filter there were some miniscule gaps in the metal. By using a high-temperature sealant, we ensured that there were no gaps that could lead to anything hazardous penetrating through.
While we were working on that, Bruce stopped by and gave me a new K&N air filter. I used it for my plane and then bought him a replacement.
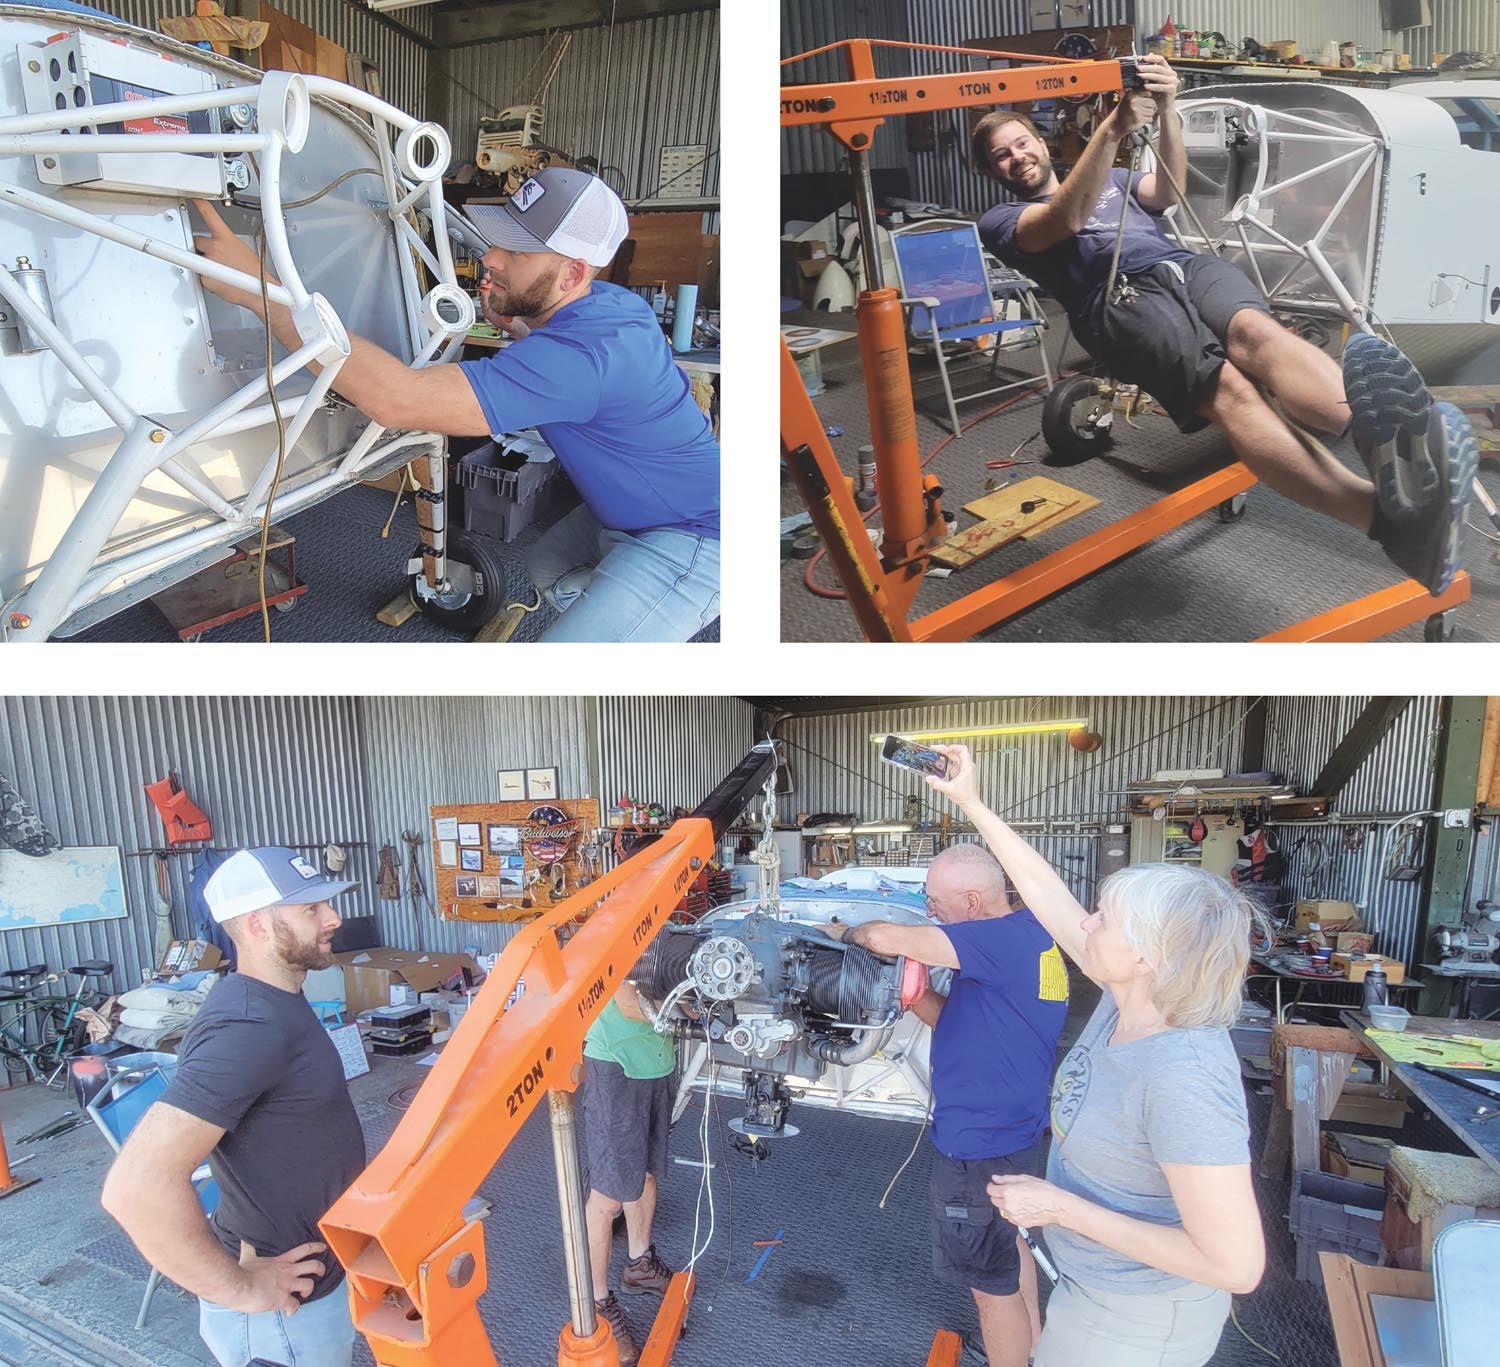
Hanging Around
My parents don’t come out to the airport very often, but they heard it was going to be a special day because we were hanging the engine! Stan had it up on the hoist and my Dad and Mom jumped in to help guide it to the mounts. Together they tightened the motor mounts to the engine. Somehow the usual struggle of getting the engine, isolators and engine mount to align gets easier with more people around to push and shove the engine into place. What can be a long project for one person was done in short order with help from my friends and family. Oh, yes, we all made sure the tail end of the fuselage had a weight on it before we unhooked the hoist.
Once the engine was on, we knew where to drill the holes for the throttle and mixture cables and could then begin connecting the engine to the airframe through more than the mounts. To allow passage of the control cables through the firewall, Stan had ordered metal-grommet ball fittings (pass throughs) that we now had to drill for the new locations. As you may remember, we had previously reskinned the firewall so little of what was there before remained, including engine-control penetrations. Stan taught me several techniques for working with stainless steel. I learned that it can be very tricky to drill—if it’s allowed to get red hot it will work harden and become brittle. Therefore, to avoid damaging the drill bit, we have to drill quickly and smoothly, occasionally letting the steel cool down for a moment before proceeding. And when the metal scraps start flying, they hurt a lot when they hit you. Safety glasses were a must!
Starting with a pilot hole and then transitioning to a step drill, we managed to get the holes started. Then we needed to use the 90° angle drill to get the holes to the size we needed because of interference with the newly hung engine. (Whenever you can, try to do this step before you hang the engine.) Once the holes were deburred, we lined up the ball fittings flush with the firewall. This was a two-person job, as I jumped in the plane to tighten the back of them while Stan held them still from the front. After that, we ran the throttle and mixture cables through! The throttle cable fits fairly well, but we needed to order a longer mixture cable.
Other firewall-forward work involved installing the EGT and CHT probes. The previous exhaust system had been drilled for probes so this was simply a matter of installing new probes and double-checking that they’re more or less the same distance from the exhaust port. The CHT probes were the standard bayonet style.
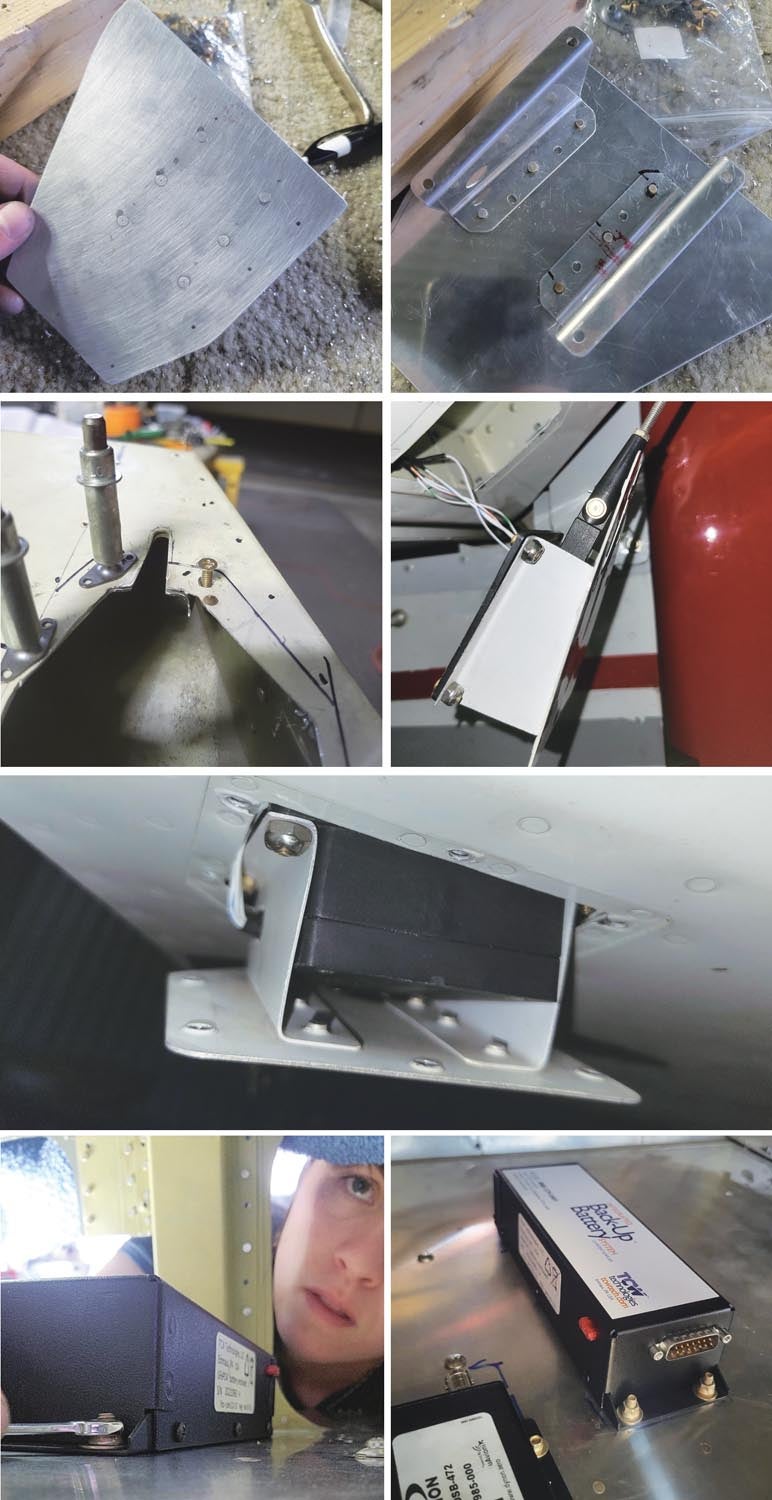
Manual to Electric
When I first welcomed N2165U home, it had manual trim. However, after flying Stan’s RV-14, I knew I liked his control sticks, which he has fitted with switches for electric trim, autopilot disengage and flaps. I knew I wanted the same ones, so we decided to install electric trim. It’s a great feature in the RV-14 and I’m looking forward to having it in my RV-6.
We bought a trim tab installation kit and started going through the instructions. However, the instructions were somewhat confusing and we didn’t want to risk guessing. Fortunately for us, Hal’s RV-6 is right next door! Whenever we have questions and get stumped on what things are supposed to look like, we just grab his spare key and walk over to Hangar 31. Often, it’s easier to see it in person than read the instructions and try to decipher diagrams.
Using the cut-out template from the installation kit, we traced the shape onto the elevator. After tracing and cutting the metal plate from a separate piece of metal, we riveted the brackets to it. It was confusing to decide which side of the plate to put the brackets on, but after comparing notes closely with Hal’s plane, we figured it out. After that, we had to attach the plate with the servo to the elevator. This was accomplished by attaching nut plates to the elevator and screwing the metal plate with the trim tab servo onto the nut plates. From there, we attached the connecting rod to the nut plates. With some trial and error, we were able to adjust the length of the rod to allow for full range of motion of the cable without hitting the elevator.
After completing the electric trim installation, I went back to work on the panel. There, I mounted my electronic ignition control box (a Light Speed Plasma II system), TCW IBBS backup battery and Dynon ADS-B In module. In case you’re not familiar, this RV-6 has a floor of sheet aluminum below the lower edge of the panel running all the way to the firewall. As long as you take into account the depth of items on the panel itself, this is a great place to mount remote boxes such as the backup battery and ADS-B. After carefully measuring each piece, considering the distance between supports and the way the cables would run, I drilled the holes through. After deburring them, despite being hard to see, I managed to bolt the backup battery and ADS-B on. I actually ended up using my phone as a mirror to see the nuts that I was screwing on to the backup battery. Old problems yield to modern solutions!
Reworking the fuel system is not unusual with a project of this size, so we tackled several parts of it. First off, I learned how to use a flaring tool to flare the lines for the tank vents. Then Stan instructed me to order a mounting flange, replacement gasket and replacement screen for the gascolator. In the process, I also ordered electrical terminal nipples from Aircraft Spruce to place over various wires and connections. Once the order arrives, the next step will be the fuel system! I’m so excited that it’s starting to actually look like a skeleton of an airplane.


Isn’t building Fun? Keep on keepin’ on you guys…Very comprehensive article
Thanks