 Longtime Kitplanes readers may recall an article about the benefits of using oxygen in an airplane and the relatively low cost of portable systems, especially if you roll your own (“Homebuilt O2“, February 2014).
You may also be aware that all oxygen comes from the same source, providing a number of lower-cost alternatives for keeping oxygen supply bottles in the hangar, ready and willing to top off your portable bottle prior to the next flight.
However, while using large bottles to buy oxygen can be a less expensive way to keep portable bottles topped off, they do have some drawbacks, namely: (1) Multiple source bottles are needed to get the most out of your portable system and (2) They are big, heavy and aren’t easy to move around the hangar, especially if you prefer to use a built-in oxygen system in the airplane.
Multiple Bottles
While it is possible to use only a single large source bottle to refill the bottle for your airplane, this has the drawback that the peak pressure that can be obtained in the aircraft bottle is equal to whatever pressure happens to be in the source bottle, and after a few fillings that pressure drops, meaning less oxygen in the tank for flying.
To partially get around this issue, multiple source bottles can be used. When the aircraft tank is empty, it is filled first from the lowest pressure source bottle (source tank #1), then topped off with the next highest pressure in source tank #2 and then source tank #3. This leaves tank #3 at a higher pressure for longer, as the volume for the lower pressure fills are being handled by the other tanks.
When source tank #3 drops to the point where a fill is desired, source tank #1 (the most empty one) is taken to the oxygen factory (or welding supply shop or wherever it’s convenient) for refill and comes back as tank #3, with the prior tanks shifting down the line. In this way, the most recently sourced tank is always the highest pressure, and the tank taken in for refill is always the most empty. This minimizes trips to the oxygen factory and keeps the aircraft bottle at the highest possible pressure each time it is refilled.
The Oxygen Cart
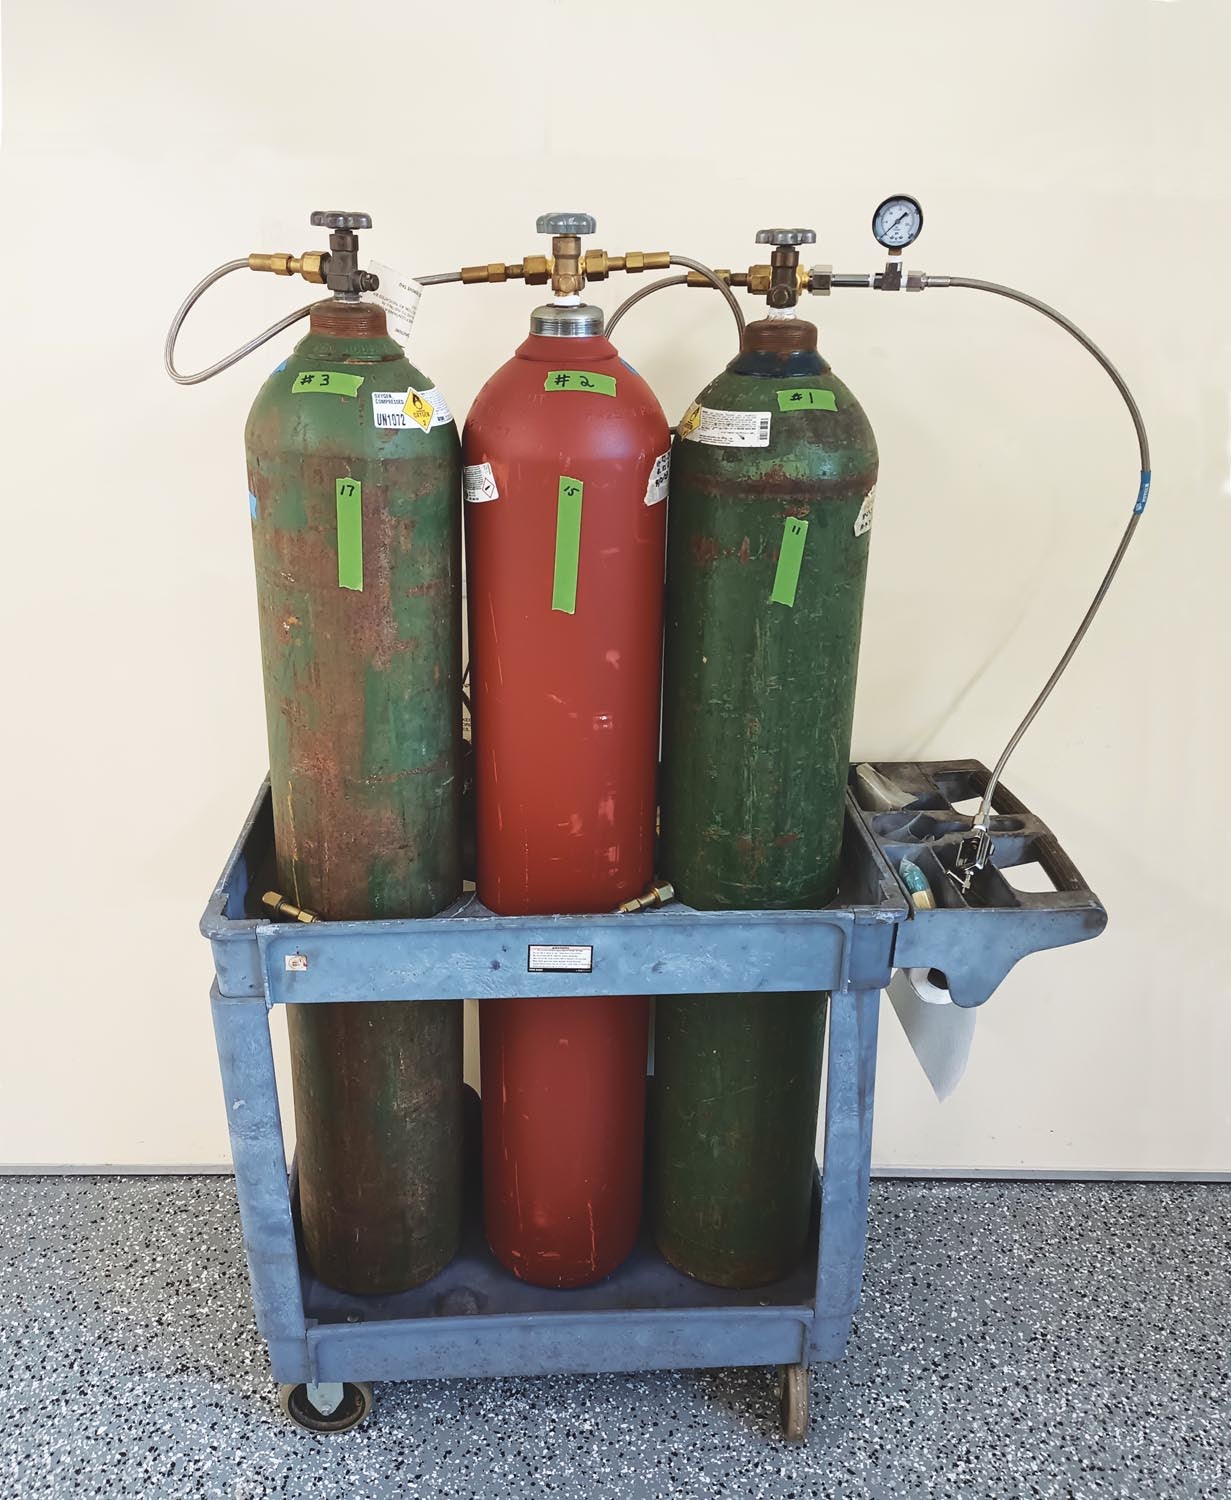
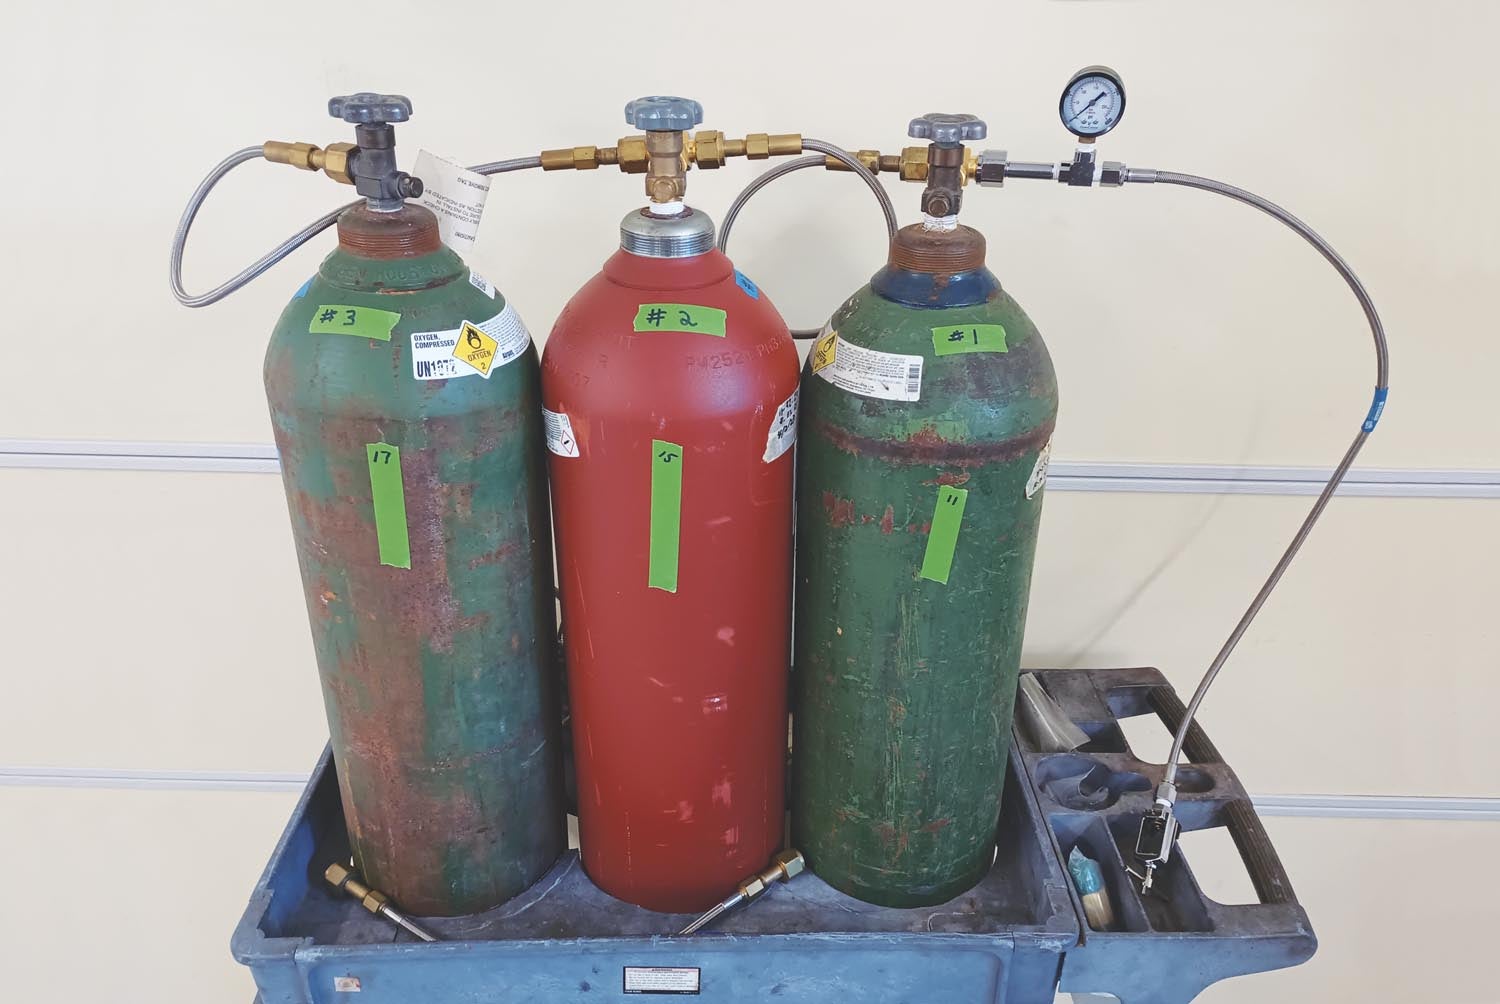
At over 100 pounds each, large oxygen source bottles can be awkward to move around. This means either the aircraft bottles have to come to the source bottles, or some means to more easily move the source bottles to the aircraft bottles is required. This is where the oxygen cart comes in.
There are commercially available welding carts that will hold up to two large bottles and in fact Harbor Freight sells one for about $75. However, it is a bit unwieldy to use; it tips over like a furniture dolly and with over 200 pounds of bottles in it, the handle can get pretty heavy if tipped a little too far. It also is rated for only 187 pounds, which is a little light for two tanks. But the price is right and if you only have two bottles, it can be a good alternative. However, it’s pretty nice to have three bottles and for that, a different cart is required.
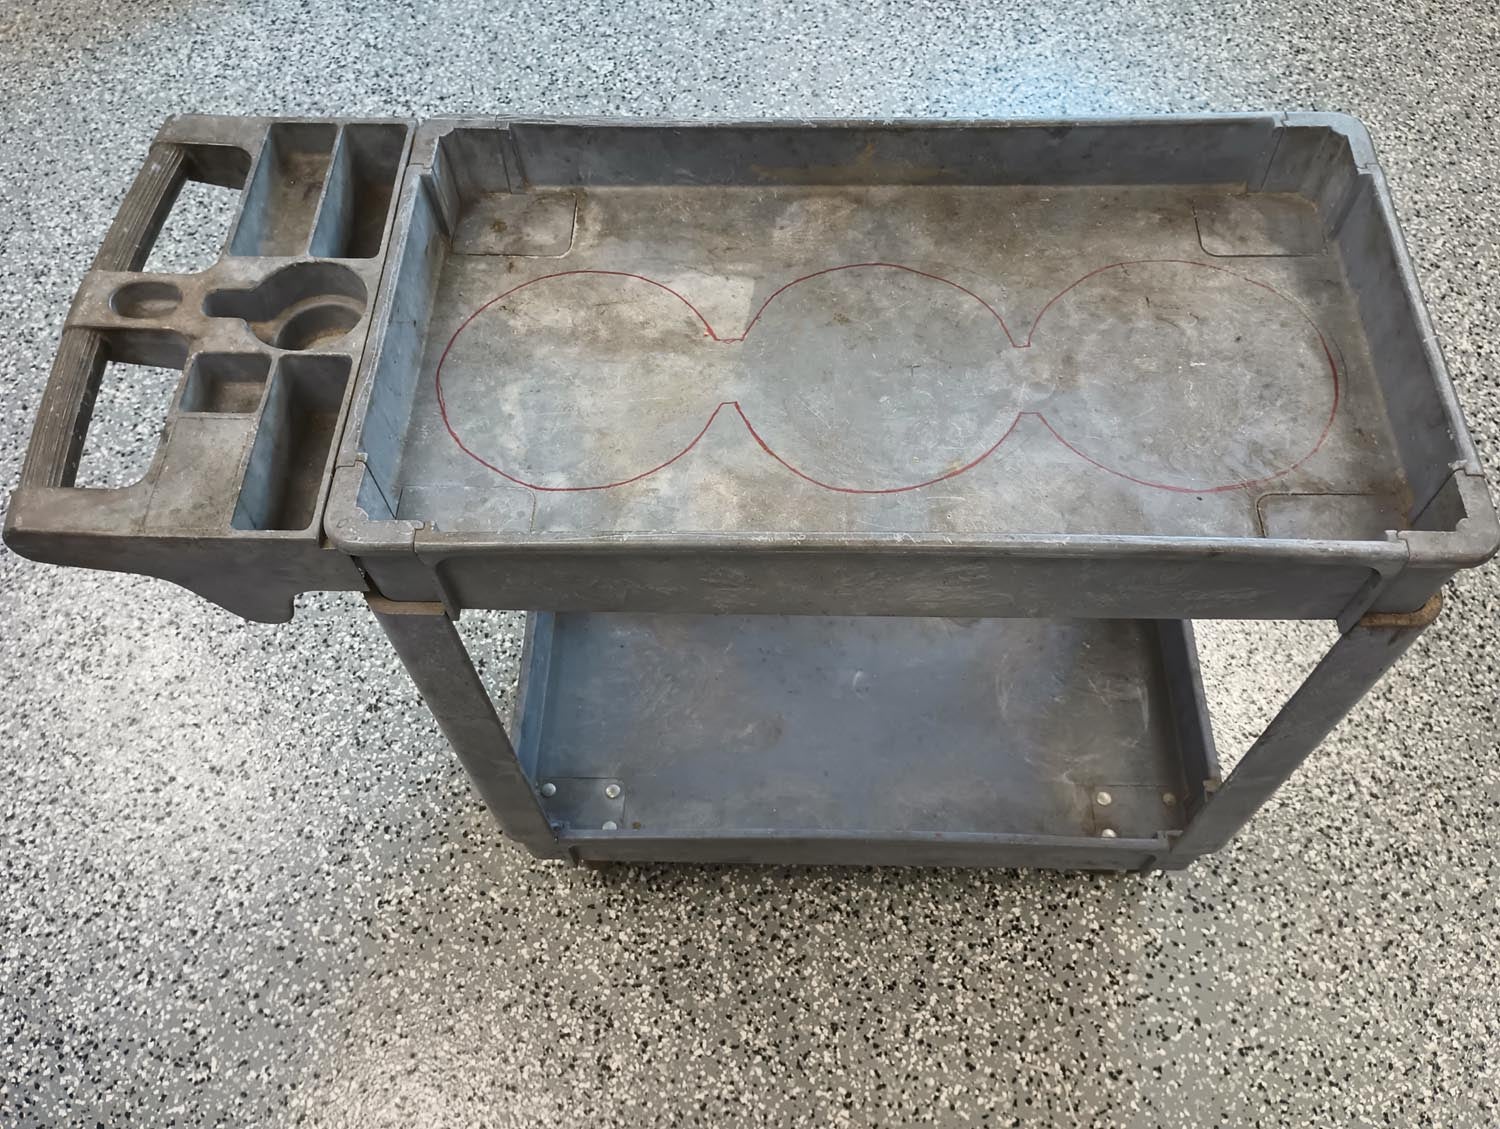
Fortunately, Harbor Freight sells polypropylene service carts that are rated for 500 pounds and their 16-inch-wide version is a perfect size to hold three Size H (also known as Size K or M250) 250 CF bottles. However, in typical homebuilder fashion, it requires a little customization.
Step by Step
Here are step-by-step instructions for how to turn an assembled polypropylene service cart into an oxygen cart suitable for holding three large (250 CF) oxygen source bottles.
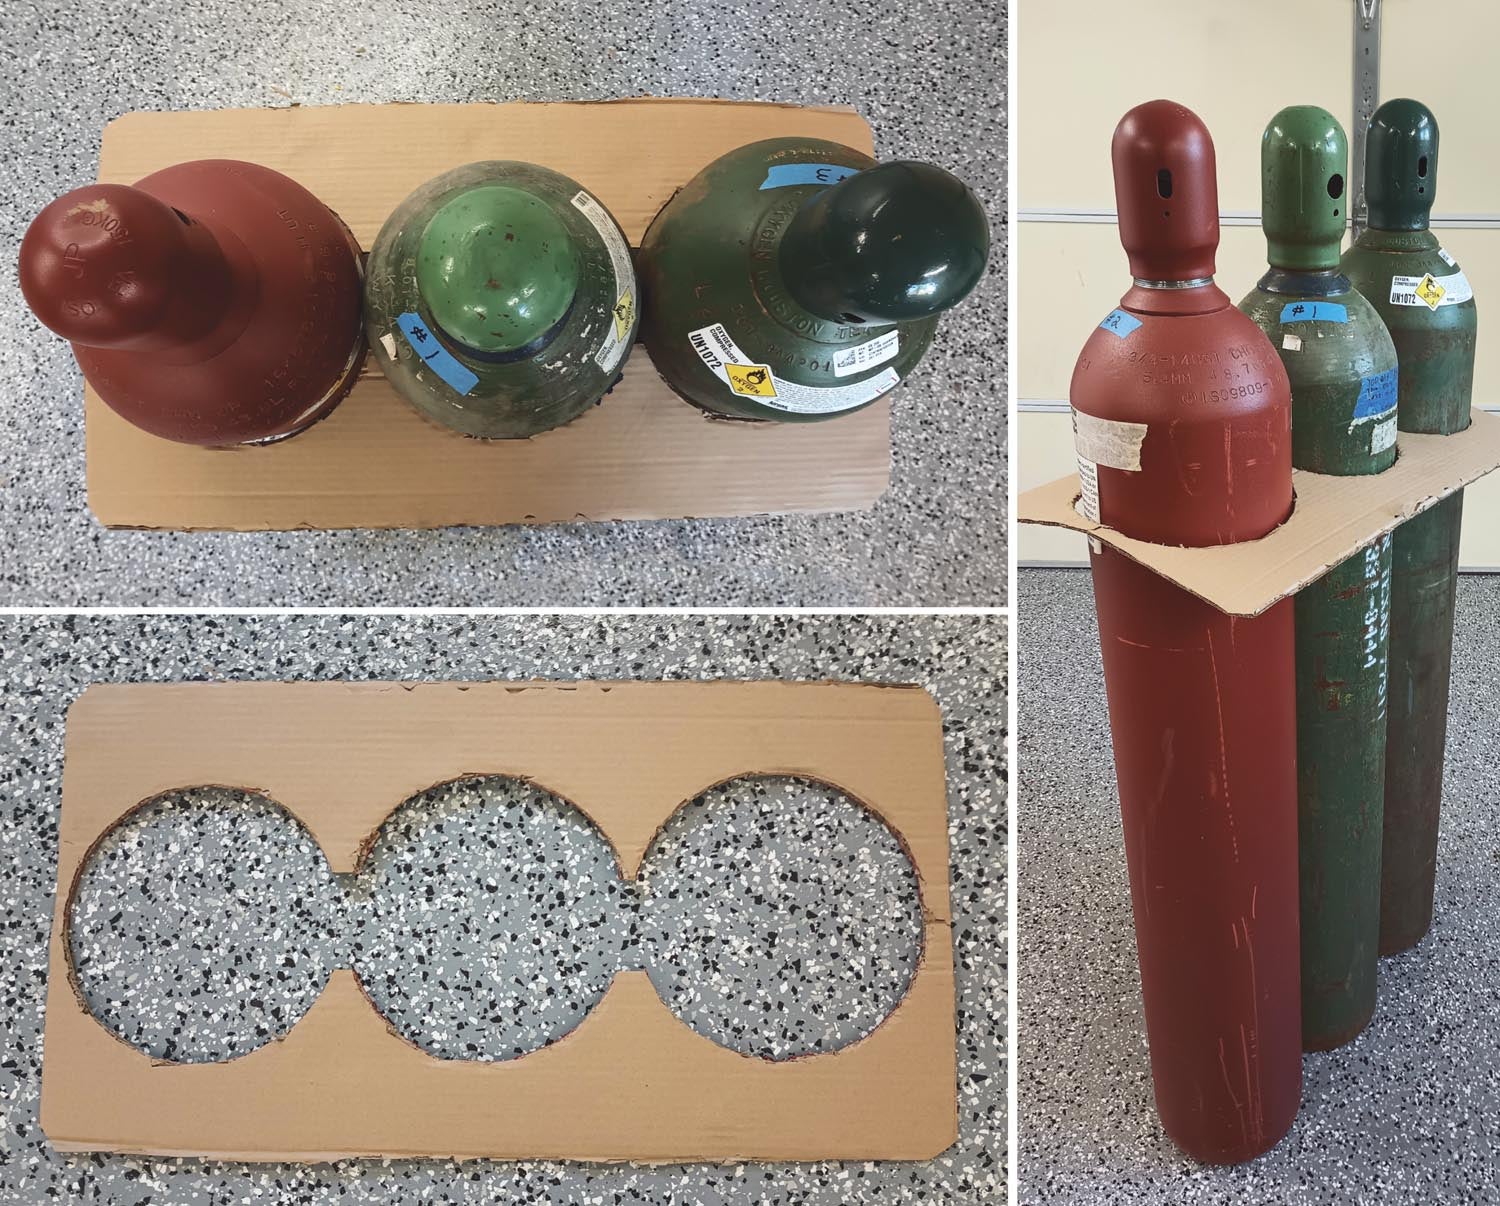
- Using a cardboard template, cut out three holes of slightly more than 9 inches in diameter, with the edge of each hole touching its neighboring hole. This will be a template for cutting the upper shelf of the service cart. Once the template is ready to go, line up the three oxygen bottles and make sure the template will lower down over the three bottles. It may be necessary to increase the size of the holes slightly to achieve a loose fit. The bottles do not need to be tight in the holes and the holes need to be large enough that the top shelf can be easily removed from the cart once the bottles are in it, so that the bottles can be removed when it comes time to refill them.
- Place the template over the top shelf of the service cart. Make sure the three holes all fit within the shelf. Using a felt marker, draw the outline of the holes onto the shelf. Remove the template.
- Using a drill bit with a large diameter (preferably at least ½ inch), drill some starter holes inside the drawn lines.
- Using a saber saw and starting in the drilled holes, cut along the marked lines on the shelf. When complete, you should have three large, 9+ inch holes in a row. Test fit the shelf over the three lined-up bottles to make sure it slides easily over them.
- Place the bottles on the lower shelf of the service cart and place the top shelf over the bottles, lining up the pins in the shelf with the sockets in the cart’s vertical arms. If desired, the mounting screws can be put back in to secure the top shelf to the arms, but these will need to be removed whenever it is necessary to fill the source bottles. I have found that as long as you don’t pull up on the handle of the service cart, the screws are not necessary.
At this point, the cart is ready to go and should provide a stable platform for wheeling the bottles around the hangar. If you have a single filler line available, you can connect it to each bottle one at a time. However, for just a little more money in fittings, much simpler and faster fills can be facilitated.
Plumbing the Bottles
There are a number of commercially available filling station hardware options with prices running up into a few thousand dollars, but there is a much simpler way to accomplish the same thing for about $125 in fittings.
Each bottle already has a valve on it, so all that is needed is a way to connect each bottle to a common line. This can be done with two T-fittings and two pigtails. Each pigtail consists of a short length of flexible hose with a CGA-540 fitting on each end.
Install a T-fitting on bottle #1 (the low- pressure bottle) and #2. Then use one pigtail to connect bottle #1 and #2 and the other pigtail to connect bottle #2 and #3. This leaves one side of the T-fitting open on bottle #1, to which the transfill adapter can be connected.
A transfill adapter is used to connect the CGA-540 fitting on the oxygen source tank to the fitting on the aircraft bottle. If you don’t already have one, they can be found on eBay for about $55, including a pressure gauge. If you are using aircraft bottles with a medical oxygen fitting, they will typically be a CGA-870, so the transfill adapter would adapt from CGA-540 on one end to CGA-870 on the other. Ensure you know what kind of fitting is on your aircraft bottle. If it is not a medical oxygen fitting, it will likely be something other than CGA-870.
Regardless of what kind of fittings and hoses are used, ensure they are rated for something in excess of 2000 psi, which is the typical full pressure for oxygen bottles.
The Filling Process
To use the system, connect the aircraft bottle to the open end of the transfill adapter and open the aircraft bottle valve, then slowly open the valve on source bottle #1, allowing oxygen to flow slowly into the aircraft bottle. Don’t open the valve very far; fast-flowing oxygen will heat up the aircraft bottle, and a hot bottle will not hold as much oxygen as a cold bottle will. Once the pressure has equalized, close the valve on bottle #1 and slowly open the valve on bottle #2. Repeat the process again for bottle #3. Close all valves, disconnect the aircraft bottle and the filling process is complete, with the aircraft bottle now at the same pressure as high-pressure bottle #3.
If you don’t already have source bottles, they can be purchased locally or from a variety of online sources. Prices vary significantly and sometimes attractive deals can be found, but be wary of expiry dates on the tanks. If you are buying your own bottles, this can be a good opportunity to pool resources with other local flying friends. Size H, also known as Size K or M250, are 250 CF size bottles. If you prefer to rent the bottles, most oxygen suppliers offer this service. I pay about $40 locally to fill up an owned 250 CF bottle and between myself and two other local pilots who use oxygen occasionally, we fill up a source bottle about once every year or two.

 Wordless Workshop")


You should also note that O2 bottles are filled to 6,000 psi, so a pressure regulator would be advisable so as to not over fill the Aero ox bottle, rated for 2,200 psi.
Great comment about watching the pressure on a fill and using a regulator and gauge. However, I have never had a bottle filled beyond its rated capacity and all of the bottles in my system (which so far as I am aware are standard bottles) are 2,000 psi. A 6,000 psi source bottle would negate much of the benefit of a chained set of fill bottles!
Could you please state the source and specifications code for a 6000psi oxygen storage container.
Hi all.
My name is Stuart Hutchison, long-term subscriber and plane nut. My background is 35-yr Air Force aviator (P3 Orions), Aviation Physiology Training Officer (including decompression chamber operator), 40-yr private pilot, SAAA Technical Counsellor and 16-yr kit builder. I am a strong proponent of the installation of oxygen in our higher performance kitplanes for improved situational awareness and reduced flight fatigue (not just hypoxia) and have oxygen installed in my IFR F1 Rocket (under construction) for that reason.
I’m also a proponent of safety and as interesting as this article is, I think it misses an important opportunity to speak of serious oxygen risks. Risks include hose contamination from dirt etc but most importantly from organic petrochemical products – fuels, oils, greases, smoke oil (parafin), cosmetics (eg hair gel, lipstick) etc, including ‘non-O2 safe’ O-ring grease. Oxygen system cleanliness is hammered into every military aviator, technician and staffer in the medical community. In the 1980s we literally wrote off a P3 Orion to a cockpit fire started by a contaminated O2 system (search ‘A9-300 fire’). The lesson is that oxygen rich environments and contaminants, especially under immense pressure, do not go well together.
I too have an O2 cart under construction, with four D-size commercial bottles. Back to the article though. With respect, my first thought was where are the dust caps, plastic bags and ties necessary to ensure those high pressure lines are kept absolutely clean? The article also talks about opening valves slowly to avoid cylinder heating, which is AOK, but the more important reason is to very gradually allow the pressure to stabilise throughout the system to avoid the risk of localised heating triggering combustion of any possible contamination.
I believe these themes must always feature in O2 related articles given the risks and potential for someone to act on the one source of information without doing their research first. After 4200 hours of kit building I know how much blood, sweat and tears go into the kitplane passion. I would really hate to see anyone get hurt or lose all their hard work to an oxygen fire!
Stuart,
I could not agree with your concerns more. I have spent 10+ years selling oxygen systems, from industrial to medical. To get as close to a non-flammable (spontanous) system, all tubes, valves and fittings must be washed internally with non-hydrocarbon media, then double or triple bagged in non-combustible packaging. It goes without saying that all the internal components and materials must also be non-combustible, but often forgotten is that even non-combustable metals can be in an oxygen rich environment.
None of this even considers the health issues of inhaling oxygen that is not of medical grade due to a lack of understanding of how to keep it that way!
To sum up, buying the required components (to not be blown up or bacterially infested) will cost an amount that far outweighs the cost of refilling – it is expensive for a reason.
Please do not do this, it is only a matter of time until this seriously injures or kills someone. Allowing this story to remain up is negligent at best.
Stuart,
Thanks for your comments. You make a great point regarding the need for cleanliness and the impact of a pure oxygen environment on the potential for combustion. As someone with a background in aviation physiology and as an amateur aircraft builder, it would be good to hear your thoughts and recommendations on the practical steps you are taking or planning to take with your own oxygen and oxygen-fill systems.
You’re welcome David … will do, I have benefited greatly from this wonderful information sharing platform over the past 16 years. Also lost one of my closest mates to a fiery aircraft crash in late 2022 (there’s a whole article in that), so I have a renewed sense of respect for fire hazards. Will post soon.