 Working with epoxy can be a simple, satisfying process, or it can be a sticky, drippy, frustrating mess. From the moment you start mixing the glue, the clock starts ticking and you are under pressure to get everything done quickly and correctly with the fear that if you get it wrong, it will be difficult, if not impossible, to fix.
The difference between success and failure comes down to a few simple “tricks of the trade.” The methods I’m about to describe might seem deceptively simple in advance or obvious in hindsight, but if you try to work with epoxy without using or at least being aware of them, you will struggle and likely have poor or even unusable results. These methods are closely guarded trade secrets and cleverly concealed where no one will ever look for them—in the instruction manual!
Allow me a disclaimer. The techniques and tools described here are based on West System epoxy and may or may not apply to other systems. I’ve successfully used these methods with System Three T-88, but you should do your own homework and check the manufacturer’s recommendations for whatever epoxy system you choose. Also, I’m not suggesting that these methods are any better than someone else’s. The idea is to share alternative methods and let you pick and choose what will work best for you on your own project. It never hurts to have another tool in the toolbox.
I’m building an 80% all-wood replica Spitfire Mk1 from plans. I’ve been at it for 17 years (so far) and have learned a lot. You learn best from mistakes and boy, have I made some mistakes! When I started, I knew very little about gluing things together with epoxy and have learned mostly from hands-on use, plus a lot of technical knowledge from the great support staff at West System (FYI, there’s no S at the end; it’s West System—not Systems).
Basic Training
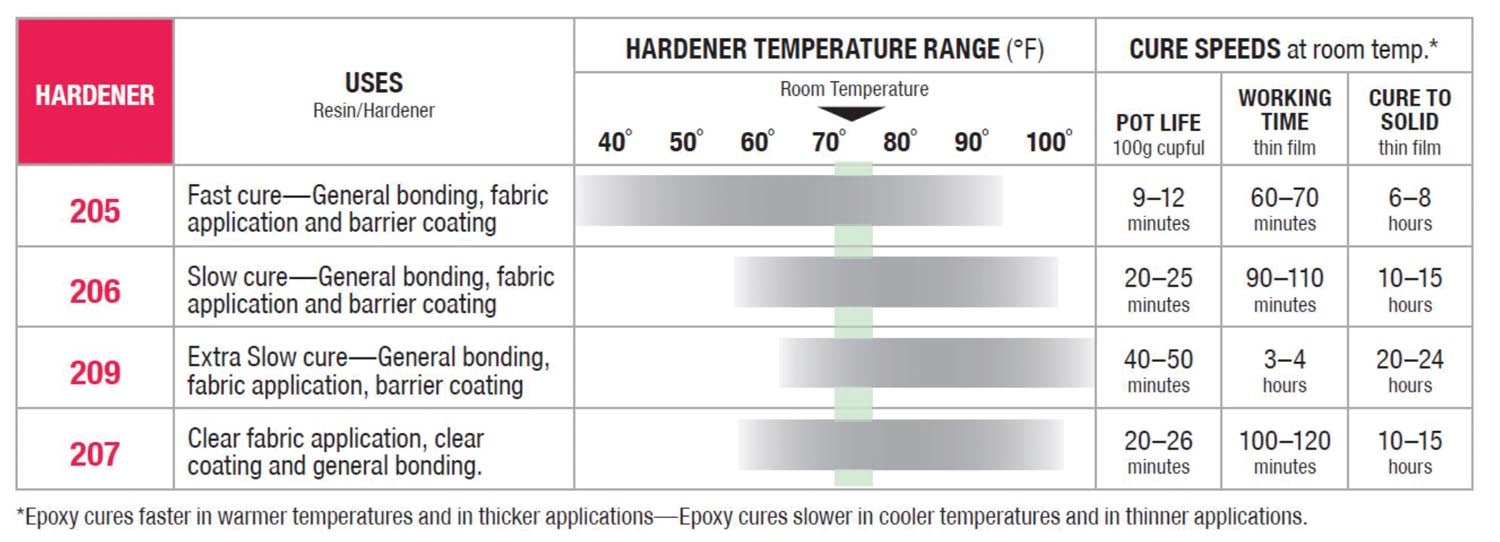
First a little about the West System product line. Though they have a large variety of specialized items available, we are focusing on their core product, the basic, most common epoxy system. This consists of the basic resin in a big can and four different hardeners in smaller cans. Based on your needs, you can choose to use fast, slow, really slow or really clear hardener.
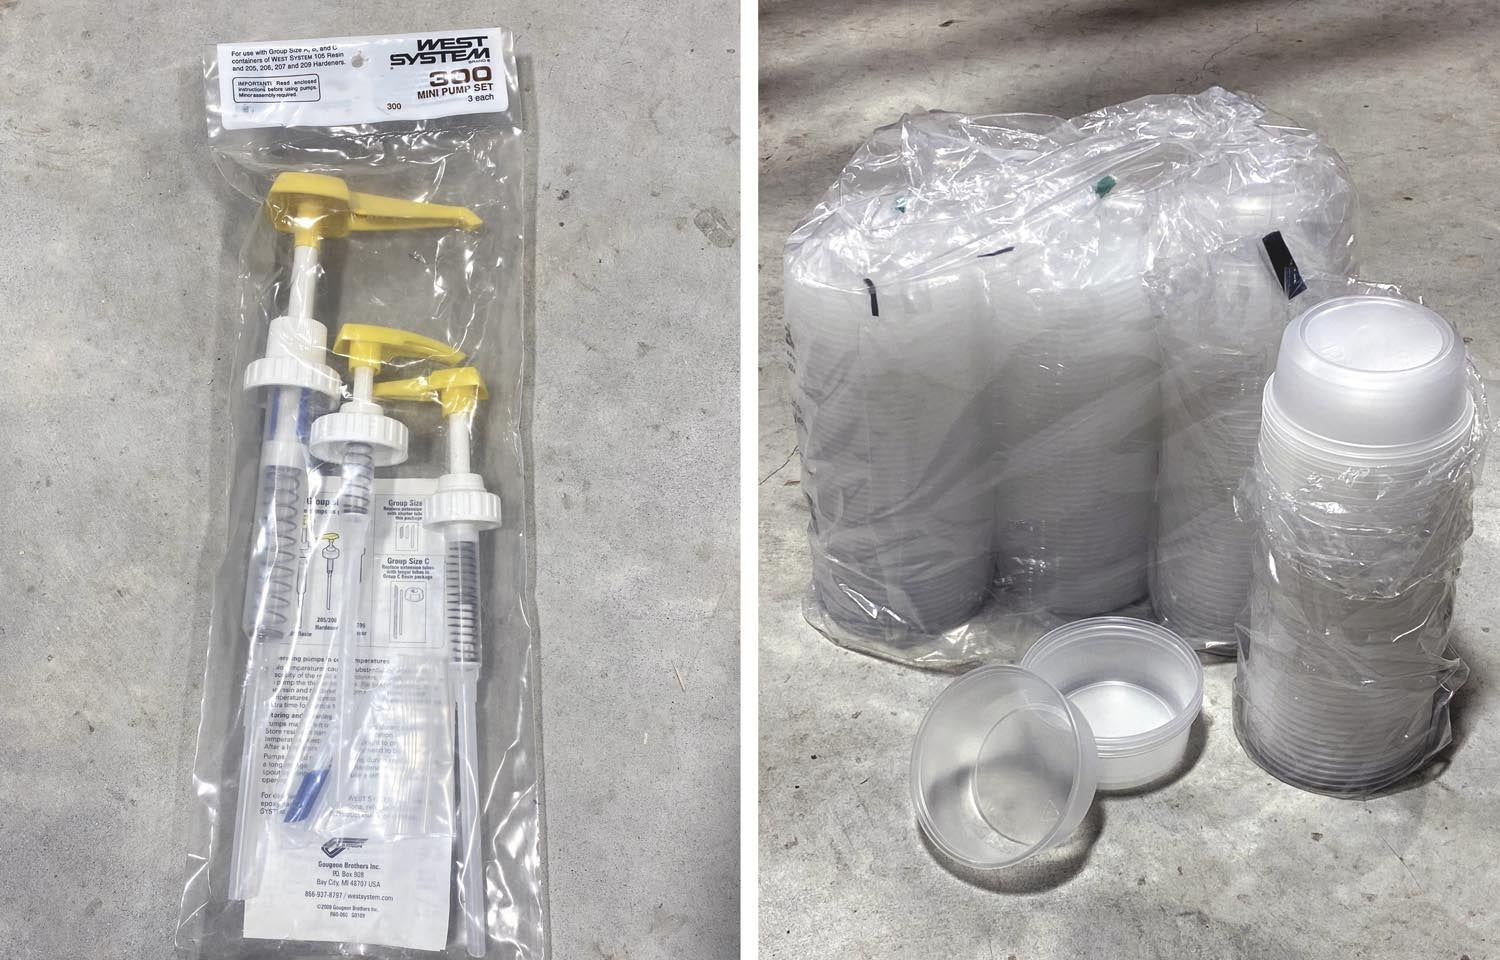
The ratio for each type of hardener to epoxy is different. This could be complex, but they’ve solved the problem using a simple, rather elegant system of different sized pumps for the hardeners. The pumps come in a bag of three. One big pump for the big can of resin and two smaller different sized pumps for the smaller hardener cans. They’re all labeled, and the lids are different sizes, so it’s difficult to get them mixed up. The big pump goes in the big can, and the correct little one goes in the correct little can. They also have bigger, more complex pump systems for large-scale applications, but for our purposes, the small pumps are a simple, semi-idiot-proof way to go.
To get the correct ratio between the epoxy and the hardener you’ve chosen to use, you have to use a full stroke on the pump on each can. One full stroke of epoxy, one full stroke of hardener. Want a bigger batch? Two full strokes of epoxy, then a corresponding two full strokes of hardener. This brings me to the only complaint I have with the West System. The smallest batch you can mix up is one full stroke on each pump. You can’t do half a stroke because you won’t be sure the ratio is correct. If you want to glue something small together, you either have to wait until you have several small glue projects or end up wasting quite a bit of glue.
For me this is worth the trade-off. The big advantage with T-88 is that you can mix up as little or as much as you want, but unless you take the time and effort to use scales, spreadsheets and calculators, you’re never sure you’ve got your ratio correct. With the West System pumps, getting the ratio correct is effortless and fast, even with epoxy-covered gloves on, but you have a minimum amount you have to use. I know some builders who use both T-88 and West for exactly this reason.
The Great Epoxy Bake-Off
When I bought my first hardener, I thought I’d just use the fastest one because, well, I didn’t want to have to wait. Drying epoxy is an exothermic reaction—it gives off heat. The faster it dries, the faster it heats up. My total experience with epoxy at that point had been a quick hands-on seminar at AirVenture where we mixed up some epoxy in a little paper cup and immediately dumped it out onto some fiberglass.
I thought I’d try it that way. I used a little paper cup, put in a full stroke of epoxy and a full stroke of fast hardener and started stirring with a Popsicle stick. I stirred it for a while, like we learned at the seminar, then I started wandering around my project planning where to apply the glue. Anyone who’s done this before can tell you what happens next: You start smelling a slight odor of epoxy, the cup starts feeling a little warm, then in just a few seconds the cup starts steaming and gets so hot you can’t hold it. You drop it and watch the epoxy sizzle and smoke as it transforms into a hard little ball, while teaching your kids some new words from your sailor vocabulary. It’s called “exotherming” or “baking off.”
When too fast of a hardener is used in too small of a container, the rapid hardener causes the epoxy to heat up quickly. The small container reduces the surface area for cooling. The hotter it gets, the faster it dries. The faster it dries, the hotter it gets. Exothermic loop. Burnt hand. Stunned kids.
After this experience I talked with one of the instructors at the local A&P school, and he told me that they sometimes will nest two containers together with ice in the bottom one to slow the reaction. Without resorting to ice, it turns out that if you can keep the epoxy from getting too deep and maximize the exposed surface area, you can prevent it from baking off. West System advises that spreading out the epoxy in something like a plastic paint roller tray will extend the working time.
My solution was to use a slightly slower hardener and to use a larger, more open container. I found some perfect disposable plastic dishes at a restaurant supply store, which subsequently went out of business during COVID. I order them online now. These are wide and flat-bottomed. I’ve heard that spilling is an issue with mixing cups and requires extra precautions. I can confidently claim that I’ve never tipped or spilled one of these dishes. On rare occasions when I want to extend the life of a glue batch, I’ll put some crushed ice and a little water into one, then nest another with the mixed epoxy on top of it. I can greatly increase the working time or use a faster hardener this way.
A friend told me he puts unfinished batches of epoxy into his freezer, which stops it from hardening. He then takes it out weeks later, waits for it to warm up and can use the rest. It’s a fine line between when it’s warm enough to work and when it starts to set up. I’ve tried this but can’t recommend it.
Thickeners—Ketchup or Peanut Butter?
Because I live in Fairbanks, Alaska, the temperature outside in the winter is routinely between -20° F and -40° F so the humidity levels in the shop drop to below 2%. Some local building engineers told me they actually consider it to be negative humidity because it sucks the moisture out of wood. It’s a long story, but I can tell you that removing that much moisture from wood will make it shrink—a lot! That can create huge amounts of stress on glue joints. This issue caused me to spend quite a bit of time on the phone with the West System tech guys. From discussions with them and many others much smarter than me, I’ve learned to keep the shop humidity constant at about 35% or more. And I’ve also learned how to make glue joints considerably stronger by using fillets.
I had seen reference to fillets in the West System manual but thought they were only for rounding off inside corners for fiberglass layups. The West System techs told me that I should use thickeners and make filleted corners pretty much all the time. I had mixed in microballoons in my class at AirVenture and thought that’s what they were referring to. I was concerned about reducing the strength of the glue by adding foreign material. They said it was common to add things to epoxy and that some people even used sawdust as a thickener, though they didn’t recommend that. I learned that there is an entire range of thickeners for different purposes, and some will even increase the strength of the glue joint. For most purposes, the most commonly available thickener is expanded silica, sometimes called fused, fumed or colloidal silica, or by the brand name of CAB-O-SIL. I guess it’s a very common thickener for all types of purposes, even food. It’s sometimes used to make ketchup thick!
There are several other types of thickeners for various purposes. The West System catalog lists graphite and even aluminum, along with several others. Be sure your thickener matches your needs. It’s possible to thicken epoxy using microballoons alone, but you end up using a lot of balloons, which makes the glue very weak. This is fine for fairings or non-structural fills. When mixing up micro, consider using some expanded silica along with the balloons. Different ratios will give you different strengths, slough resistance, sandability, etc.
It’s pure conjecture on my part that the reason many T-88 users haven’t considered using thickeners is because T-88 is naturally thicker than West to begin with. Might it be easier to get away with not thickening T-88? Just a thought.
Why Use Thickener?
There are several benefits, but the two big ones are the ability to make fillets and the fact that the glue stays where you put it.
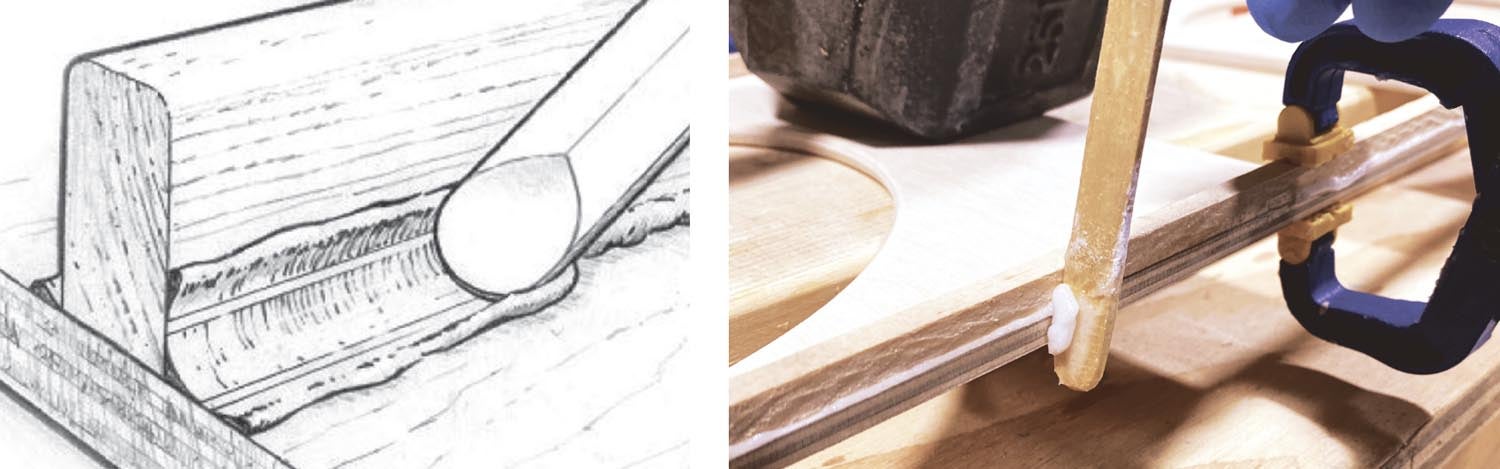
The idea with a fillet is that it increases the surface area of the bond, increases the amount of glue overall—which reduces the stress per volume—and creates a curved distributed area for the stresses to occur, rather than all the stress being focused into a small tight corner. And I’ll admit, they look kind of nice too.
But to me the biggest benefit is that the glue stays put! Even on vertical surfaces. No more fighting to find a way to get everything lying flat or building glue dams out of tape and such. It doesn’t run out of a joint when you’re not looking, it doesn’t spill and it doesn’t even drip! I know it sounds too good to be true but try it. You’ll never go back!
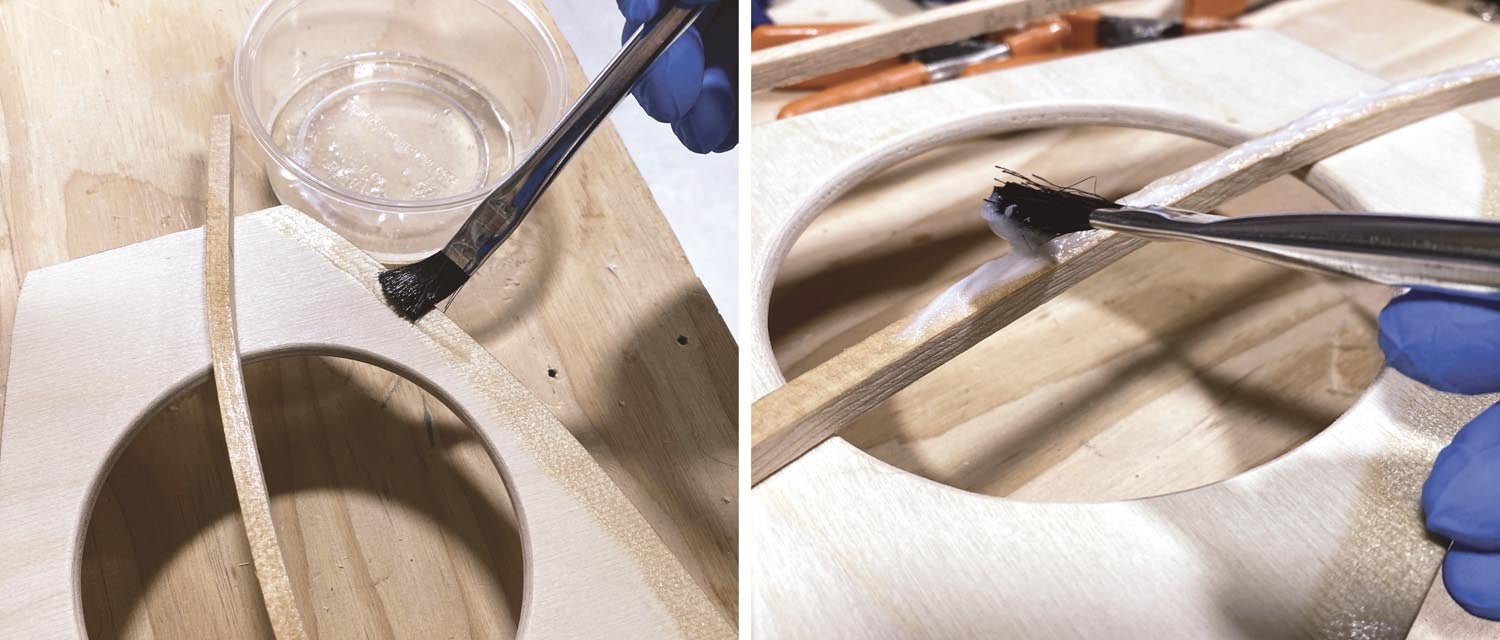
There are two ways to use thickened epoxy: either directly or the “two-step” method. If it’s a structural bond, I always use the two-step. It’s not a big deal; you just put some regular thin epoxy on the joint area first and then put thickened epoxy over it. This gives you the best of both methods. The thin will be able to soak into the wood grain, and the thickened will be able to stay in place and give you nice fillets. If you skip the pre-wetting and just apply thickened epoxy directly, there won’t be as much of the glue soaked into the wood. This is fine for non-structural joints, or for additional layers.
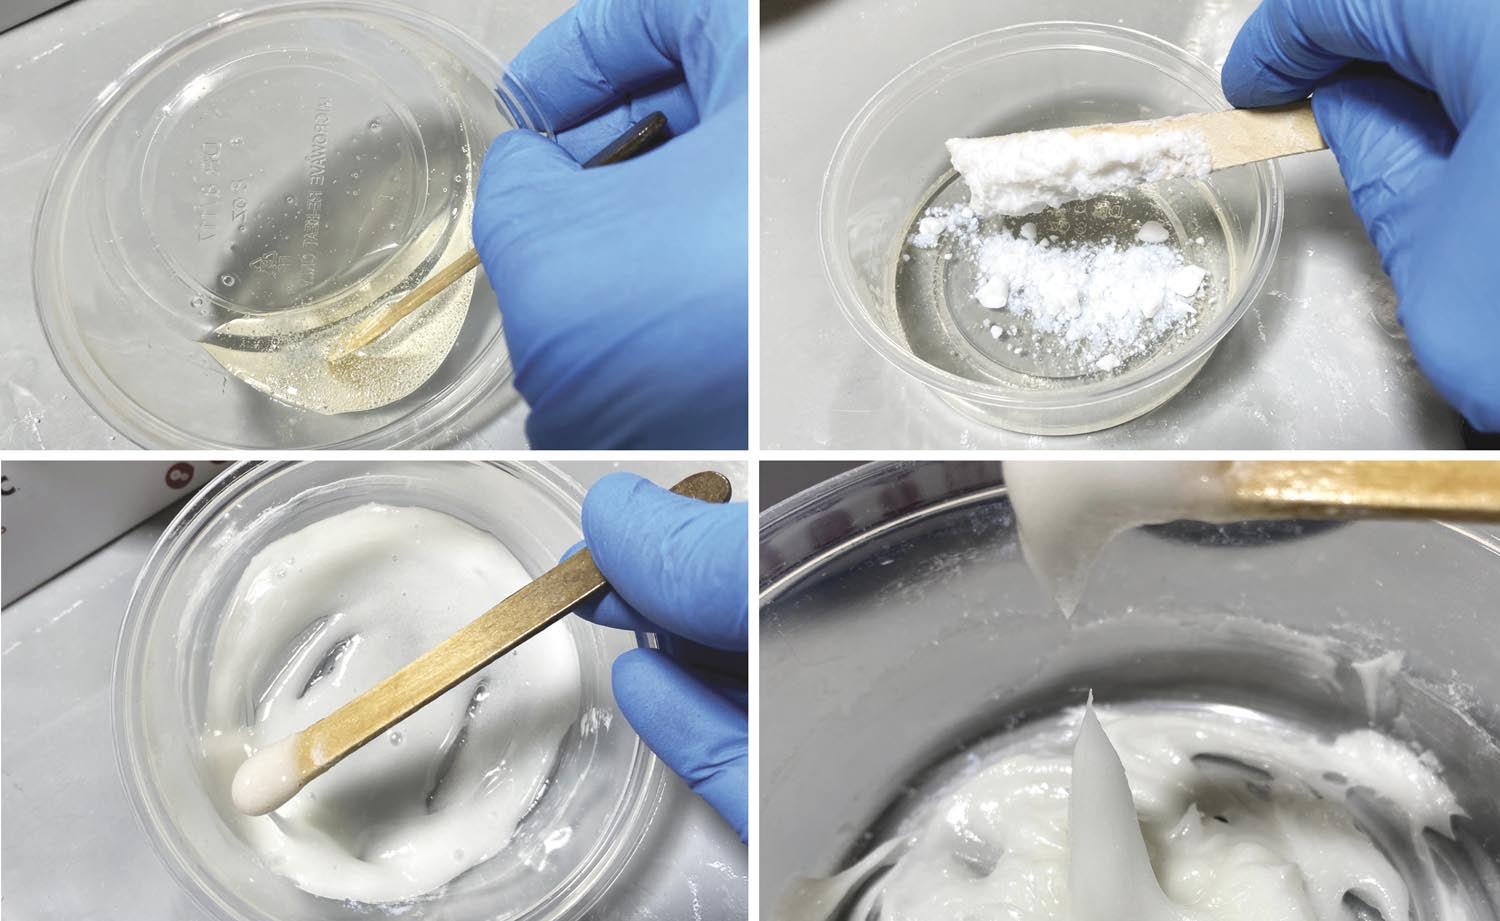
The process goes something like this: Put on your gloves, pump an equal number of strokes of resin and hardener into your bowl. Mix it up well with a Popsicle stick, being sure to scrape the sides and bottom frequently.
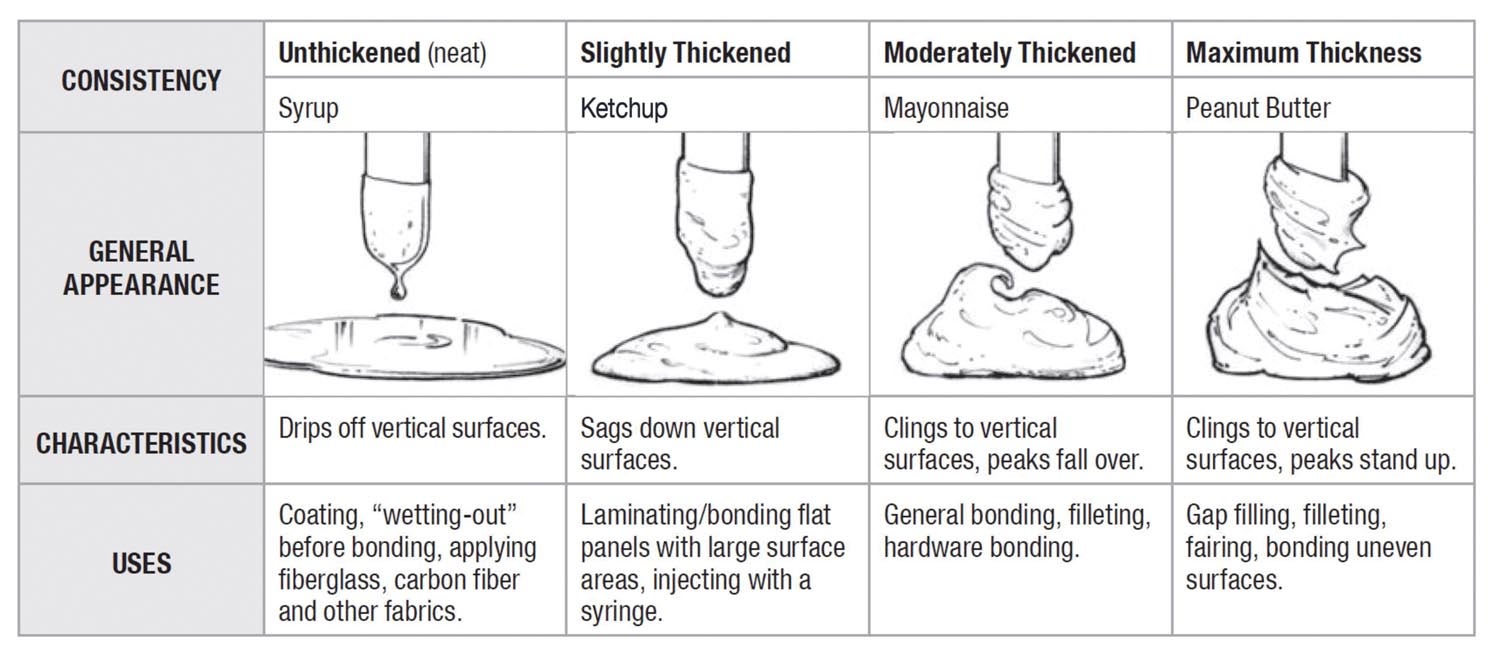
Using a brush for small areas or a roller for larger areas, apply a coat of thin epoxy. Mix expanded silica into the remaining glue in the bowl. If you need more epoxy, it’s better to mix the additional hardener and resin up first before adding the silica. Add thickener until you get the consistency you want. The manual refers to ketchup, mayonnaise or peanut butter thickness. I tend to use something that looks like frosting thickness for most purposes, but you will develop your own preferences for different applications.
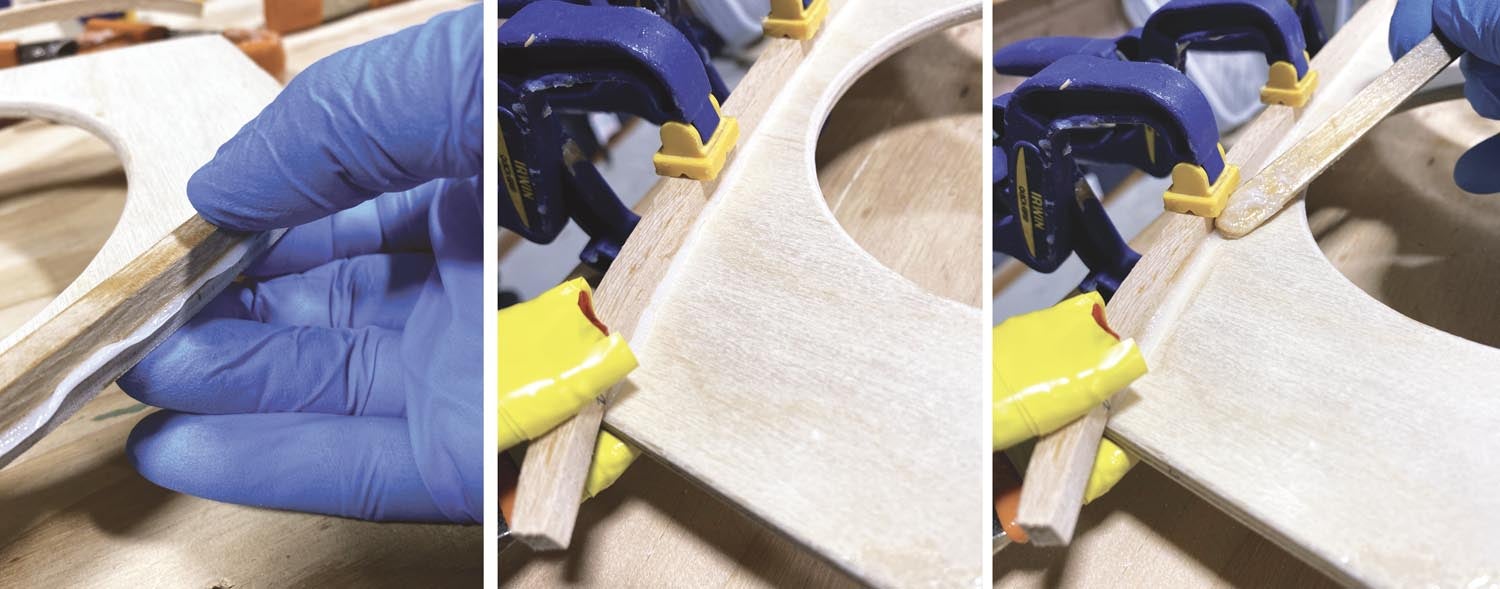
Use the brush or roller to apply the glue to the surface to be bonded, thick enough so that some of it will be extruded when the parts are joined. Press the parts together and clamp. Don’t get carried away and squish all the glue out of the joint. Now use the rounded end of a Popsicle stick, or a tongue depressor for large joints, and create the fillet. The hard part for me is to stop fiddling with it at this point. Once you get the fillet looking nice, leave it alone and let it dry.

Another Coat
There is some conflicting information on this subject out there, so be sure to check with your epoxy manufacturer for their recommended methods. For the West System, it’s OK to add more glue to an area where glue has already been applied. I don’t know how you could actually avoid it on a big project. But it’s very important that you do it properly. If you just add another layer of epoxy to a previously cured layer, it will not adhere properly and will delaminate eventually, if not right away.
I did a test and painted a thin layer over a previously cured one, and after it dried, I could peel it off like an onion. You only have two options when you want to apply epoxy over a previous layer. You must either get the second coat on before the first one dries, or you have to wait for the first layer to fully cure and prepare it for the additional coat.
If the second layer goes on before the first one cures, it creates a chemical bond between the layers. The more the first layer is cured, the less strong the bond will be. The techs at West told me that as long as the first layer was between masking-tape tacky and easily marked by a fingernail, you would still get a good bond.
If the first layer goes beyond the “fingernail mark” stage, you need to wait for it to cure completely and create a mechanical bonding surface. The most common method will be to sand it with a very aggressive grit sandpaper. Nothing less than 60 or 80 grit. This will create a “tooth” for the second layer to lock into.
Another method would be to use peel ply on the first surface, exposing a rough surface capable of a mechanical bond, before applying the additional layer of epoxy. This is a very common method used in composite construction.
Another little trick: If you’re covering a large area with an additional coat of thin over uncured epoxy, sometimes it can be difficult to tell if you’ve missed any spots. Adding a little pigment to the second layer mix will solve this problem.
In Conclusion
There are multiple epoxy systems out there and multiple ways to use them. The best thing you can do is RTFM (read the freaking manual) and talk to people who know more than you. The manufacturers know their product better than Billy Jo Bob down at the hardware store who’s never even seen an epoxy pump. And surprisingly, some well-meaning fellow builders have given me advice that turned out to be just wrong. Check your sources and confirm with the manufacturer. And remember to not scratch that itch in your hair with epoxy on your hands!
Photos: Bruce Dunkle and West System. Charts and Illustrations: West System.

 Wordless Workshop")


Great article! I have used Gougeon’s WEST System epoxy ever since the brothers developed it. To note, WEST stands for “wet epoxy saturation technique “. The importance is that when wood moisture is adjusted to yield the desired structural properties, lock it in with epoxy! These resins are not porous as are polyesters. And they are phenomenal when used to fabricate parts or panels with reinforcements such as fiberglass or carbon fiber-the latter yielding material stronger and stiffer than aluminum! Very popular for sailboat masts.
It is a little amusing to see the words “glue” and “dry” used-epoxies do not dry-they cure. There is nothing to evaporate!
Jan Gougeon became aware of epoxy as he was helping a master boat builder construct a 36 foot sailboat in the early 60’s ( that I ultimately sailed on) and the rest is history!
WEST epoxies are formulated in Bay City Michigan and sold around the world!
H. Riley
I went to the ‘West System’ website… and found all sorts of useful/practical data for their epoxy resin systems for boats. BUT I couldn’t find any technical data sheets for physical performance, strength/temperature-ranges, etc…NOR any ‘whisper’ of use for aircraft adhesive bonding… NOR any technical points of contact for Tech data consult within this website.
WK, visit here, and click on the “See TDS” button:
https://www.westsystem.com/products/105-system/
Excellent article, though not sure if “Nothing less than 60 or 80 grit.” means the same in my part of the world, where less than 60 or 80 grit could be taken to mean 30 or 40 ( if there is such a coarse grade)