Whether for a flathead screw or a flush rivet, drilling clean countersinks can sometimes be a source of frustration. Typical issues with countersinking are chatter marks, out of round, and inconsistent depth control. These problems are easily solved by adjusting your technique and/or upgrading your tools.
For occasional needs, most shops will have a collection of multi-flute countersink bits. In our shop at work, we have the following multi-flute bits: 60 for doing chamfers on the edges of holes, 82 for SAE/English-thread flathead screws, 90 for metric-thread flathead screws, and 100 for flush-head rivets. To get good results with these type bits, we use a drill press or milling machine to control the depth, and we run them at low rpm (300-600) with a steady, and slightly aggressive, feed. If you feed them too gently or have the rpm too fast, they can be prone to chatter. Although we try to avoid using these with a hand drill for anything except edge deburring or chamfering, it’s sometimes unavoidable. In those cases I’ve found you can get decent results by making the initial pilot hole as small as possible, setting the drill to the slowest possible rpm, and using an aggressive feed. Another issue is, it’s impossible to produce a consistent depth using these bits in a hand drill. So, while they offer a level of versatility, multi-flute bits are also the least likely to produce perfect countersinks.
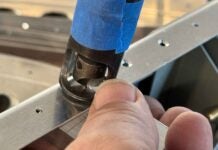
Examples of micro-stop countersinks. Note the bit in the center has a fixed pilot built into the tip of the bit, while the bit on the left has an interchangeable pilot. The serrations on the housing denote depth adjustment increments.
Aircraft manufacturers realized eons ago that perfect countersinks are an absolute necessity for structural integrity. When you consider the millions of flathead screws and flush rivets on all the airplanes made through the years, there must be some good trick to making countersinks! The secret weapon is the micro-stop countersink. While the basic form was patented in the ’50s by Cogsdill and now comes in many different sizes and shapes, all basically work the same: A close-fitting pilot extends from the tip of the cutter to center the bit and prevent out-of-round or chatter. The retractable housing is spring loaded, and the depth limit is adjustable. The increment of adjustment is typically 0.001 inch. The cutters are interchangeable, and they are available with fixed or interchangeable pilots. It is critical to the function that the pilot be correctly sized to match the pilot hole.
This mess shows the worst-case scenario: Using an unpiloted bit with a purposely unsteady hand drill.
There are no special tricks to using micro-stop countersinks. They make countersinking about as idiot proof as possible! Aside from setting and locking the depth, you must hold the housing to prevent it from spinning when you engage the drill. Failure to do that results in a nasty round scratch on your part. Some new models come with a plastic end cap to help prevent this problem.
How deep do you make a countersink? The correct depth is whatever makes the screw exactly flush. The specifications for flathead screws can be found in Machinery’s Handbook (Industrial Press). With that data you can calculate the proper depth to assure a flush installation. Or it may be faster to simply make some tests holes in a piece of scrap material. You will find a lot of discussion online about measuring the screw head and calculating the geometry to get a countersink depth, but this method can result in some error because flathead screws are not tapered to a sharp edge. In fact, Machinery’s Handbook provides the “theoretical sharp edge” diameter of the cone, as well as the actual head height, to help you determine the correct countersink geometry for a given screw. The specifications allow for some tolerances in the manufacturing of screws, so even the most accurate calculations may not result in a perfect countersink every time. But they will be pretty close!
During the course of my research into countersinks, I was introduced to the Vernon Devices Counter-Bit. While it is a bit pricey (pun intended), it is by far the best non-piloted countersink cutter I have ever used. It solves the problem of maintaining concentricity to the pilot hole by using a conical guide that, as you press down to drill the countersink, retracts ever so slightly against an elastomeric spring to expose two cutters. It takes a fair amount of pressure to get it to start cutting, which means the workpiece must be adequately supported. The Counter-Bit can be used in a hand drill, but you will get the best results using a drill press.
Special thanks to Jim Hadley of Schwien Engineering.

![]()
Bob Hadley is the R&D manager for a California-based consumer products company. He holds a Sport Pilot certificate and owns the VW-powered Victory Stanley Fun-Kist.


