 “Whiskey Oscar November, cleared to cross Runway 19.”
“Cleared to cross 19, Whiskey Oscar November.”
These innocent words commenced what was to be my second away-from-home maintenance event in over 35 years of flying.
Halfway across the runway, the tailwheel fell off. Or, at least it felt and sounded like it. There was a sudden grinding and a vibration throughout the airplane. Directional control was unaffected and not wanting to be “that guy” blocking the runway, I kept the power up and continued across to the welcoming taxiway on the other side. As soon as the power was reduced, the airplane shuddered to a stop.
“Conroe Ground, Whiskey Oscar November is disabled and immobilized. I need to shut down, get out of the airplane and see what the problem is.”
“Whiskey Oscar November, cleared as requested.”
Fortunately, we were to one side of the taxiway, so other aircraft were able to squeeze past as I exited the airplane, expecting a trail of parts and the stump of a tailwheel rod. However, I was surprised to see that the tailwheel was intact and instead, the left main wheel pant was resting flat on the ground, the tire folded under it. Despite no issues with directional control, it was clear the left tire had blown out.
After a few minutes, the helpful guys from the FBO showed up with a tug and lifting plate. However, I had heard many stories about airplanes damaged in the recovery process and was in no hurry to rush the retrieval, despite the rather large business jet taxiing up with a wingspan that obviously wouldn’t clear. It was time to phone a friend. Fortunately, Joe is president of the local EAA chapter, which has a sizable contingent of RV-type aircraft and had all the equipment and volunteers necessary to successfully retrieve the airplane and tow it to his hangar without any further damage. The following day at the hangar we were able to accomplish replacement of the tube and tire—both only about one year old and with no signs of puncture on the tire.
However, this got me to thinking about being prepared at our own airport for a similar event, so I set about collecting the necessary tools and equipment, flagrantly copying much of what Joe and his team had developed. This equipment is optimized for RV-type aircraft, but similar principles apply to many aircraft designs and can be adapted accordingly.
How To Lift a Plane
There are at least two ways to jack up most airplanes: at the wheel/landing gear and at the wing, with or without a built-in jacking point.
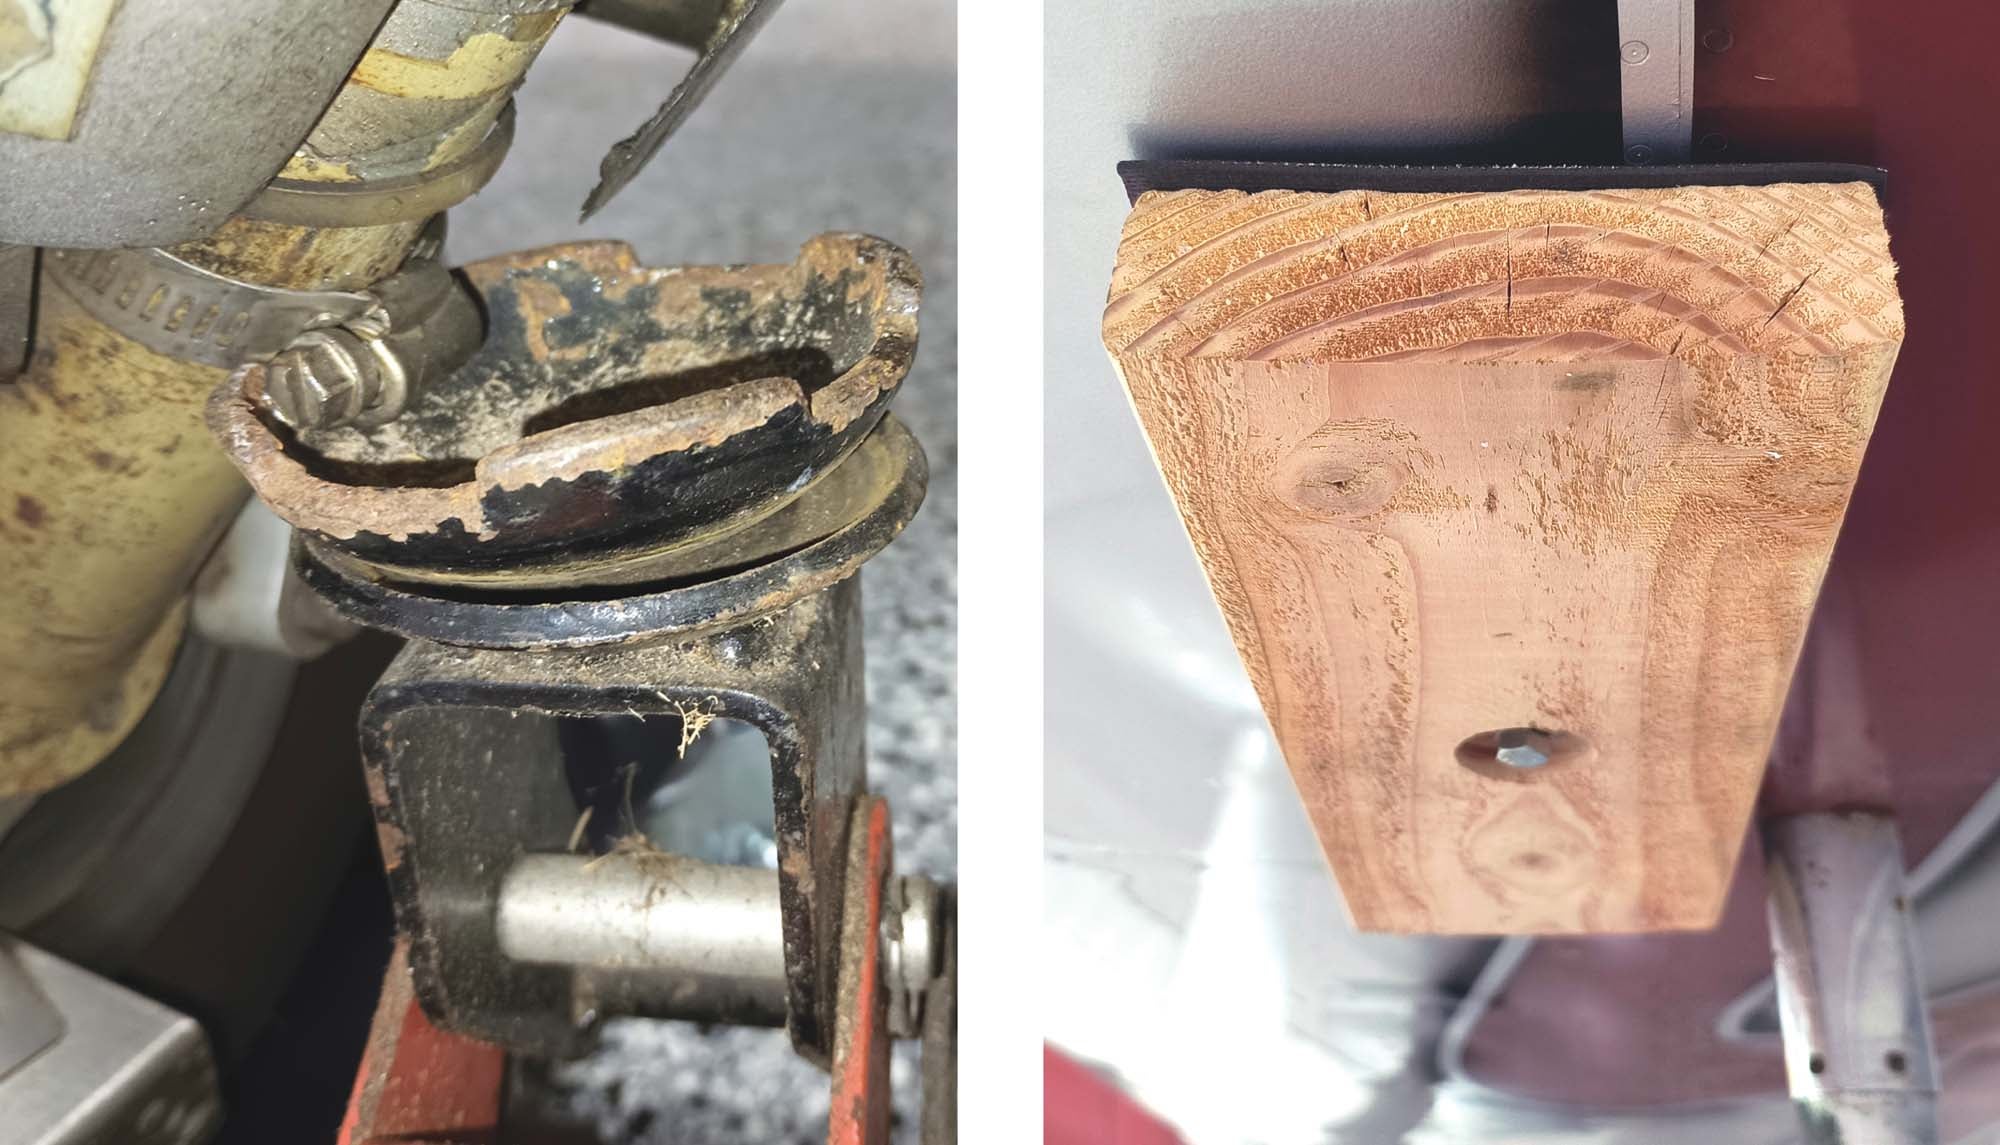
Some aircraft have a gear leg design with enough protruding axle so that a floor jack can lift directly against it. Examples include the main gear on a number of Beechcraft models. Most RVs have only a smooth, angled gear leg with nothing exposed to lift against. However, all is not lost. A steel hose clamp around the lower gear leg provides enough resistance to keep a floor jack from sliding up the gear leg. The jack doesn’t actually lift solely against the clamp; it lifts against the gear leg and the clamp just keeps it from sliding. This is probably not an arrangement you would want to rely on if getting in and out of the airplane, but if lifting only far enough to get a tire off or a dolly under the wheel, it may be sufficient. If using this lifting method for a wheel dolly, keep in mind that the jack needs to be sufficiently clear of the wheel to allow the dolly to slide under the wheel—more on this later.
The other alternative is to lift the wing using a wing jack. These can be acquired from typical aircraft sources or less expensive flat-bottomed long ram jacks (e.g., Harbor Freight) can be modified with an appropriate brace using steel tube or angle and bolts or welding as preferred. However, regardless of the source of the wing jack, there is still the question of where to lift on the airplane if there are no built-in lifting points.
Most aircraft have some form of tie-down on the wing. In some cases, it is just a metal loop. In other cases, it is a threaded fitting that an eye bolt can screw into. However, it may not be advisable to lift the weight of the aircraft up using solely the fitting and its method of attachment to the aircraft.
An alternative that may work for some aircraft is to use the tie-down point as a way to immobilize a block, which lifts against the lower surface of the wing. The end of the jack is held securely in a recess of the block, and the tie-down attachment point serves only to immobilize the block. This is an important consideration—an airplane that slips off the jack or block could easily wind up with the rod of the jack penetrating the wing.
Steps To Build the Wing Block
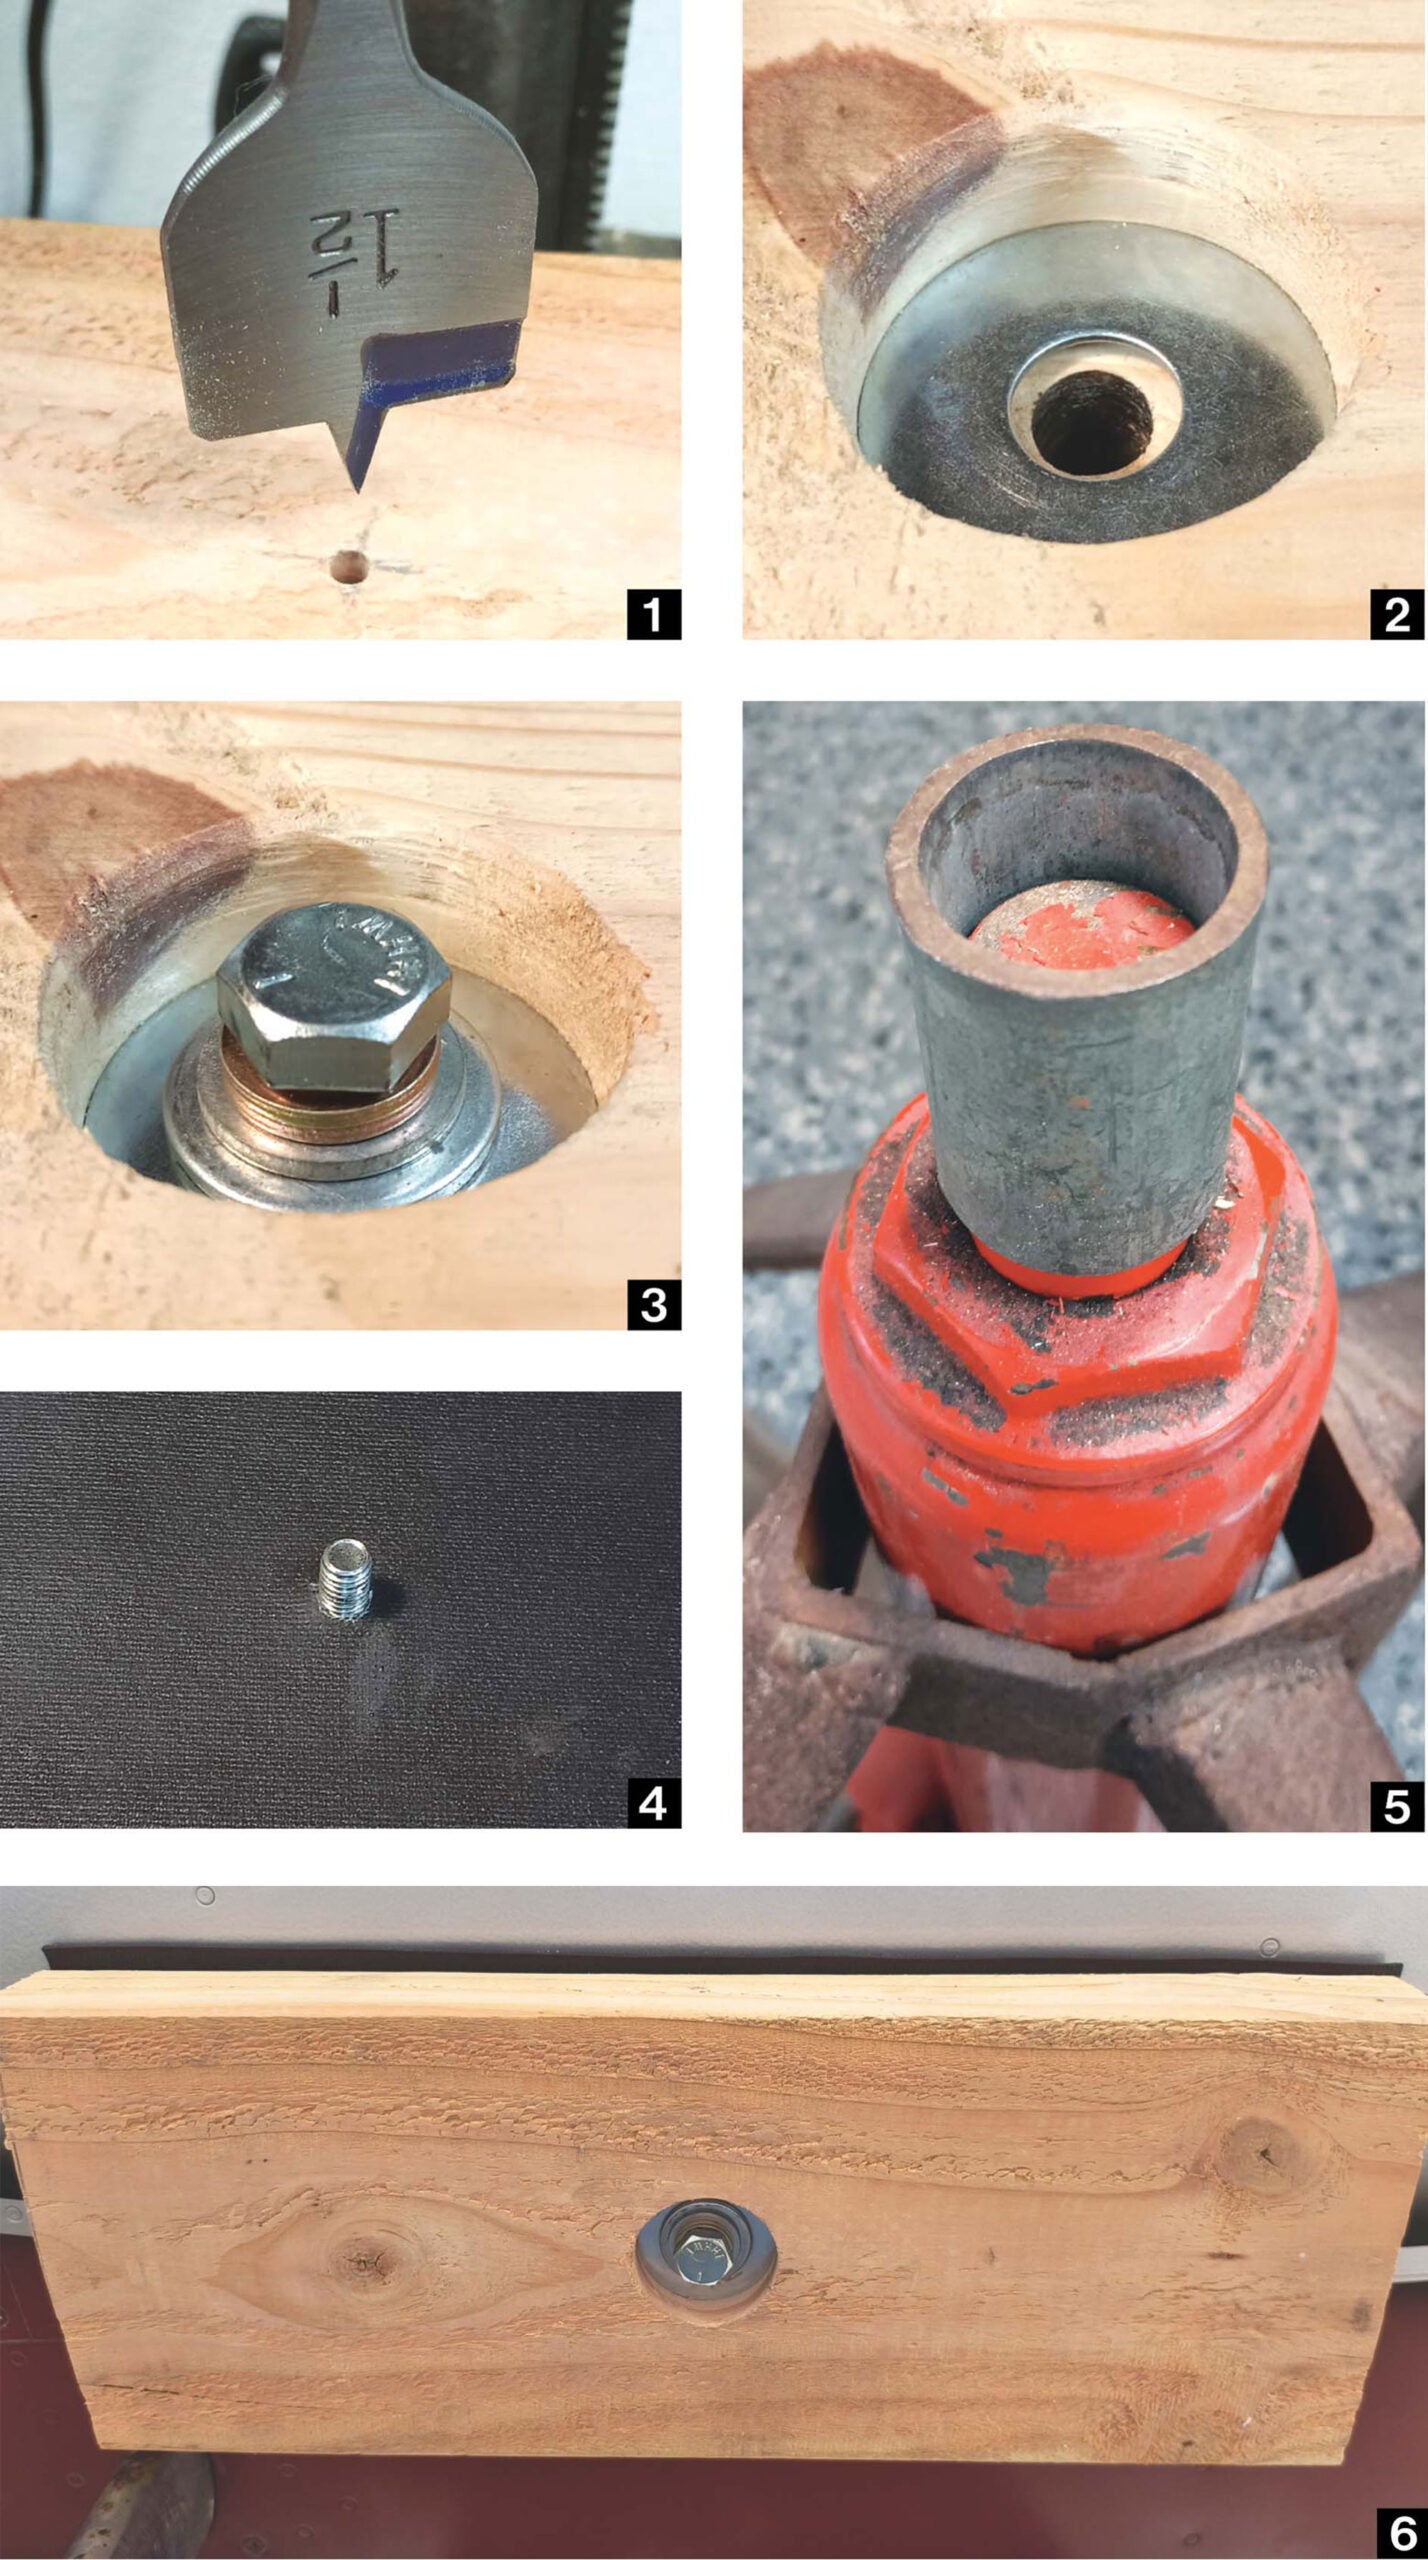
1. Cut a piece of lumber large enough to cover the tie-down point, the wing spar and to span over at least a couple of ribs. I used a scrap piece of two-by-six that is 14 inches long.
2. Drill a hole through the wood where the tie-down anchor is to go. Keep in mind that this will also be where the jack will press up, so if the load is to be evenly distributed, the hole should be fairly close to the center of the board. In my case, the wing tie-down fitting is designed for a 3/8-16 threaded fitting, so the pilot hole in the board was ⅛ inch. Don’t drill up to full size just yet.
3. Using a flat spade bit, cut out a recessed hole in line with the pilot hole. This is the receptacle for the end of the wing jack. It should be deep enough for the end of the jack to be trapped within it, but not so deep as to compromise the strength of the wood when pressing up against the wing. In my case, I used a 1½-inch flat spade bit and drilled into the wood to a depth of 0.55 inch. The small-diameter pilot hole drilled in Step 2 will keep the spade bit centered as it cuts this recess.
4. Now drill out the pilot hole to ⅜ inch.
5. Place a 1½-inch outside diameter penny washer into the recessed hole. This provides a metal surface for the jack to press against and helps to protect the wood block.
6. Stack about four ⅜-inch standard washers under the head of a 2x⅜-inch bolt. This will be used to attach the block to the tie-down fitting. The stack of washers means that the bolt head will protrude well above the penny washer and provides extra assurance for keeping the end of the jack locked into the recess.
7. Place a short tube, with an outer diameter of ¾ inch, over the end of the jack and against the shoulder of the rod portion of the jack. Many floor jacks already come with this tube or a similar recessed attachment that fits into the top of the jack. If your jack is different than this, you may need to modify the block accordingly. The purpose is to provide some kind of recess to accommodate the head of the bolt so that the jack can’t slip off the block and so that it presses against the wooden block, not the head of the bolt. If the jack presses against the head of the bolt, then much of the lifting force will be applied to the wing fitting, which reduces the value of using the block.
8. Cut a piece of tool drawer mat to fit the block. This helps to protect the wing of the airplane. If desired, the mat can be glued to the block, but it won’t go anywhere, even if not glued.
With the block on hand, jacking the airplane is a simple matter of bolting the block to the wing, chocking the wheels of the plane and then lifting the wing with the wing jack, ensuring that the tube on the wing jack fits into the block’s recess and around the protruding bolt head.
For airplanes that have a permanent tie-down loop instead of a threaded fitting, rather than drilling a ⅜-inch hole all the way through in Step 4, a slot can be cut on the wing side of the block so that the block will fit over the existing tie-down loop. The loop then helps to hold the block in place—not to take any weight of the aircraft as it is lifted.
Dollies
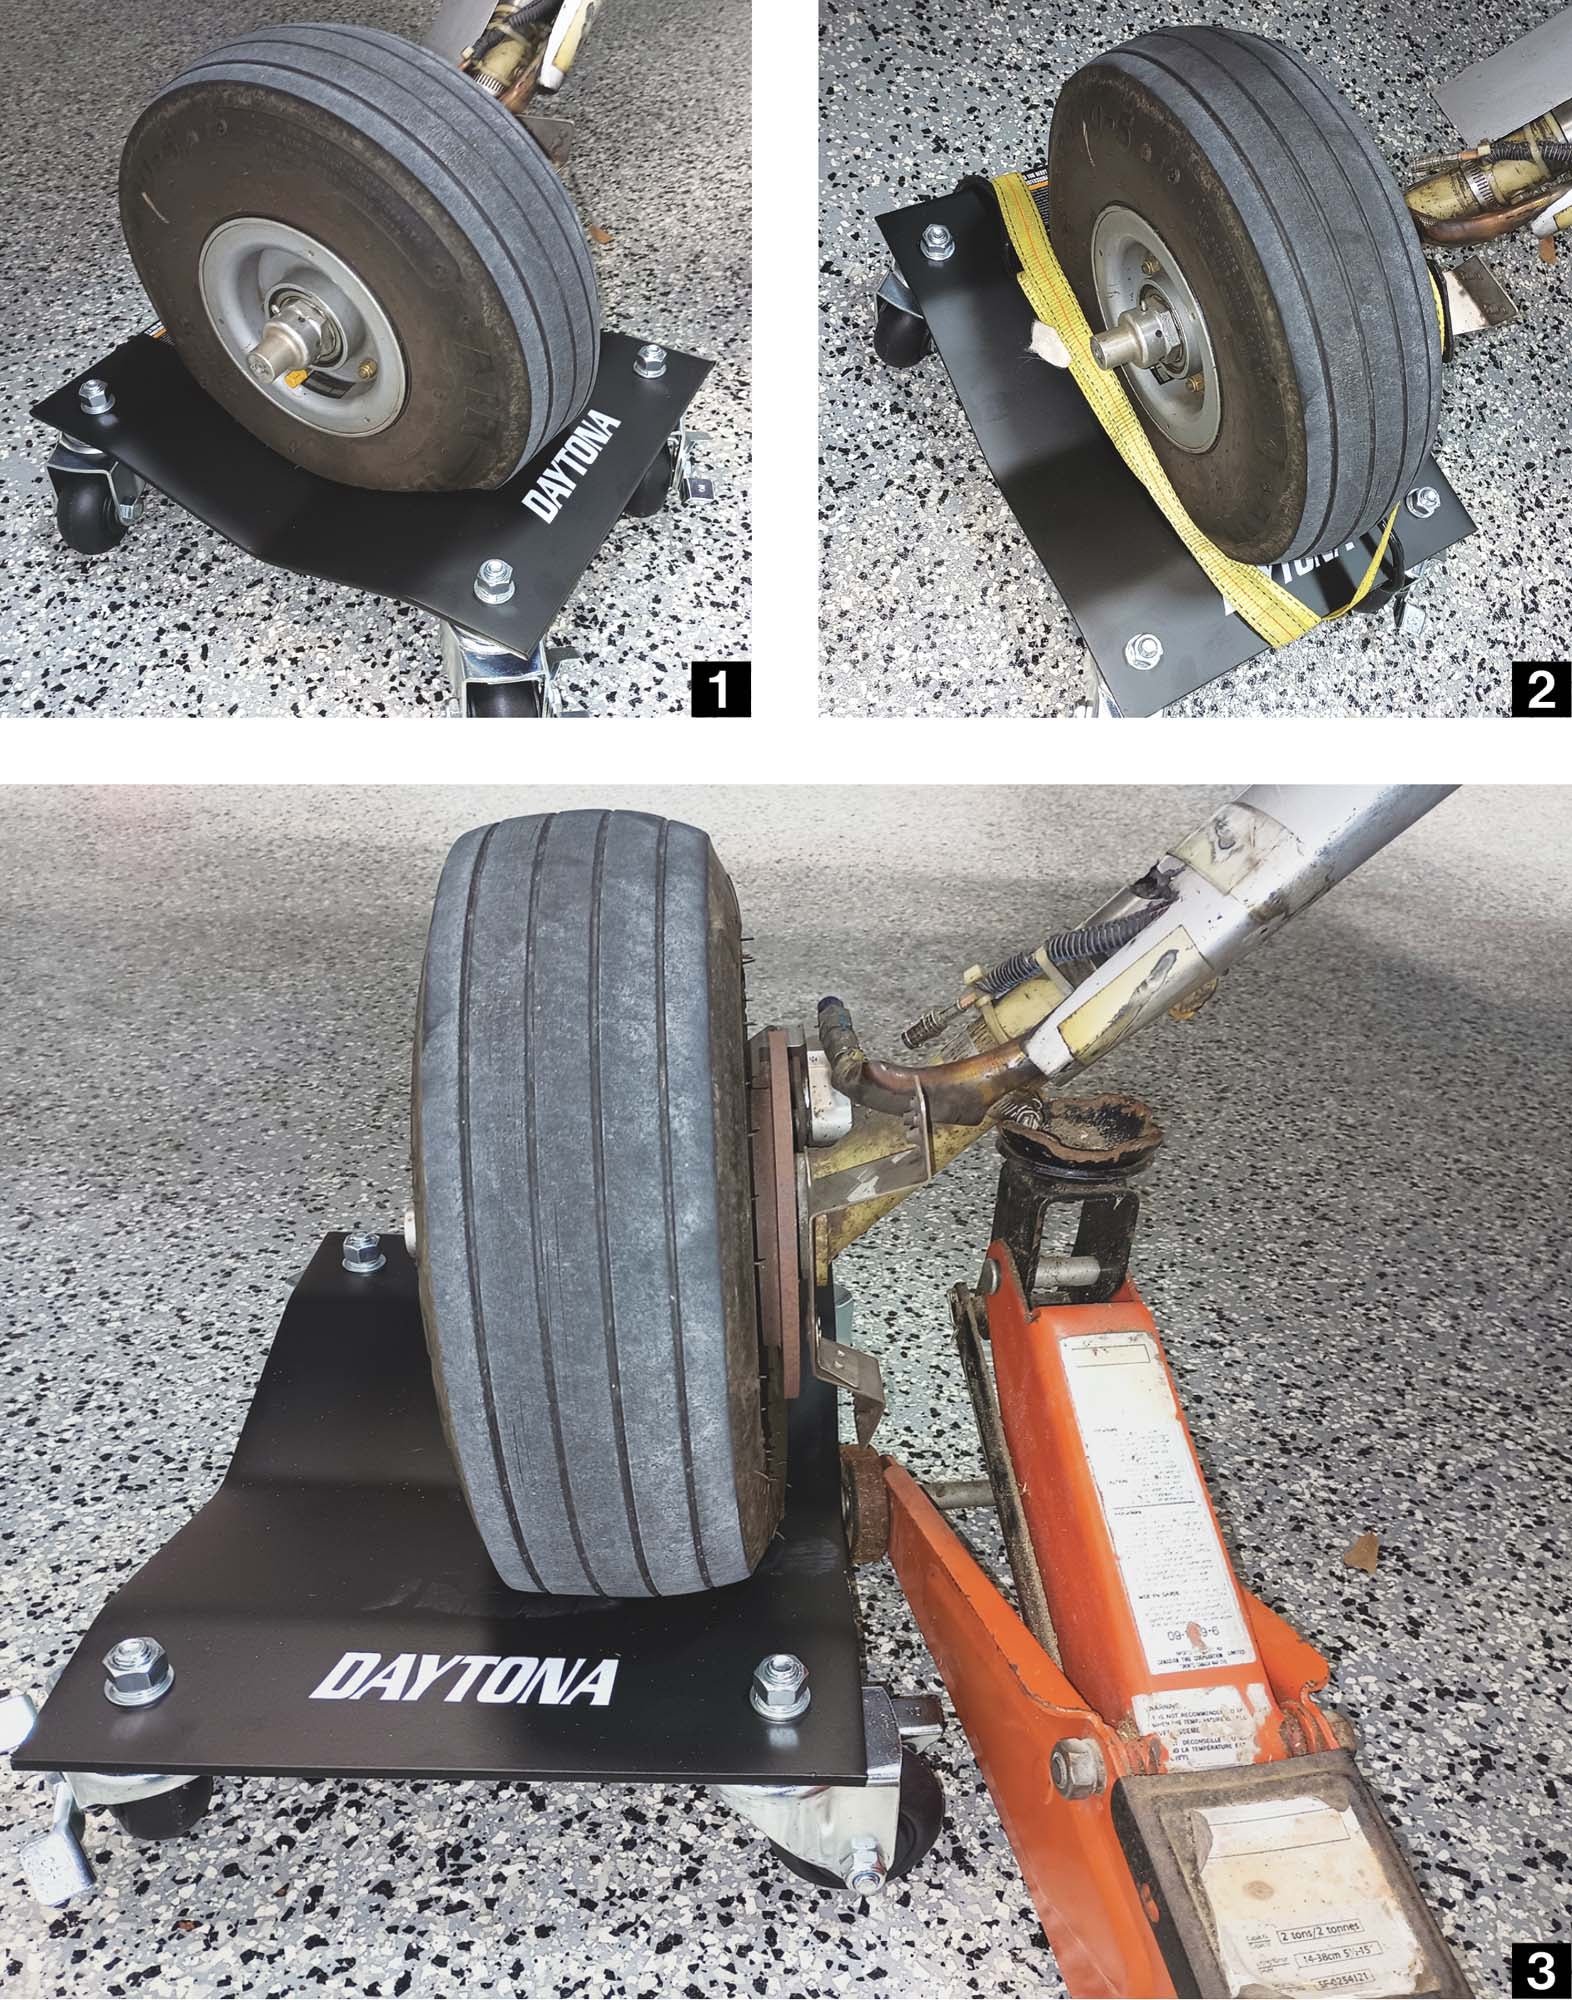
Lifting the airplane alone may be fine if the wheel and tire are to be replaced where the airplane sits. However, if the airplane is stricken on a runway or taxiway, it’s nice to tow it out of the way first. For this, a wheel dolly is required.
Fortunately, the aviation aisle of Harbor Freight has just such a dolly. They are sold in pairs for $80 and each has a capacity of 2500 pounds, which should be more than enough for one wheel on a typical empty GA airplane. These dollies are curved to fit the airplane wheel, but a strap is still advised to secure the wheel to the dolly prior to moving. As an added advantage, the curve of the dolly means that it is not necessary to lift the airplane very high before the dolly will slide underneath. And it so happens that these particular dollies will slide under the wheel of an RV-type aircraft even when using the floor jack/hose clamp combination described earlier. The curve of the dolly clears the wheels of the floor jack (or at least it does on mine). You might want to test yours to confirm it all fits before counting on it to perform in action.
The wheels on these dollies are not very large and may not stand up to rolling for miles over asphalt. However, based on my tests, they should be fine for short distances. And since they are sold in pairs, if one fails, you have a spare.
Bags
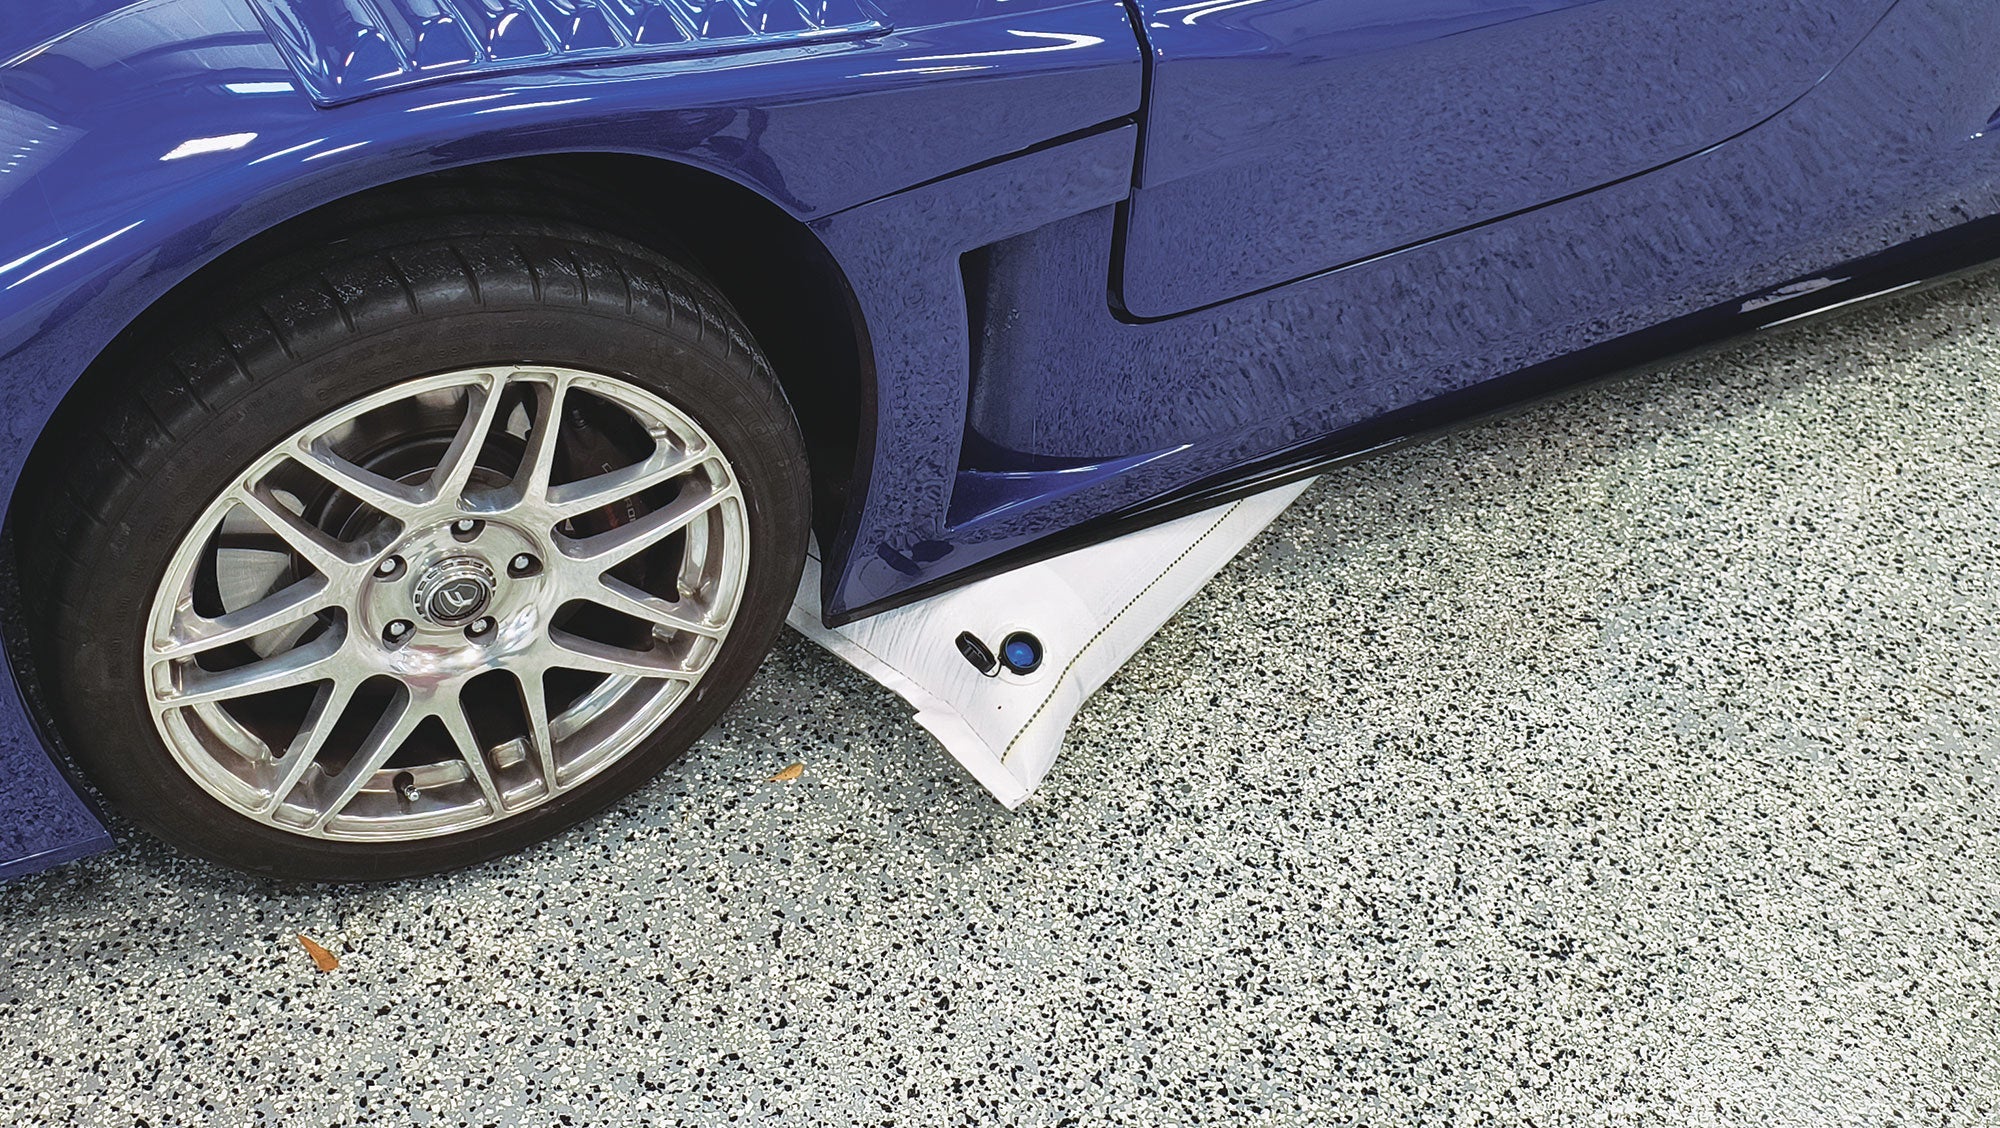
The jack suggestions above have the potential to work when the airplane is still on its wheels, but what if the landing gear itself has failed? This is not very common for fixed gear, but there are several retractable aircraft on my home field. If the gear collapses, the wing is likely to be close to the ground. The typical wing jack will be too long and the floor jack may be too short. However, there is a safe way to lift the airplane without causing damage: air bags.
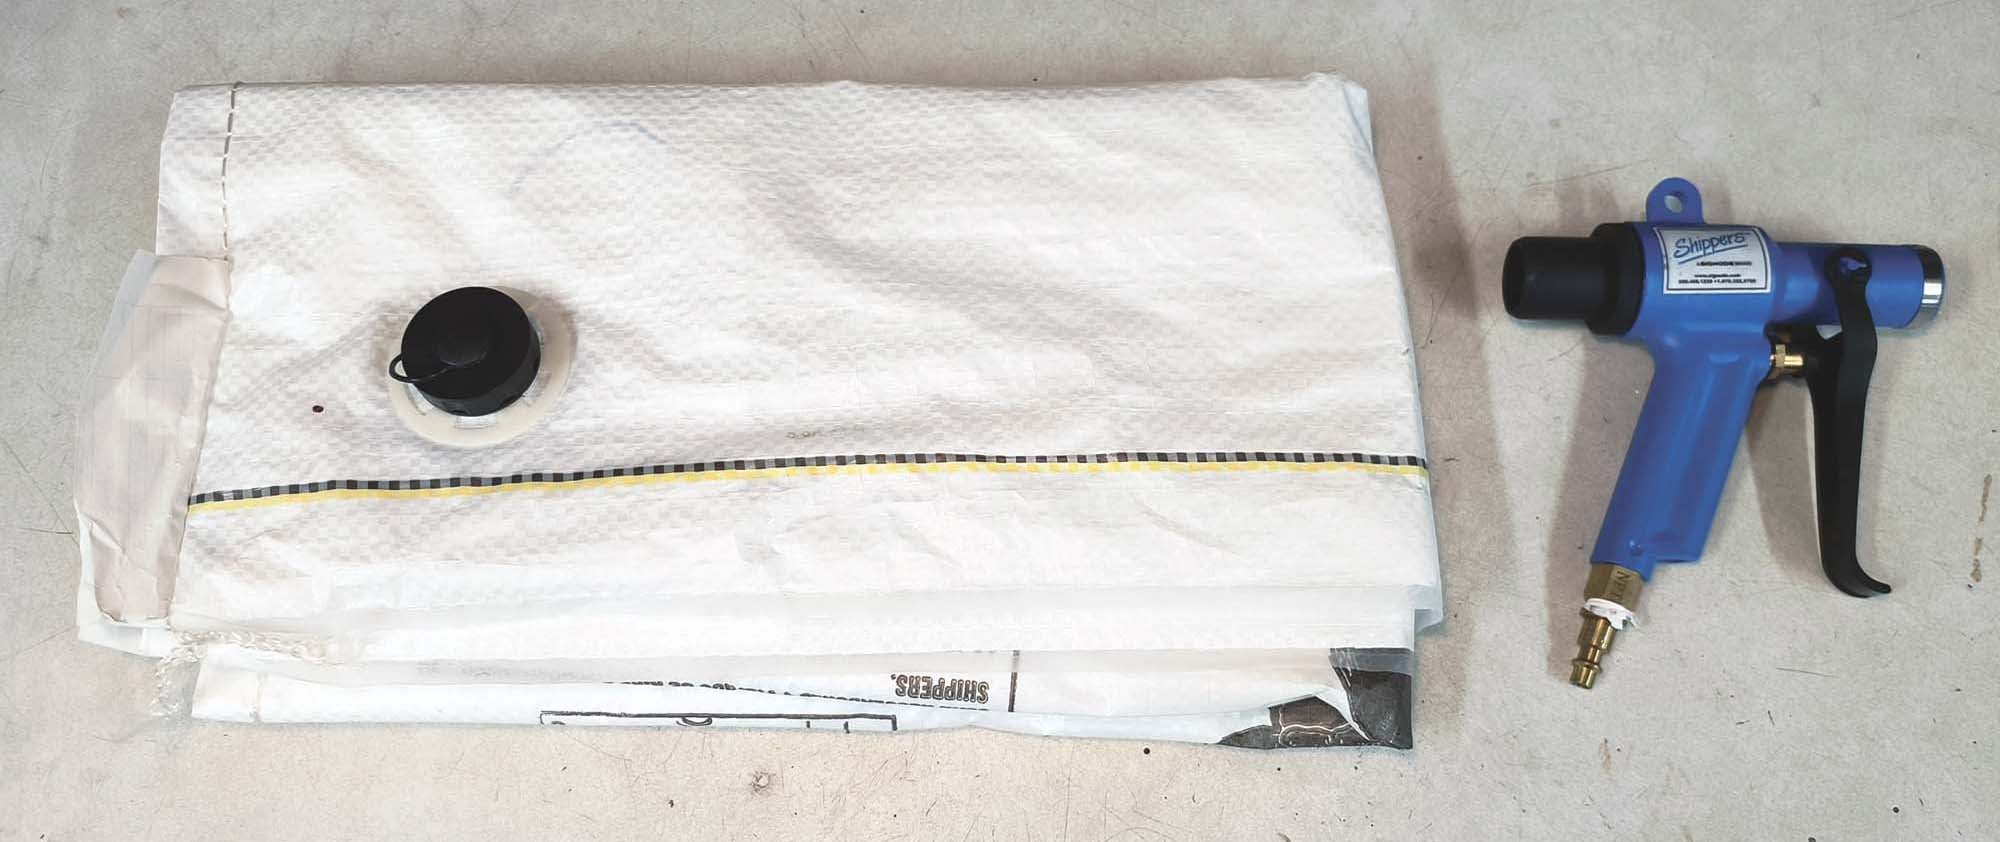
Custom aircraft lifting bags are not very common and are expensive, but there is an alternative. Dunnage bags are prevalent in the shipping industry and are used to secure loose loads in trailers and cargo containers. They are inexpensive and practical to inflate with a portable air compressor. When stacked on top of one another, it may be possible to lift an airplane all the way up to get it back on its gear, or alternately, they could be used to lift the airplane just enough to get a floor or wing jack underneath.
The bags I acquired are designed to be inflated to 2.5 psi. That may not sound like much, but they are 36×36 inches in size, or 1296 square inches. This means each bag is capable of lifting over 3000 pounds, which should be more than sufficient for most GA airplanes.
The inexpensive dunnage inflator is specifically designed for the bags. When connected to an air compressor it uses a venturi effect, which allows for a typical 25-gallon compressor to fill up to five bags before it cycles, making it practical to roll out and use next to a stricken airplane. The bags include a rubber flapper/filler valve so that when the inflator tool is removed the bags automatically seal. Pressing the flapper with a finger allows the bag to deflate, and the gun can be turned around with the venturi end connected to the bag to help draw all the remaining air out. It takes about 6 seconds to inflate each bag to its maximum 16-inch thickness.
The inflator works by using both compressed and ambient air. The applied bag pressure is proportional to the compressed air going into the inflator and provides a maximum of around 1.8 psi bag pressure with 120 psi of shop air pressure. As the bag reaches the 1.8 psi level, the venturi effect stops and the compressed air simply exits the inflator through the venturi inlet. However, as the bag is inflated, the pressure in the compressor falls off quickly. By the time the first bag is nearly full, the applied pressure is probably going to be closer to 1.5 psi. The bags are rated for up to 3 psi, with 2.5 psi being a typical working pressure, so this means a lot of lifting force is being missed with the standard inflator.
If the inflator venturi inlet is capped while filling, there will be no venturi effect and the compressed air will have nowhere to go but into the bag. This allows the bags to be inflated above where the venturi might normally stop, but it needs to be done carefully to avoid rupturing a bag. Fortunately, there is an easy and cheap way to modify the inflator to get more air into the bag while monitoring the pressure at the same time.
To modify the inflator, some hardware store fittings and an inexpensive pressure gauge are required to build a venturi cap. Total cost was about $25.
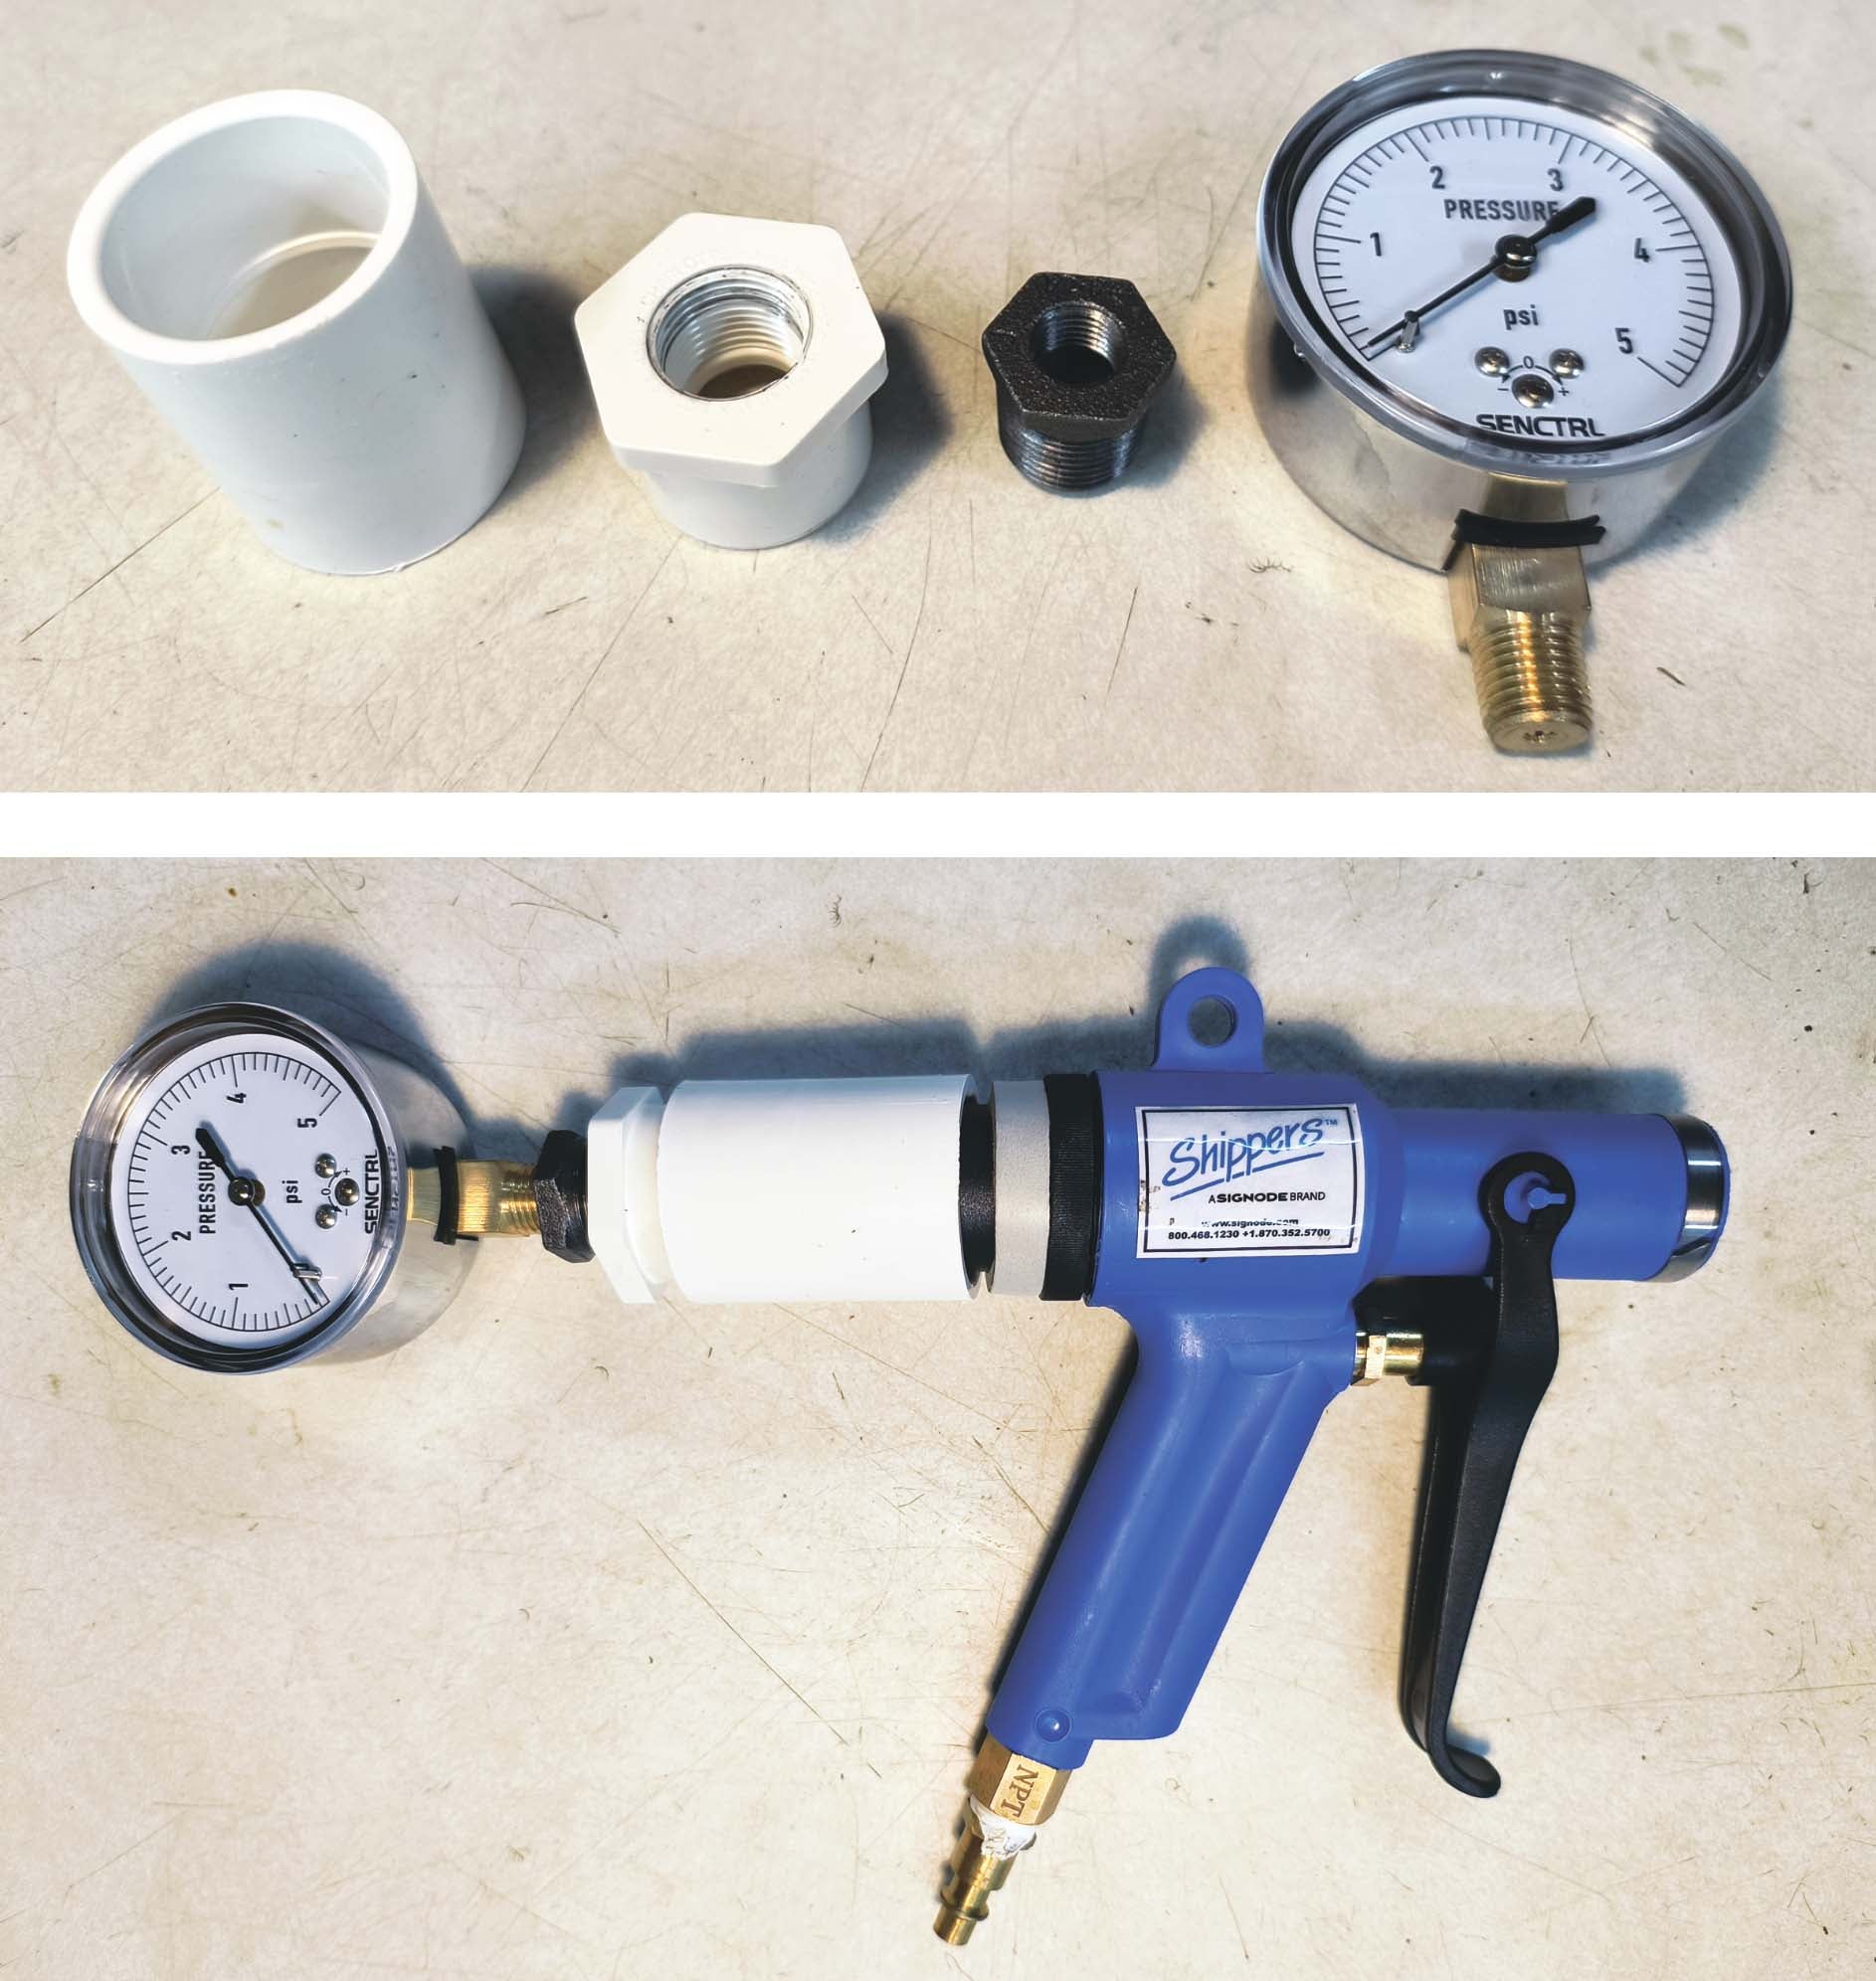
Steps To Build a Venturi Cap
1. Using PVC cement, glue a 1x½-inch PVC bushing into a 1-inch coupler.
2. Thread a metal ½x¼-inch bushing into the PVC bushing.
3. Screw a 0–5 psi pressure gauge with a ¼-inch NPT fitting into the steel bushing.
4. Wrap some weatherstripping around the base of the venturi tube. Secure with thread if necessary.
These steps provide a manually operated cap that can be placed over the venturi and used to monitor bag pressure while inflating. When the cap is pressed into the weatherstripping, it makes for a relatively airtight seal, forcing the compressed air into the bag. Because the pressure in the bag is quite low, it is easy to hold the assembly in place by hand while inflating.
With the venturi cap assembly, getting the bags to a higher pressure is easy. First, fill the bags using the unmodified inflator as normal. Then, when the bags stop inflating, reduce the regulated pressure on the compressor to a reasonable level (e.g., 20 psi), hold the venturi cap over the inflator and press the trigger while watching the pressure gauge. When the desired pressure is reached, release the trigger and remove the inflator. Because of the size of the bags, even though 20 psi is being put in, the rise in overall bag pressure is slow enough to easily control. As the bags are rated for 3 psi, it is probably a good idea to stop when the gauge reads about 2.5 psi.
As a test, I placed a bag under the front corner of a 2500-pound car. With the standard inflator, a single bag lifted the body up a few inches, but not enough to get the wheel off the ground. With the venturi cap, the pressure was raised to 2.3 psi and the wheel came off the ground. This proved the math and physics of the arrangement, but the real test came with lifting an airplane.
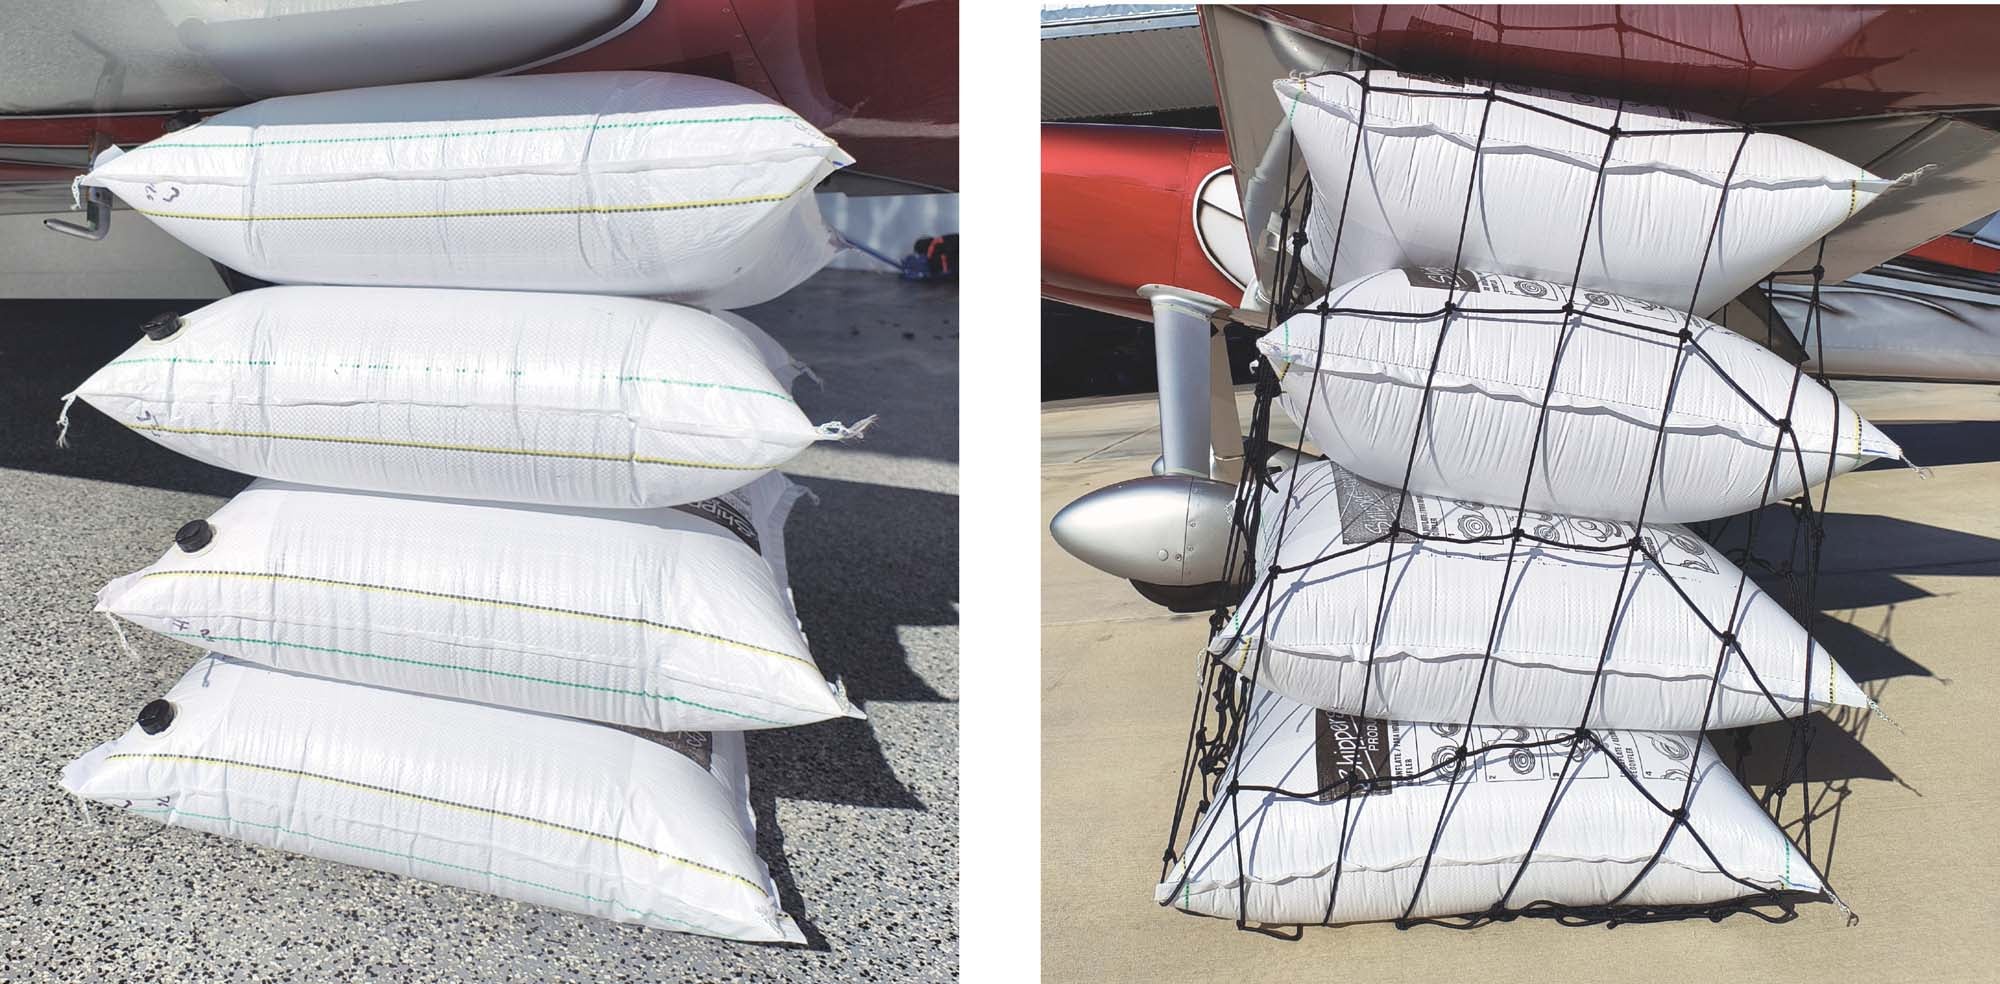
Testing the bags on the F1 Rocket demonstrated their limitation. It took four bags to stack up to the height of the wing and lift the main wheel off the ground. However, the bags are slippery when inflated and the Rocket is a taildragger. With the tailwheel on the ground, the wing sits at a significant angle. Making the assembly work required immobilizing the airplane by placing the tailwheel in soft ground so it wouldn’t roll and then wrapping the bags in bungee cord netting to keep them stacked more or less vertically against the base of the wing. If all that is needed is to raise a stricken wing off the ground far enough to get a jack under it, then one or two bags might suffice and no netting will be necessary. However, as the height increases, the netting is required to keep everything in place. When using netting, place the clasps anywhere other than on top; you don’t want anything hard to press into the bottom skin of the wing.
Warning: Multiple slippery bags stacked on top of one another are not very secure. When using this method, make sure nothing expensive or important is under anything heavy. More than once during the testing, a bag squeezed out from the stack and fired off into the aether, dropping the airplane back on its wheel. Using the netting addressed this problem but caution is still warranted.
The total cost for 10 bags, inflator and venturi cap assembly was under $125.
Shopping List
Bags and Inflators
- 36×36-inch air bags: $70 for 10 on eBay (e.g., Gorilla Series Superflow Level 1)
- Inflator: $25 on eBay (e.g., Shippers Products SF1000)
- 1-inch PVC coupler: $1 at local hardware store
- 1x½-inch PVC bushing: $2 at local hardware store
- ½x¼-inch steel bushing: $2 at local hardware store
- 0–5 psi gauge: lower mount, ¼-inch thread, $22 at Amazon (e.g., SenCtrl)
- Weatherstripping: small piece of leftover scrap or $6 at local hardware store
- Cargo netting: $22 on Amazon (e.g., cargo net for pickup stretches to 6×8 feet)
Dollies and Blocks, Etc.
- Dolly: 2500-pound capacity, $80 at Harbor Freight (e.g., Daytona)
- Tray liner: $7 at Harbor Freight (e.g., U.S. General)
- 2×6-inch lumber: leftover scrap or local hardware store
- ¾-inch O.D. steel pipe: leftover scrap or local hardware store
- Rope or luggage strap: whatever is handy or Harbor Freight/hardware store
Tools and Supplies
- 9/16-inch socket (to screw in the lifting block)
- PVC cement (for venturi cap assembly)
- Air compressor
- Wing jack or floor jack


In our experience, the plastic dolly wheels only lasted about 3000 feet on asphalt when trying to retrieve an Extra with a flat right tire. Unfortunately, it was about 4000 feet back to the hanger. I’m still looking for a better wheel or a better dolly for retrieval.