“If you need it to keep you in the air, you should not be buying it at your local hardware store or home center.”
Let’s get this out of the way first. Aircraft fasteners work best for aircraft needs, especially for anything that keeps you in the air. Certain automotive fasteners may work better for specialty interior items, but otherwise, AN nuts, bolts, washers, cotter pins, screws, and rivets bought from a reputable aviation vendor are best. Maintenance time presents the owner with a new opportunity to consider the value of aviation hardware installed to aviation standards. This is the time to take a hard look at any deficiencies in that regard and bring them up to snuff. If you need it to keep you in the air, you should not be buying it at your local hardware store or home center.
Bolts
Grade 8 bolts, such as you may find at the hardware store, are not equal to AN aircraft bolts. They may have the same gold color, but the composition of the metal and other important specifications are not the same. A good way to tell a grade eight bolt from an AN bolt is to look at the length of the threads. The threaded portion of an AN bolt is typically much shorter and the markings on the head are different. For a good description of aircraft bolt markings, please see Chapter 7 of Advisory Circular AC 43.13-1B, a book that every amateur airplane builder should have in his or her library.
Grade 8 bolts are not equivalent to aircraft bolts. On the left is a 1/4-28 Grade 8 bolt, and on the right is an AN4 aircraft bolt. Note the much shorter threaded portion on the AN bolt.
There are some specialty bolts that you may come across for special applications. Eye bolts sized from AN42 (3/16 inch) to AN46 (3/8 inch) can come in handy for creating tie-down points. AN173, AN174, and similar bolts are available with actual diameters that produce a close tolerance or zero-clearance fit. NAS bolts have extra strength. If your aircraft design calls for one of these special bolts, do not be tempted to substitute a regular bolt in its place.
Bolts need to be replaced when their plating has worn off, when it becomes at all difficult to thread on a nut, or when there is any damage to the unthreaded grip area. Another good rule of thumb is to replace a bolt with a shorter one if you need more than 1/8 inch of washers anywhere on the bolt to make it work.
Not more than four threads should project beyond the end of a standard AN365 nut. This nut with six threads showing is bottomed out on the shank of an AN4 bolt. This situation could easily lead to a failure of the bolt or the item being secured.
AN bolts come in length increments of 1/8 inch. These bolts start with a grip length of 1/16 inch (AN3-3A for example) and with each increase in number grow 1/8 inch longer. Thus an AN4-11A bolt is 1/8 inch longer than an AN4-10A bolt. Two standard AN960 washers equal the same 1/8 inch.
Nuts
Nuts and bolts work together as a team to take on many different tasks, but these different tasks often require different kinds of nuts. The basic aircraft nut is the AN365 stop nut. It features a nylon insert that keeps it from loosening after installation and is readily available in sizes ranging from #4 to ¾ inch, (with designations AN365-440 and AN365-1216A respectively) to match standard AN bolts. Look-alikes are often available at your favorite hardware store, but they are not the same. A thin version for use where the bolt is in shear carries the designation AN364. They should not be used where there is any load that tends to pull the bolt along its length.
All-metal stop nuts are best for firewall-forward applications where temperatures are likely to be above 250° F. The two nuts on the left are MS21042 nuts; the others are AN363 nuts.
In areas where temperatures are high, such as firewall-forward installations, it is better to use an all-metal AN363 stop nut. As an alternative you can also use the less common MS21042 nut. These nuts are smaller but develop the same strength as the AN363 nuts.
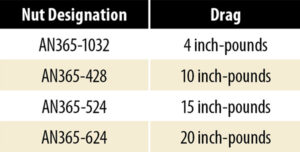
 The question often arises, “Do I need to adjust the torque to compensate for the nylon insert drag?” The answer is yes. The torque used to overcome the drag of the locking insert does nothing to tighten the nut you are using. Here are some drag numbers derived from testing a number of new stop nuts.
Another question is, “When should I replace a stop nut?” Some mechanics say if you can turn a stop nut by hand it is time to replace it. While it is certainly true that you should replace any stop nut that can be turned by hand, it is also true that the locking insert needs to apply a lot more drag than that, especially for larger nuts. Most people cannot exert more than about 5 inch-pounds of torque with their bare hand. The real rule is that you should replace a stop nut whenever there is a reduction in the drag or locking power of the nut. Unfortunately, there is a reduction in drag every time you reuse a stop nut. The practical answer is, do not reuse stop nuts for critical installations, and replace other stop nuts whenever there is a noticeable reduction in drag as you tighten the nut. The bottom line is that nuts are cheap, but the trouble they can cause if they fail may be quite costly.
Castle nuts are best for any application where there is going to be rotation, such as this Cub aileron control. Be sure that the down-side tail of the cotter pins does not interfere with the rotation and that the up-side tail extends to at least the center of the bolt being secured.
Castle nuts work best on bolts where there is possible rotation such as on control linkages. The standard castle nut is the AN310, but a thin shear-only version called AN320 is also available. Castle nuts obviously require cotter pins to work properly. When tightening castle nuts, always start by applying the minimum torque and then tighten to line up the cotter pin hole with the slots in the nut.
Cotter pins secure castle nuts or clevis pins. For clevis pins the cotter pin is typically wrapped around the sides of the pin, but with castle nuts the cotter pin folds up around the end of the bolt.
Cotter pins are usually installed with the legs of the cotter pin perpendicular to the axis of clevis pins but parallel to the axis of bolts. The legs of the cotter pin should extend to at least the centerline of the clevis pin as they wrap around the end. In a nut-and-bolt installation, the top leg of the cotter pin should wrap over the end of the bolt to at least the centerline of the bolt, and the bottom leg should be cut off just short of flush with the bottom surface of the castle nut. Cotter pins should in all cases be regarded as non-reusable.
Another handy nut is the AN315 check nut or jam nut, which also comes in a thin version, designated AN316. These nuts work by jamming another nut or threaded clevis when you tighten them against each other. Jam nuts also work well to remove threaded studs.
Anchor nuts or nut plates work really well for places where it is going to be difficult to access the bolt and the nut at the same time for maintenance or repairs. On the left are some K1000 fixed anchor nuts, and on the right are some F5000 floating anchor nuts.
In areas where access to the nut is restricted or merely inconvenient, an anchor nut or nut plate can solve the problem. These come in a variety of shapes and sizes, some of the more common ones being the K1000 fixed anchor nut and the F500 floating anchor nut. They are typically riveted into place with 3/32-inch flush rivets. All anchor nuts should be replaced as soon as their locking action begins to be compromised. They do not have an infinite life.
All nuts should have a minimum of one complete thread exposed beyond the end of the nut, but no more than four threads exposed. With too many threads showing, it is likely that the nut is bottoming out on the end of the threads, rather than the item being held together by the nut and bolt.
Torque
For a bolt to produce the holding force for which it was designed it must be properly tightened. There are more precise ways than torque to determine a bolt’s tightness, but torque is still the universal standard used by aviation mechanics. AC43.13-1B and other aviation mechanic handbooks list torque values for fine and coarse thread nuts and bolts. Use these values unless the manufacturer of the item in question specifies something else.
Please note that engine and propeller manufacturers will always have recommended torques for nuts and bolts used to assemble and install their products. Be sure to consult them for the proper torque values and do not rely on generic tables.
Another important point regarding torque numbers is that generic tables provide torques for clean, dry (no oil or anti-seize compound) nuts and bolts. Lubricants and anti-seize compounds will alter the tightness of nuts and bolts tightened to any particular torque value. Engine and propeller bolt torques will be based on assembly as per the manufacturer’s recommendations, which may—or may not—be with dry threads. You must look to the manufacturer’s literature to determine whether or not a particular bolt torque is based on assembly with a lubricant, anti-seize, or dry.
One last point on torques. You will notice on the generic torque tables that there are two values listed for each bolt diameter and thread combination—one for shear and one for tension. The shear value assumes the use of a shear (thin) nut such as an AN364 nut and that the bolt has a load that is perpendicular to its length, in other words, the load is trying to shear the bolt in two. This will be a lower value than the tension value because the thin shear nut has less ability to hold a load. The tension values will be based on using AN365 or other similar tension or standard nuts. In addition to the shear and tension values, there will be separate tables for values for fine and course threads. Standard AN bolts have fine threads, thus the fine thread values should be used. Be sure to use the correct torque for the nut and bolt you are tightening.
Damaged Threads
You should always be able to start the threads of a nut or bolt by hand. If you cannot, you need to find out why. Undamaged threads should easily engage and begin to turn until they hit the stop portion of the nut. The best solution to hard-starting nuts and bolts is usually to simply replace them, but there are times when this could be extremely difficult or expensive. For these instances it is important not to grab a simple machinist’s tap or die and recut the threads. There are taps and dies made just for restoring threads that are designed not to remove material but to merely straighten it. These are often called rethreading or thread chasing taps and dies. A serious mechanic should invest in a set of these tools for the more common aircraft sizes.
Thread chasing taps and dies (left) are best for repairing threads. Machinist taps and dies (right) are for cutting new threads. They are different tools for different jobs.
Even when using the proper thread restoration tools, care should be taken when working on nut plates or anchor nuts. You must never cut into the anchor part of the threads. This will destroy the locking feature and make the part worthless.
Always inspect fasteners before reusing them to avoid causing harm to undamaged parts. And remember, whenever possible simply replace any fastener that has any damage to its threads. Big problems often start when mechanics try to simply push their way through little problems.
Washers
The standard aircraft washer is the AN960 flat washer. It is 1/16-inch thick, so that when two of them are added together they equal a one number bolt length. AN960L washers are one-half the thickness of standard washers. Use aluminum washers against aluminum surfaces and steel washers against steel surfaces. No bolt should have more than 1/8 inch of washers on it. If it does, it is time to get a shorter bolt.
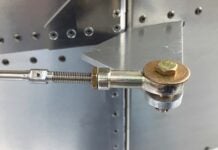
Use a large AN970 washer over rod ends such as this throttle linkage to protect against the rod end failing and coming completely off the bolt.
For applications requiring a large diameter washer, the AN970 fills the bill. Tinnerman washers come in handy when placing screws through fiberglass, and finishing washers make for a neater installation of interior items.
Internal star lock washers (MS35333) are commonly found on Lycoming exhaust systems. They fit between the AN960 washer and the nut. These lock washers are single-use items.
Lock washers are not too common on aircraft except on engines. The most popular lock washer is the MS35333 internal star washer, but you can also get external star lock washers (MS35335) or split washers (MS35338). The most common application for lock washers is in conjunction with exhaust system nuts. In these applications lock washers should be regarded as single-use items and replaced each time they are removed. Use a thin, protective washer under the lock washer to protect the surface below, especially if the attached item is aluminum. Never use lock washers on nuts where there will be rotation, such as control ends.
Rivets
Standard AN rivets should be replaced with the same whenever possible, but sometimes it is nearly impossible, or at least very difficult to do so. For such instances, and certainly wherever originally specified, pull rivets (also called pop rivets) can come in very handy. This is another instance where hardware store rivets should be avoided for any structural items. For these applications Cherry Aerospace rivets come in two varieties that can meet most aviation rivet needs. The less expensive “Q” rivets can substitute directly for AN rivets of the same diameter in many applications, but where maximum shear strength is critical, it will be necessary to increase the size or go to the more expensive and stronger CherryMAX rivets. If these rivets are being used for structural repairs or as substitutes for AN rivets, it is best to double-check with the kit or plans designer to be sure of their suitability. For things like attaching baffle seals, or for interior items, there are a number of non-structural pull rivets available from your local hardware store or from aviation vendors. Just be sure to not cut corners on any structural rivets.
Various pull rivets can come in quite handy when it is difficult or impossible to buck a conventional rivet. From left to right: low strength, non-structural rivets; Cherry ‘Q’ rivets; and CherryMax rivets. Above are some washers especially designed to work with rivets.
Choose Wisely
Aircraft fasteners have come to be what they are today through many years of experience, some of it tragic. The result is a system of nuts, bolts, washers, rivets, and such that work pretty well. Unless there is a really good reason not to, using certified aviation hardware is the best way to go. As you work on your airplane, please keep that in mind—and don’t be reluctant to throw out any fasteners that no longer measure up to new standards.


Our tests on the landing gear hardware supplied with the RV-8, and other similar hardware, showed that MS20142 nuts are substantially weaker in tension than full-hex nuts such as the AN363 and MS21045. So I would suggest caution in substituting MS21042s for AN363s.
https://vansairforce.net/community/showthread.php?t=42630