One of the most common questions I get: What is the difference between the Zenith 750 Super Duty and the 750 Super Duty Xtreme (SDX) I’m building? Basically: What makes this 750 SD “Xtreme”? The short answer to this is: The crazy builder (me) is taking everything about this build way too far. A better answer might be that the 750 SDX is still evolving. But I have decided it is time to make a list because there are many ideas and customizations I want to do with this airplane that will make it unique and, hopefully, better for my personal missions. Here’s the list.
Extreme Power to Weight
This one is simplified mainly by ULPower. Remember that the base Zenith CH 750 Super Duty has been flown with a lot of different engines; the biggest the factory tested was the 205-hp IO-375 from Titan. With turbocharging, my ULPower installation will have 220-plus horsepower, which is fine by itself. But the weight savings program I’ve been working on throughout the build will help with the other part of the power-to-weight equation.
The weight trimmings, such as all of the scalloping, additional lightening holes and plenty of extra shaving weight on the entire airplane kit, should help. As will the several customized or modified components, such as the scratchbuilt engine mount that is shorter and lighter than the commercially available mounts for this particular airplane/engine combination.
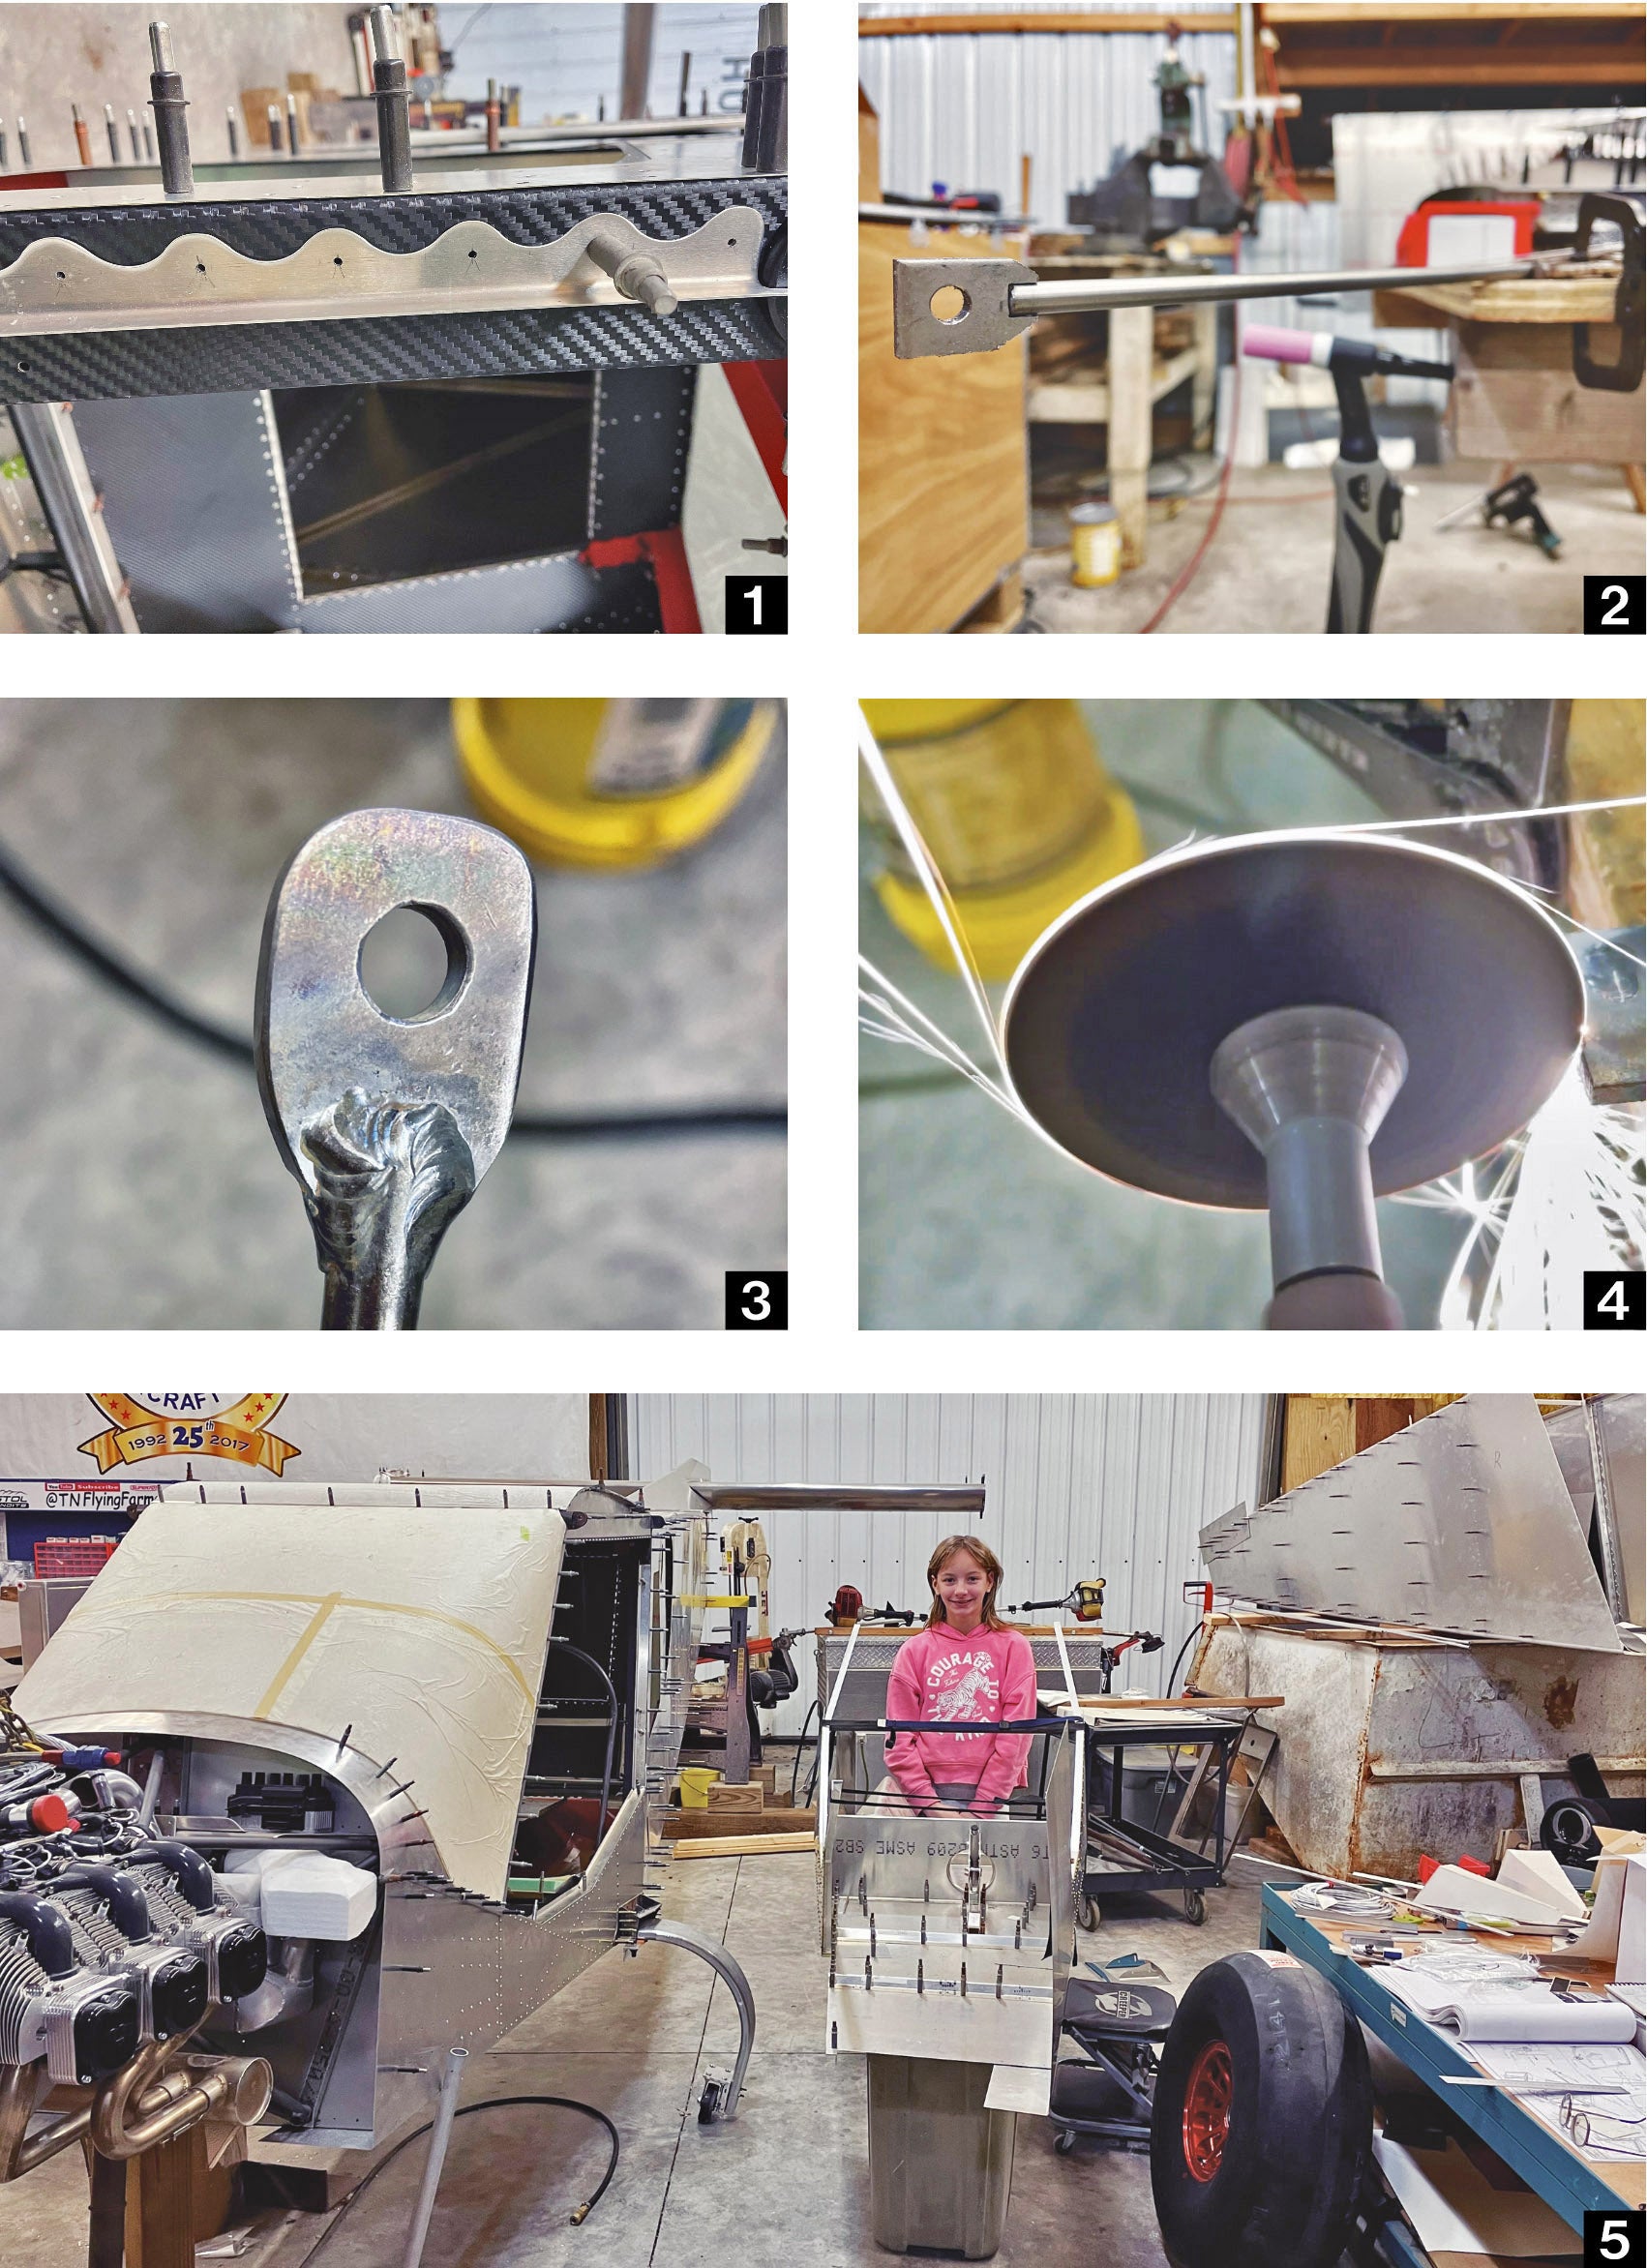
I also mentioned in the last article that I was looking to try my hand with some titanium parts. Progress on my first experience with fabricating and welding the lightweight titanium has been good. I actually enjoy TIG welding titanium and am considering investing in the Argon gas purge setup that is required for welding titanium tubes. The first components I fabricated and welded using titanium were the steering rods for the nose gear strut. These rods are fairly simple, with two required pieces—a plate that is cut, drilled and welded to a 5/16-inch round rod to be threaded on the opposite end for installation of a standard rod end bearing.
While titanium is unique to work with, it is also a tough metal that requires special treatment with hand fabrication. For instance, the threading of titanium has proved to be a challenge and it seems similar to a few stainless metals I have worked with. The threading die has to be hard and tough to survive cutting into titanium. Plenty of oil is needed to help prevent seizing while being worked. I also quickly noticed that the titanium sparks coming from grinding, sanding or abrading the metal are very bright and white in color. After a little more research, I found out that titanium dust can be flammable, kind of like magnesium.
These finished titanium pieces, when compared to the factory chrome-moly components, are roughly half the weight, which doesn’t realistically add up to much when you are just looking at a few small pieces. However, I do hope to replace several of the control rods and some of the main gear bolts with titanium and the best I can figure, the total weight savings should add up to around 5 pounds.
Extreme Visibility
With my previous build, the Super701 (a standard kit in this regard), the visibility was already one of the big highlights, especially when taking passengers who are always amazed by the unobstructed views offered by the bubble doors and side-by-side seating. I knew from the start that I wanted to improve this 750 SDX even more than what the Zenith kits already offer in their stock form. I have been doing plenty of extra trimming around the windshield and plan to eliminate the door vents, which will both help add to the level of visibility.
The windshield trimming has been a very tedious and time-consuming task. I have been trying to get everything fitted up as nicely as possible, and this required the use of a handheld heat gun to help stress-relieve the windshield where it attaches to the cabin frame. I am also completely removing the standard instrument panel and building a custom center pod-style panel to open up visibility even more.
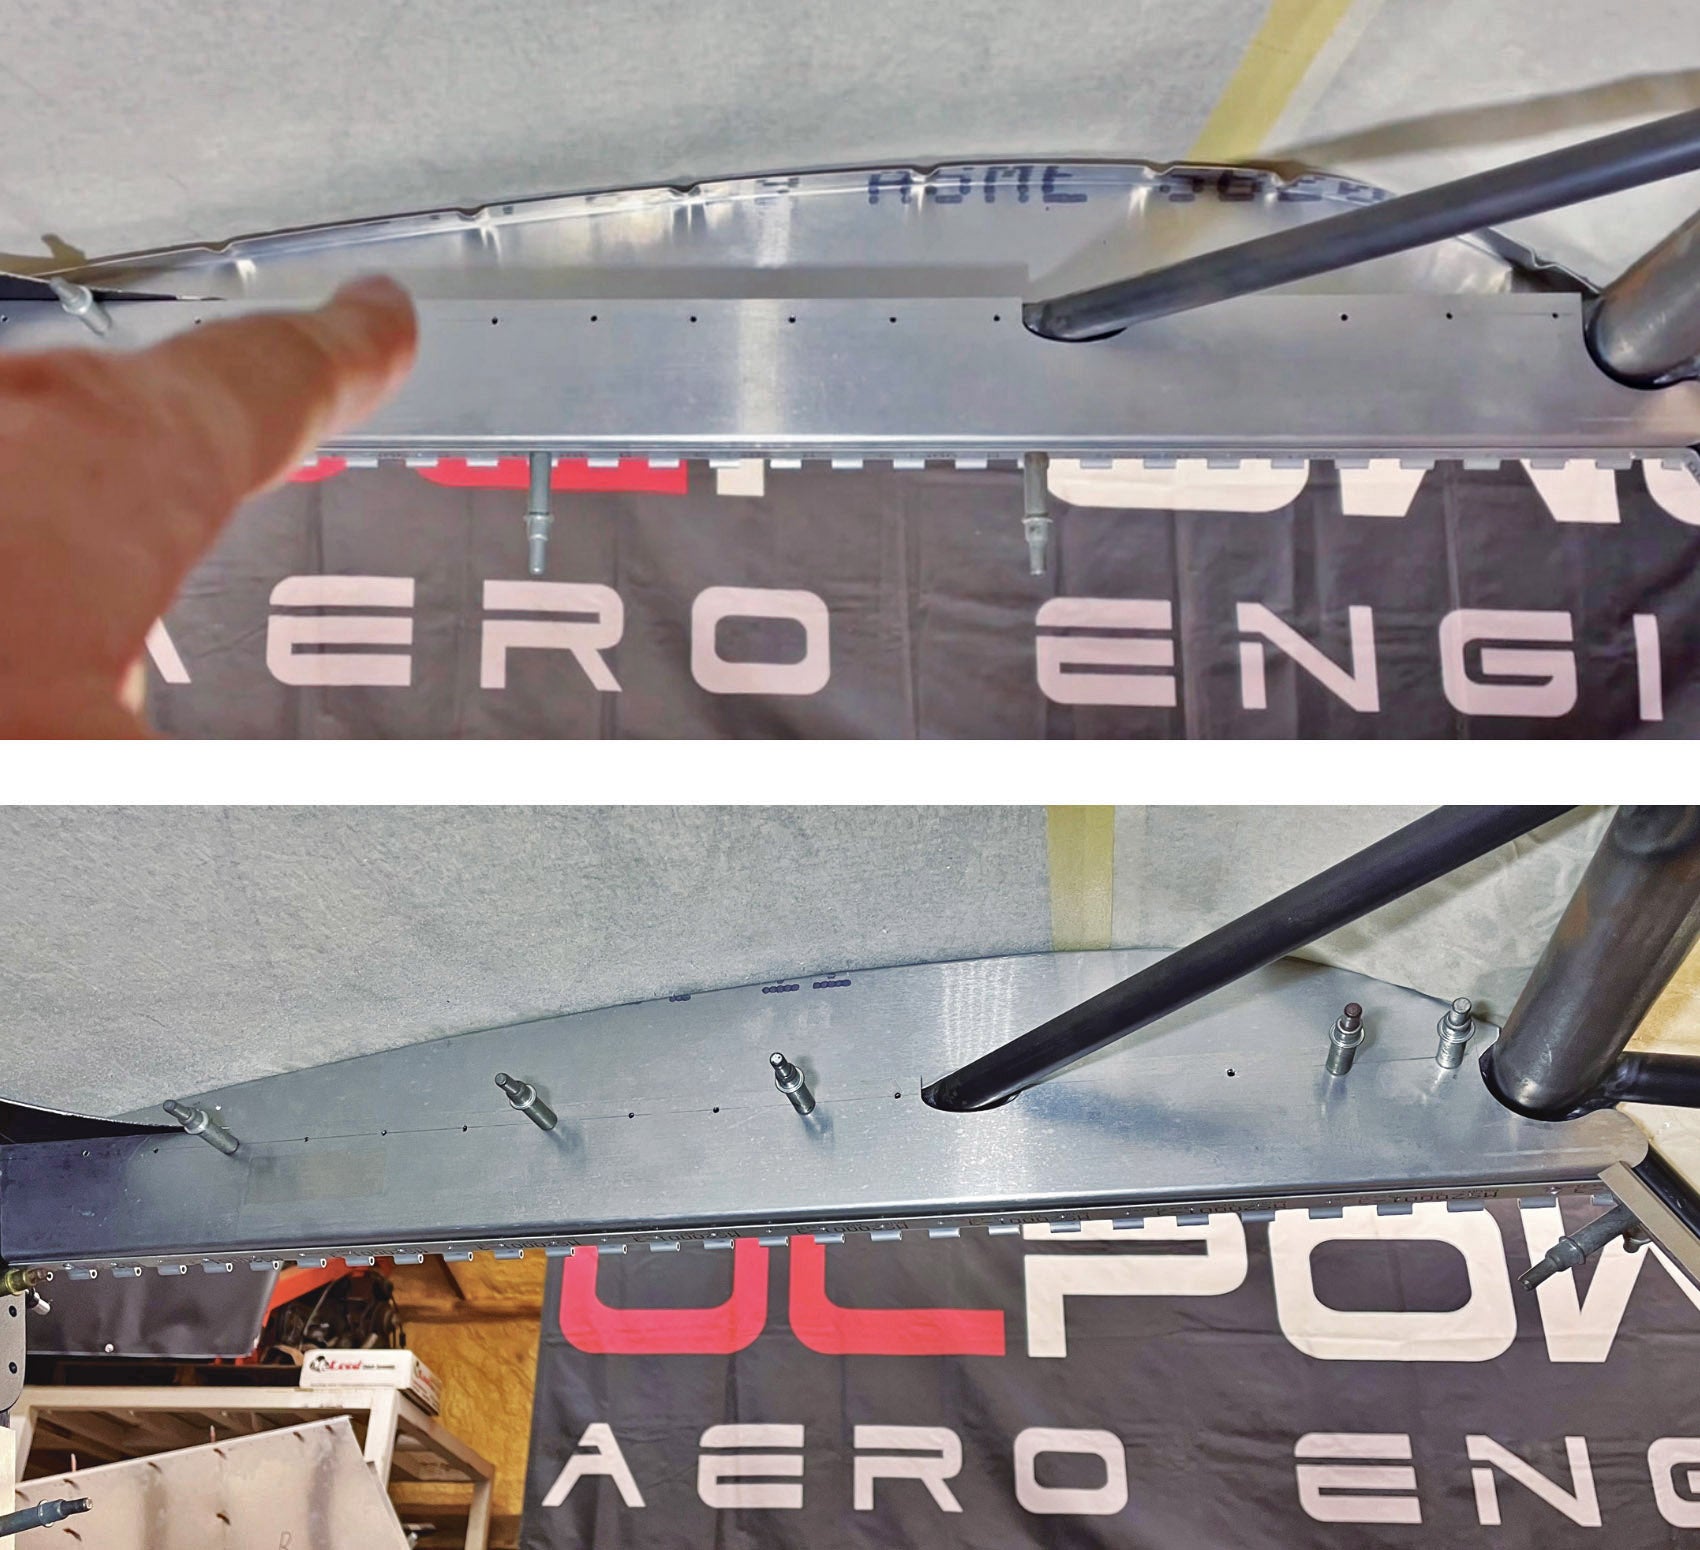
Along with all of this, I have started working on the top window. One of the things I quickly noticed was a visibility obstruction with the trim piece that joins the top window to the windshield and helps secure both to the top tube of the cabin frame. The trim piece is just a strip of aluminum with a bent angle that runs from side to side. The back and top of the windshield attaches to the front of this trim and is directly attached with fasteners to the cabin frame, then the top window is attached to the rear flange of the angle. This is all very simple and robust but the rear flange does protrude into the line of sight if you are looking up and forward through the top window. I know from my flying style and attitudes with the Super701 that I will be utilizing the top window’s visibility regularly, so I want to remove visual obstacles there as well.
As with many other modified parts, I opted to make more modifications here. It starts with using the heat gun, along with clamps and straight edges, to put a slight extra bend in the front of the top window so it will fit underneath the back of the windshield and directly attach to the cabin frame with the windshield instead of attaching separately to the trim. This allows me to eliminate the rear flange of the trim that protrudes and blocks a small part of the view out the top window.

Extreme Clean
The Super701 has been dubbed “one of the nicest 701s ever built,” and I believe this was achieved by the attention to detail. I am taking even more time with the 750 SDX build to be sure each part is smoothly finished with rounded corners and nicely trimmed and fitted parts. I do not want anyone to be able to find any rough corners or jagged/sharp edges.
One of my latest “aha” moments occurred while I was sitting inside the plane looking at the top window and the ribs, which create a slight bubble overhead. These ribs are usually mounted to the outside of the cabin frame tubes with the smooth side facing outward. Well, the outward (smooth) side of this rib is completely covered by the wing, but the inside of the rib is exposed to the cabin area with an obvious step, crimps and window fasteners all left in full view. The step, which leaves a slightly recessed “shelf,” is often used by builders to route wiring, etc. This is probably completely unnoticed by most onlookers/passengers, but for the Xtreme clean look I am trying to achieve, this was just unacceptable for me.
So here we go with yet another modification. I am taking the ribs and swapping sides with them on the cabin, mounting them to the inside of the cabin frame instead of the outside. This leaves a perfectly flat/smooth surface when going from the upper door sill to the top window rib, and it also eliminates being able to see the rib crimps as well as the top window fasteners. I have not seen another Zenith built with this modification, but I have already received a comment from a fellow builder who said, “Dang it! Once you see this improvement, you can’t un-see it.”
Extreme(ly) Switchless
Going along with the extreme clean is also the switchless panel. With the Garmin G3X being the center of attention in the cabin, I intend for this panel and the exposed parts of the control system to be as manicured and simple as any airplane could possibly be. The center pod/panel is coming along nicely after a considerable amount of time spent meticulously trimming and fitting it all up. I am very happy with the results so far and I think it will be unique.
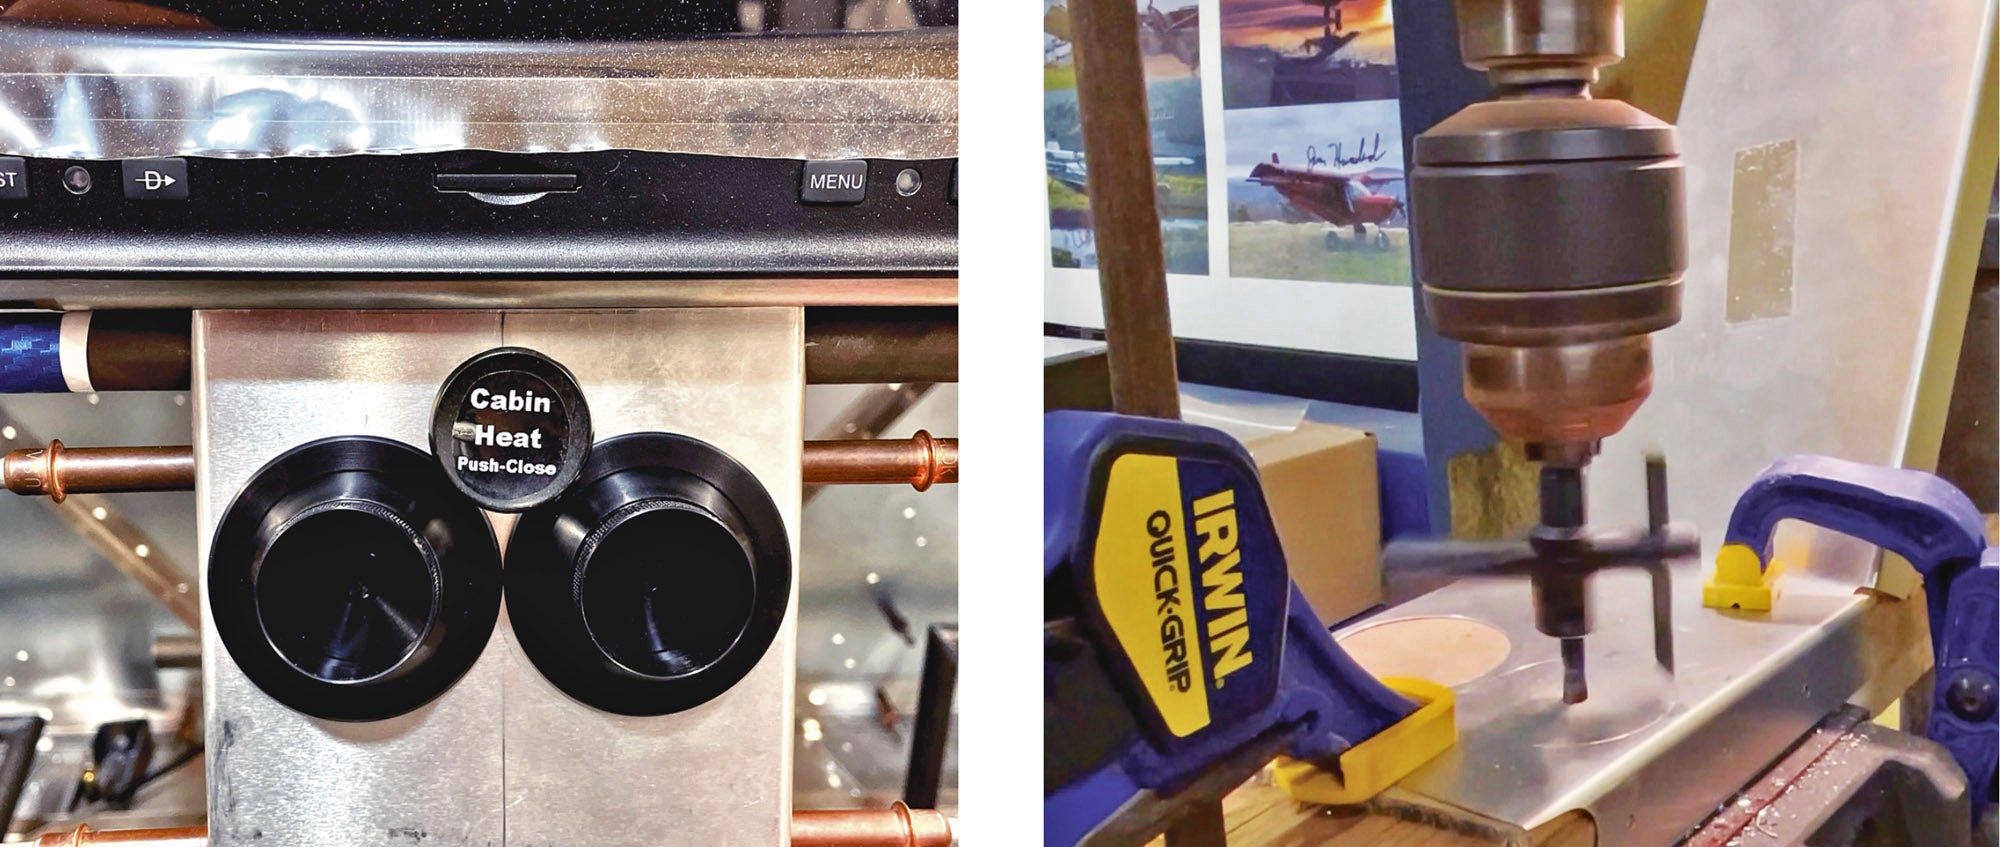
I am using the standard center tunnel and tunnel cover by simply tying it in underneath the instrument pod. I do not intend to have any switches in the center tunnel cover, either. The only things that will be mounted there are the heat control actuator cable and the eyeball vents for fresh air. I will possibly mount a couple of LED indicator lights in the center tunnel cover, just underneath the Garmin G3X, but I have not decided on that complete layout yet.
Extreme Comfort
I will be utilizing what I have learned from the Super701 for what I want to achieve in comfort for this 750 SDX, including fitted seating, an insulated cabin and a custom cabin heat system for winter flying. I am also debating installing heated seats, which should be good for the frigid flying as well as to increase comfort on long flights.
On the other side of the seasons, there are plenty of cool air modifications in the works to help negate the summer heat. The eyeball vents, for example, are now temporarily mounted and mocked up in the center tunnel cover. I think this central location will allow a nice direction of adjustable cooling airflow to the pilot and passenger. After some time spent carefully measuring and then having a friend use a lathe to turn down the outside diameter of the vent nuts that attach them, I’ll be able to mount them side by side into the tunnel cover. Even getting the eyeball vents installed was a challenge due to the tightness of how they have to fit inside the cover and they are basically touching each other, but I believe it will work and look really good once I am further along and ready to add the carbon fiber vinyl to the instrument pod and center tunnel.
Extreme Performance
High power and low weight already help performance but I’ve gone a bit further. The short engine mount I’ve designed and built moves the engine back 6 inches from the original, which will make a considerable difference in the empty CG. I have noticed that Zenith airplanes are designed and usually built with an empty CG that is pretty far forward. When the airplane is loaded with fuel, passengers and cargo, the CG moves toward the middle of the range. Note that there is a fairly large envelope for the CG range in these Zenith airplanes. This is smart design on Zenith’s part for the typical mission the 750 SD will see.
Its aft CG is one reason the Super701 has performed so well in demonstrations and competitions, so I’m following the same approach with the 750 SDX. I have pulled information from several weight-and-balance spreadsheets of built 750 SD airplanes and have done all kinds of calculations to try and get an idea of how mine might come out. But it is really a best guess at this point. Even though I am still quite a ways from it, I cannot wait to get this thing on the scales so I can begin to see where it is actually going to fit within the wide CG range.
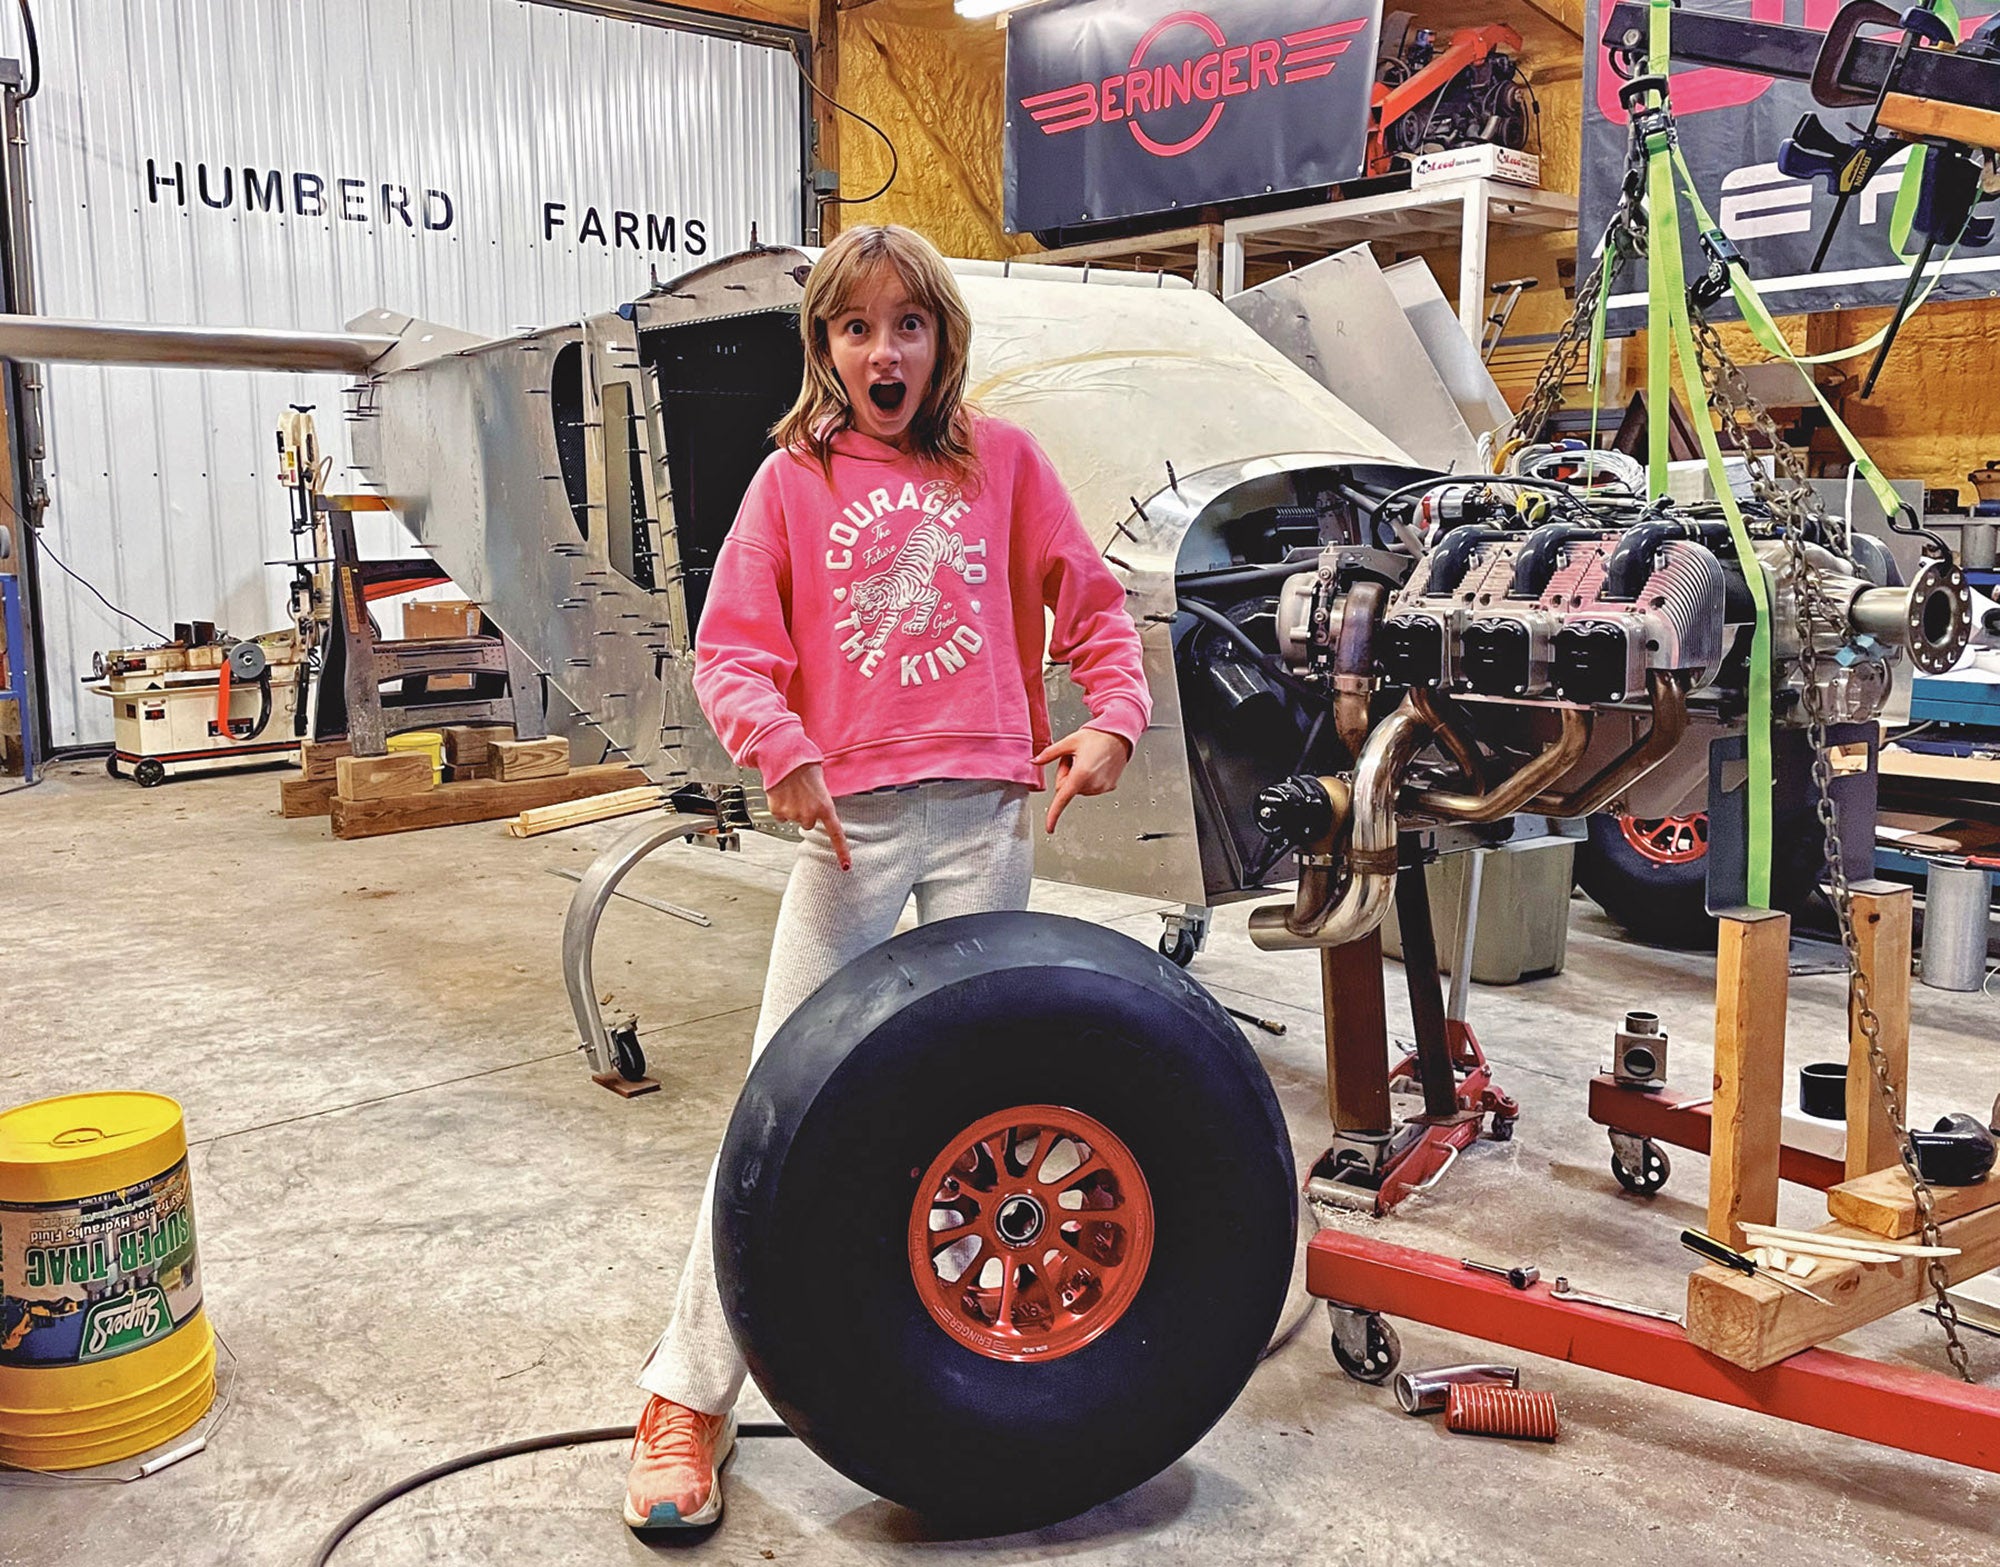
On a closing note, the long awaited 29-inch tires have just arrived as I am turning in this article, so next time we will indulge in the special tires, wheels and brake system—and the modifications required to make them all come together for this 750 SDXtreme.