The battery you install in your homebuilt kit will have nearly the same kind of life as the one in your automobile. It will perform flawlessly most of the time. However, once in a while it will show signs of problems, such as playing dead or just being too weak to start on a cold day.
If you fail to shut off an electrical accessory after flying, a charger may be needed to nurse the battery back to life. Flood an engine and the battery may not have enough juice to see you through to a start. An aircraft sitting dormant for the winter season may need a trickle charge to keep the battery alive, or a full recharge may be required when flying season returns. I have experienced all of these situations, and they almost always occur at some inconvenient time when I was hoping to just turn the key and fly.
Hooking jumper cables or charger clamps to the battery may involve removing the cowl and locating the battery terminals, which may not be so easy to access. Unlike an auto, your aircraft battery is probably not located right up front, with terminals exposed with a pop of the hood. We should plan our design to deal with the inevitable need to charge. And the best time to create an easy charging system for your battery is while you are wiring your aircraft.

One solution is to install an external charging receptacle made for this purpose on the fuselage. These receptacles are not cheap and require a matching plug for them to work. Not everyone will have an appropriate plug, so it may be tough to get a charge while away from home base.
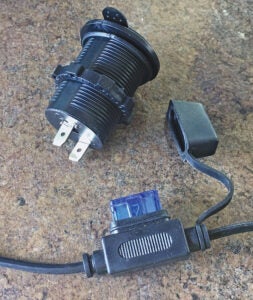
Fortunately, there is an alternative method to accomplish the same purpose: A quick and simple charging port using a high-quality cigar lighter socket will do the job. We need one with a high amperage rating and terminals for our own wire connections. Shop carefully online (Amazon or similar) to locate these. Then, create a wired connection from this socket directly back to the battery with a fused set of wires (12 gauge or larger) to handle about 20–30 amps. This means bypassing any battery contactor switches or solenoids when connecting the socket to the battery.
Adding a cigar lighter socket to your aircraft panel provides dual service. You gain a 12-volt universal port to power all sorts of accessories (think phone chargers with USB adapters, etc.), and you’ll have a way to recharge your aircraft battery when it fails for any reason. While this is not the same as jump-starting your aircraft battery (jumping requires way too much amperage for this purpose), the 20- to 30-amp capacity of this socket allows most small automotive battery chargers to quickly bring your aircraft battery back to life. (Use an approved charger if you installed lithium batteries in your aircraft.)

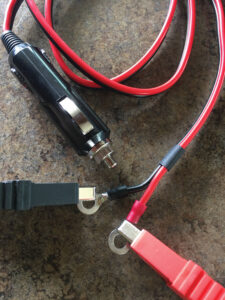
The only part missing for completing this operation is to attach a male cigar lighter plug to your charger’s clips (observing proper polarity, of course). The male plug with cord and ring terminals shown here was purchased from Amazon.
Plugging the male plug (with charger attached) into your panel’s cigar socket provides a quick and easy way to bring your aircraft battery back to life without opening the cowl and searching for a good connection on the battery terminals. Any charger with less than 20–30 amps output can now be used to bring a weak battery back to life when overworked during flying season or to maintain the battery with a trickle charge during off seasons. By storing the male plug and cable with the aircraft, anyone with a small charger can help you restore your battery when away from home base. You will find that the simplicity of this setup is hard to beat when you need a quick charge to get back into the air.


