A typical milling machine hold-down kit consists of various size blocks, hold-downs, and threaded rods, plus an assortment of T-nuts, flange nuts, and coupler nuts.
It’s safe to say the majority of milling jobs are done using a vise as the sole work-holding device. It’s also safe to say that many machinists, especially new machinists, are reluctant to tackle jobs that require removing the vise and clamping work to the mill table or a tooling plate. This aversion stems from the hassle that comes at the end of the job—namely, resetting the vise and getting it bolted down straight and square (as in, as close to 0.0000-inch on the test indicator as possible). It makes no difference if it’s an 80-pound vise on a Bridgeport or a 20-pound vise on a mini-mill—it’s the time and trouble of lining up, tightening, checking, loosening, rechecking, and retightening, that makes them crazy. However, the more you work with hold-downs (in other words, the more you remove the vise to do other jobs), the better you’ll get at squaring your work. You’ll very soon get so it only takes a few minutes, at most, to square the mill vise. The bottom line is, you should never be reluctant to take on a job because it won’t fit in a silly vise!
Hold-down basics: The upper left example provides optimal clamping pressure. Any other orientation is not correct.
All hold-down jobs start with a thorough cleaning of the mill table, including using a T-slot cleaner to wipe any swarf from the grooves.
Hold-down kits, or clamping kits, sell for between $50 and $150, and they typically come with a half dozen T-nuts, various sets of clamping blocks and straps (usually small, medium, and large), flange nuts, coupler nuts, and a collection of double-ended threaded tie-rod sets. Before you buy a kit, measure the width of the T-slots on your mill table. The three most common T-slot widths are 7/16-inch, 1/2-inch and 5/8-inch. Benchtop machines are likely to be 7/16 or inch. Larger, industrial-grade machines tend to have 5/8-inch slots.
Both the blocks and straps have serrated teeth to adjust the height of the stack to match the part or fixture to be clamped. Ideally, the heel of the clamping strap should be slightly higher than the part to be clamped, and the tie-rod should be biased more toward the part than the clamping block or blocks.
Mix and match clamping blocks to get the correct height. If a large set is too tall (left) and a small set too short, then mate a small one with a large one (right).
A typical hold-down arrangement. Note how the threaded tie-rods are biased toward the workpiece and how the heel of each hold-down bar is slightly higher than the nose.
Hold-downs are often used in conjunction with tooling plates or, in the case of the sheet aluminum example shown in the photo on the next page, with a sacrificial base-plate bolted to the table. Tooling plates tend to be made from one of the easy-to-machine aluminums (6061 T6, 7075, etc.), but if all you need is a sacrificial base between the workpiece and the mill table, it could be 3/4-inch plywood or whatever you have lying around. The point is, if you’re drilling or milling all the way through the thickness of your part, you want the cutter going into the base plate and not the mill table. I’ve seen many milling machines with random holes drilled in the table—a sure sign of a careless or unsupervised machinist!
With the sacrificial base installed, you can mill or drill through the part without worrying about damaging the mill table.
Square up tooling plates and sacrificial bases so they can be used to register the workpiece square to the machine. Torque all tooling plates and hold-down clamps tight!
Although most jobs can be held sufficiently with two hold-down points, consider adding additional hold-downs if there’s room or if the part has unsupported elements such as a flange or tab that might be prone to chatter if not clamped.
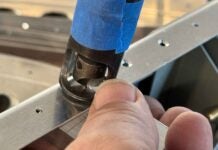
An example of using hold-downs in conjunction with a mill vise to secure thin aluminum angle for milling a slot between the two clamping points.
Hold-downs clamps can also be used as work-stops and in conjunction with vises and rotary indexers. The only real limitation is your imagination. As with most subjects, there are many educational videos just a few keystrokes away on YouTube, including some very nicely done tutorials by Tormach and LittleMachineShop.com.
Hold-downs aren’t just for holding; they also make rock-solid work-stops. This job required drilling a hole from a precise distance from the long end of several dozen stanchion tubes. A stack of hold-down clamps provided both precision and rapid setup.


Wow. That takes me back. Decades ago I stated out as a machinst and welder.